Wednesday 30 August 2023

New Release - Bella Bear Christmas - Bauble Hat with Polkadoodles

Hello everyone wishing you all a happy Wednesday and I'm back today to share another card using the fabulous new Bella Bear Christmas  release by Polkadoodles 

This is such a cute collection, packed with cuteness and I'm certain you will love it for all of your winter & Christmas projects. 

Don't forget  that there are pre-coloured images available too, so don't be put off if colouring isn't your thing!


This is a 5 x 7  card with a frame die cut from one of the papers in the collection layered onto the base card.

The Bella image was resized in my graphics software to suit the card design and I have also added one of the digital sentiments and two strips of the digital paper at the bottom of the panel, before printing out and colouring with my promarkers.  The design panel has been adhered to the card with foam tape for dimension.

Just a few highlights with a white gel pen, glossy accents and sparkly glitter to finish off the card.

I hope that you like my card today and you'll enjoy the next cards I share from the new Bella Bear Christmas Collection by Polkadoodles.


Hasta luego ๐Ÿ‘‹ 


Enjoy the rest of your day !


Card recipe:
Polkadoodles digital stamp - Bella Bear Christmas - Bauble Hat
Polkadoodles digital paper - Bella Bear Christmas - Set 1 & Set 2
Polkadoodles digital Sentiment - Bella Bear Christmas - Sentiment Bundle
Sakura Gelly Roll pen - white, black, clear star
Cosmic Shimmer - Cosmic Twinkles - Icicle Blue
Glossy accents


Promarkers Used:

Bella:            cocoa, burnt sienna (nose)
                    salmon pink, pale pink (ears & feet)
                    caramel, praline, sandstone

Hat
Scarf:            burgundy, poppy, lipstick red
                     lavender, ivory

Present:        forest green, bright green, leaf green
Bauble          sunflower, mustard, pastel yellow


Thanks for stopping by and reading my blog I would love if you could leave me a comment. 

Wendy x

Tuesday 29 August 2023

A Passion for Markers BlogSpot Challenge #705 - Feminine Cards

Hello and a happy Tuesday to you all I hope that you have a lovely week ahead! 

My step-daughter and her friend arrive today to stay for a week so were going to be doing a little sightseeing and showing them around so I'm hoping that it will be a little cooler while they are here.  We're still not used to it completely after 6 years!

I'm here today to let you know that a new challenge has started over on the Passion for Markers Blog.


This weeks challenge is being sponsored by Leann's World


The theme this week chosen by Kitty for Team 2 is Feminine Cards  and I chose to use the adorable image called Sweets for my card today. 


I've created a very pink and girly 6" x 6" Z-fold card and used some pink foiled card that I've had for many years to make the simple card base. The card was a little pale for my project so I've used distress ink to give it a more vibrant pink look.


The fancy die cut frame was gifted to me a few years ago in a swap so I don't know the name sadly but I've also blended pink distress ink over this to tie in with the card.


I resized the image to suit the size of my card and then coloured with
 my Promarkers (see below for colours) before fussy cutting out to mount onto the front panel using foam tape for dimension.

I added just a touch of clear sparkle to the hot pink bow, shoes, ice cream and the dress and a few sequins around the image for extra sparkle.
Its such a fun and cute image don't you think! I also used a stamp from my stash to stamp a simple sentiment inside the card.

Don't forget there will be a prize for the Winner of the challenge - there are more details over on the Passion for Markers blog.

I really hope that you have enjoyed my card today and will drop by again to see my next project and don't forget to join in with the challenge over on the Passion for Markers blog


Hasta luego ๐Ÿ‘‹ 


Enjoy the rest of your day !


Card recipe:
Leann's World digital stamp - Sweets
Gifted Die cut frame
Polkadoodles Digital Sentiment - Coffee Tea & Cake Sentiment bundle
Distress Ink - Picked Raspberry
Sentiment stamps - Auchan Supermarket
Sugar & Spice sequins - Candy Floss
Sakura Gelly Roll pens - white, black


Promarkers used :

Skin:        almond, blush, oatmeal, soft peach, dusky rose

Hair:        primrose, buttercup, yellow, lemon chiffon

Blouse:     soft green, pastel green, tea green
                hot pink, carmine, cerise

Skirt:        gold, sunflower, buttercup

Cupcake:   soft green, pastel green, tea green
                caramel, praline, sandstone

Sprinkles:  carmine, soft green

Bow:        hot pink, carmine, cerise
Shoes

Ice Cream:hot pink, carmine, cerise
                soft green, pastel green, tea green
                gold, sunflower, buttercup


Thanks for stopping by and reading my blog I would love if you could leave me a comment. 


 Wendy x

Monday 28 August 2023

Christmas Magic with Last Minute Manda

Happy Monday everyone…..I hope that you had a lovely weekend. 

Were off to the shops this morning to buy lots of food and goodies for family arriving tomorrow - going to be an expensive shop I think and we'll probably buy far too much as usual!

I'm back today to share a Christmas card that I've made for Last Minute Manda.


To create this card I've used one of the sweet little mice from the digital stamps from the You Warm My Heart Mice collection of digital stamps, coloured with my promarkers (see below).


The sentiment strip is from Lisa Horton Crafts.  

Just another simple card today using some of my pretty winter/Christmas papers combined with Kraft card and a little layering.


If you head over to the new Last Minute Manda store don't forget to use my special discount code Wendy25 to get 25% off your shopping.

I really hope that you like my card today and it would be lovely if you you leave me a comment and let me know what you think.


Hasta luego ๐Ÿ‘‹ 


Enjoy the rest of your day !


Card recipe:
Last Minute Manda digital stamps - You Warm My Heart Mice
Pinkfresh Studios essentials dies - stitched rectangles
Designer Series Paper  from my stash
White acrylic paint
Lisa Horton Crafts Sentiment strip
Sugar and Spice Sequins - Enchanted
Sakura gelly roll pen - white, black
Glossy accents


Promarkers used :

Cocoa Mug:        soft green, pastel green, tea green
                         burgundy, poppy, lipstick red

Mouse:               warm grey 4, 3, 2, 1
                         cocktail pink, pale pink

Cream :            pale cream, lemon chiffon
Marshmallows

Chocolate 
powder:            deep mocha,umber, burnt sienna, caramel, sandstone


Thanks for stopping by and reading my blog I would love if you could leave me a comment.


 Wendy x

Friday 25 August 2023

New Release - Bella Bear Christmas - Christmas Tree with Polkadoodles

Hello everyone wishing you all a happy Friday and I'm so excited to share the news of a fabulous new release by Polkadoodles launched today! 

If you are a VIP then you will have received a special email telling you all about this new collection and giving you a special 50% discount code for a limited time so don't miss out.

This is Bella Bear Christmas and she is just so gorgeously cute!  The collection is packed with cuteness and I'm certain you will love it for all of your winter & Christmas projects. 

There are pre-coloured images available too, so don't be put off if colouring isn't your thing!


This is a 5 x 7 faux stepper card (my favourite design at the moment) which I have created with some green cardstock and layered with two of the beautiful papers from the collection.  I used one of my Christmas tree dies to cut two trees from the same cardstock as the base and added these to either side of the card, adding gold confetti to both trees for the baubles.

The snowy bank has been die cut from white Lisa Horton Crafts Euphoria card and is super sparkly.

I chose one of the wonderful sentiments from the collection and mat and layered this to match the card, adhering to the top right corner of the card.

The Bella image was resized in my graphics software to suit the card design and then coloured with my promarkers before fussy cutting out and adhering to the card with foam tape for dimension.

Just a few highlights with a white gel pen and glossy accents on Bella's nose as I think its so cute

I hope that you like my card today and you'll enjoy the next cards I share from the new Bella Bear Christmas Collection by Polkadoodles.


Hasta luego ๐Ÿ‘‹ 


Enjoy the rest of your day !


Card recipe:
Polkadoodles digital stamp - Bella Bear Christmas - Christmas Tree
Polkadoodles digital paper - Bella Bear Christmas - Set 1
Polkadoodles digital Sentiment - Bella Bear Christmas - Sentiment Bundle
Sakura Gelly Roll pen - white, black, clear star
Pretty Pink Posh confetti - gold
Glossy accents


Promarkers Used:

Bella:            cocoa, burnt sienna (nose)
                    salmon pink, pale pink (ears & feet)
                    caramel, praline, sandstone

Coat:            burgundy, poppy, lipstick red, cerise

Hat:              marine, turquoise, pastel green
Scarf             hot pink, carmine, cerise

Tree:             forest green, bright green, leaf green
                    burnt sienna, caramel, praline

Robin:           burgundy, poppy, lipstick red
                    burnt sienna, caramel, praline
                    sunflower, mustard
                    marine, turquoise, pastel green
                    hot pink, carmine, cerise


Thanks for stopping by and reading my blog I would love if you could leave me a comment. 

Wendy x

Thursday 24 August 2023

Warm Winter Wishes with Last Minute Manda

Happy Thursday everyone…..I hope that you are having a lovely week....It was so hot and sticky last night so today I am thinking cool thoughts and hoping it helps as I have loads to do today!   

I'm back today to share a Winter wishes card that I've made for Last Minute Manda.


To create this card I've used one of the sweet little mice from the digital stamps from the You Warm My Heart Mice collection of digital stamps, coloured with my promarkers (see below).


The sentiment strip is from Lisa Horton Crafts.  

Just a simple card today using some of my pretty winter/Christmas papers combined with Neenah Desert Storm/Kraft card - Love this combination of colours.


If you head over to the new Last Minute Manda store don't forget to use my special discount code Wendy25 to get 25% off your shopping.

I really hope that you like my card today and it would be lovely if you you leave me a comment and let me know what you think.


Hasta luego ๐Ÿ‘‹ 


Enjoy the rest of your day !


Card recipe:
Last Minute Manda digital stamps - You Warm My Heart Mice
Craftelier essential Frame dies
Designer Series Paper  from my stash
Lisa Horton Crafts Sentiment strip
Sugar and Spice Sequins - Enchanted
Sakura gelly roll pen - white, black
Glossy accents


Promarkers used :

Cocoa Mug:        soft green, pastel green, tea green
                         burgundy, poppy, lipstick red

Mouse:               warm grey 4, 3, 2, 1
                         cocktail pink, pale pink

Antlers:              caramel, sandstone, pastel beige

Scarf:                lipstick red, poppy, burgundy
Heart

Candy cane:          lipstick red, poppy, burgundy
                            soft green, pastel green, tea green

Snowflake:            ice grey 00, blender
Cream

Chocolate drops:    umber, burnt sienna, caramel


Thanks for stopping by and reading my blog I would love if you could leave me a comment.


 Wendy x

Wednesday 23 August 2023

Have a Beary Happy Christmas with Pink Gem Designs

Hello everyone and a happy Wednesday... I hope that you are having a good week.

It's still quit hot here at the moment and I'm starting to feel ready for it to be a little bit cooler especially at night, and maybe just a little rain too - I'm not being greedy!

I decided to make another Christmas card  today for Pink Gem Designs using the recently released and very cute Christmas Bears Digital Stamp Set


This set of digital stamps includes 7 black line art images and a coordinating  sentiment for you to use.  

This is a sweet card A6 (UK Size), with a simple mat layer of gold glitter card on the card base. 

I created the design using my graphics software adding two of the little angel bears , the sentiment and the Christmas tree from the Christmas Kittens set 


To create my scene for the card I cut the panel of white cardstock using a stitched edge border die and then blended a yellow distress ink through a starry sky stencil.  I've added a little blue ink around the bottom of the design with a torn piece of paper to resemble little clouds...I wanted the bears to be in the sky on a cloud with their tree.

Just a little sparkly glitter was added to the snowflakes and I've used a clear sparkle pen for the bears wings, stars and baubles.

Just a simple strip sentiment and then some sparkle and shimmer were added to the snowflakes, baubles and the star.  I've blended a tiny amount of yellow distress ink behind the star too to give it a glow. 
I really hope that you like my card today and it would be lovely if you you leave me a comment and let me know what you think.

Hasta luego ๐Ÿ‘‹ 


Enjoy the rest of your day !


Card recipe:
Pink Gem Designs digital stamp - Christmas Bears  &  Christmas Kittens
Lawn Fawn Clippings Stencil - Lots of Stars
Distress Ink - tumbled glass, squeezed lemonade
Spectrum Noir Sparkle pen - clear
Sakura Gelly Roll Pens - Black, White
Card Making Magic A6 Nesting Die set
Cosmic Shimmer Twinkles - Icicle blue


Promarkers used :

Bears:                salmon pink, pale pink
                         praline, sandstone, pastel beige

Robes:                lemon chiffon, pale cream, ivory

Trunk:                umber, burnt sienna, caramel
wand

Baubles:            hot pink, carmine, cerise
                         petrol blue, marine, turquoise

Christmas Tree:   pine, forest green, bright green

Star:                   gold, sunflower, mustard
Halo
                    
Wings:                soft green, pastel green, tea green


Thanks for stopping by and reading my blog I would love if you could leave me a comment. 

Wendy x

Tuesday 22 August 2023

Digi Choosday - Beat the Heat with Polkadoodles

Hello everyone and happy Tuesday.  Wishing you all a lovely day today and I hope that you enjoy the week ahead....We have loads to do this week as we have family staying next week so lots of cleaning in the house and tidying around in the garden.


It's that time of the week when we launch a brand new 'Anything Goes' challenge over on the Polkadoodles Digi Choosday Blog so I hope you are going to join in and don't forget the amazing discount off all crafty printable downloads until midnight today!


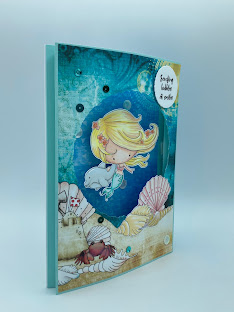
The theme set for the DT this week is Beat the Heat / Water themed card which given the current high heat levels here in Spain was perfect so I chose to use a sweet little Lil Miss Mermaid with Dolphin digital image from the Lil Miss Sugarpops collection

I wanted to create a 3D Underwater scene and I was inspired by a YouTube tutorial by Jennifer McGuire, to make a popup up frame card.


If you haven't seen the video here is the link,  I would highly recommend watching as it's really easy to make and you can easily adapt the instructions to suit loads of different sizes of cards. Mine is a larger 5 x 7 card with a circular aperture on the front.  
I created the base for the card and then chose two papers from the Winnie Starfish & Sandcastles collection, one for the outside frame and one for the inside of the scene.

Before assembling the card I used a circular die to create an aperture in the front panel.

Next I resized the Lil Miss Mermaid image to fit my aperture and also created a small group of sea shells to add extra interest to the card before printing out onto alcohol marker friendly card stock.  These were coloured with Promarkers (see below for colours)
I also chose one of the sentiments from the Winnie Starfish & Sandcastles collection which I have printed onto white card and die cut, adding to the top of the card with foam tape. 

Once the main images were coloured I have fussy cut these out and used a thin strip of acetate mounted inside the pop up frame to add the little mermaid so she is floating in the scene.  The cluster of shells was adhered flat to the pop up frame.

I then adhered this to my card blank adding a layer of navy cardstock for a small mat layer

To finish off the card I added just a few co-ordinating sequins, some glossy accents and a little clear sparkle here and there. 


I have a very special DT discount code that you can use for all your shopping on the Polkadoodles online shop at checkout use WENDYJ-10 and you will get 10% of your entire purchase (not in conjunction with other discount codes!)


I hope that you like my card today and you'll enjoy the next cards I share from Polkadoodles.


Hasta luego ๐Ÿ‘‹ 


Enjoy the rest of your day !


Card recipe:
Polkadoodles digital stamp - Lil Miss Sugarpops - Lil Miss Mermaid & Dolphin
Polkadoodles Digital Paper - Winnie Starfish & Sandcastles - Paper Bundle 4
Polkadoodles Digital Paper - Winnie Starfish & Sandcastles - Greetings Bundle
Lisa Horton Crafts Dies - Torn Edge Circles
Sugar and Spice sequins - Under the Sea
Sakura Gelly Roll pen - white, black, pink metallic, green metallic
Glossy accents


Thanks for stopping by and reading my blog I would love if you could leave me a comment. 

Wendy x

Monday 21 August 2023

Happy Dance Christmas Cards with Amanda Jayne Designs

Hello everyone wishing you a wonderful Monday!  

We have had a very busy weekend and quite a few unplanned late nights so a few quieter days are on the cards (fingers crossed). 

Today I am sharing some Christmas cards that I have made for Amanda Jayne Designs 


Most of the cards I make are unique one off designs, but at Christmas I like to batch make cards and this digital image is perfect to make lots of quick, simple and very cute cards. 


This pre-coloured image is called  Happy Dance and I printed it out several times adding different Christmas sentiments to make each card slightly different before printing, but using the same layout.  

Don't they look happy - it just makes you smile
I think this image would make a perfect Winter birthday card too as who could resist this cute cow and his sweet penguin friend.

The images were cut out using a nesting die and frames added in the lilac cardstock.  

I love the combination of purple and teal!

These beautiful pre-coloured images are so adorable and I think they don't need much adding to create a set of wonderful cards

To finish off my cards I have added some sparkly gems to each design.

I really hope that you like my cards today and it would be lovely if you you leave me a comment and let me know what you think.


Hasta luego ๐Ÿ‘‹ 


Enjoy the rest of your day !


Card recipe:
Amanda Jayne Designs - Happy Dance
Amanda Jayne Designs Paper Collection - Mint Christmas
Amanda Jayne Designs Sentiment - Christmas Sentiments
Card Making Magic A6 Nesting Die Set
Pretty Pink Posh gems - Sugar Plum


Thanks for stopping by and reading my blog I would love if you could leave me a comment. 


 Wendy x

Friday 18 August 2023

Sending you all some Summer Sunshine

Happy Friday everyone…..I hope that you have had a good week. Thankfully its been a little cooler during the week and that's made it easier to sleep at night - with out the fan too, so a brief respite in the heat although the temperatures are set to rise again over the week end up to around 37C.

That being said - I do love the sunshine, it just makes you smile looking out of the window each morning and wondering what sort of day its going to be - Gorgeous normally!

So I decided to make a simple little card to send some summer sunshine, especially if its not been great where you are.

I had some digital paper left from another project too and wanted to use this up rather than filing it away for another day.


I treated myself to some new dies earlier in the year - from Studiolight and thought they were perfect for my simple beach scene for  today.

Its an A6 (UK) size card with a simple die cut frame of Neenah Desert storm card, to resemble looking through a window at the beach and the ocean.

I added a piece of wavy blue digital paper at the top of the panel and then die cute another peice of Neenah card for the sand at the bottom of the frame.  To add depth I've blended distress inks over this and then splattered with brown ink and white acrylic paint, before adhering both of these onto the card panel inside the frame.

The palm trees have been die cut from Neenah desert storm card and a green card stock and I've used more distress ink to add shading to the trees, leaves and the coconuts.

The sentiment from the set was cut from a layer of green card and a layer of white for depth.

I couldn't resist adding a few sequins but I have used some pearlescent white just to add a little sparkle.


I really hope that you like my card today and it would be lovely if you you leave me a comment and let me know what you think.


Hasta luego ๐Ÿ‘‹ 


Enjoy the rest of your day !


Card recipe:
Studiolight dies -Take me to the Ocean - Summer Sunshine
Polkadoodles Digital Paper - Coral Mermaid Papers
Lisa Horton Crafts Edgecutz dies - Essential Edges
Card Making Magic A6 Nesting Die set
Distress ink - Scattered Straw, vintage photo, mowed lawn
White acrylic paint
Sakura gelly roll pen - white
Sugar & Spice sequins - Mojito


Thanks for stopping by and reading my blog I would love if you could leave me a comment.


 Wendy x

Tuesday 15 August 2023

A Passion for Markers BlogSpot Challenge #703 - Let's Celebrate

Hello and a happy Tuesday to you all I hope that you have a lovely week ahead! 

I'm here today to let you know that a new challenge has started over on the Passion for Markers Blog.


This weeks challenge is being sponsored by All Dressed Up


The theme this week chosen by Karen for Team 2 is Let's Celebrate! and I chose to use the image Birthday Monkey

Today's card is a 5" x 7" and I decided to create an aperture for my monkey to hang in.

I've used a couple of stencils with distress inks to create a cloudy sky behind the monkey and a beautiful leafy stencil to represent the trees in the foreground.

I resized the monkey image to suit the size of my aperture which I created using a couple of oval dies and a co-ordinating green cardstock.  The image was coloured with my Promarkers (see below for colours) before fussy cutting out and adding into the aperture using foam tape for dimension.


The digital image includes a sentiment which I have added to the design but I have also stamped a couple of additional sentiments onto the panel and added some coordinating sequins.


Don't forget there will be a prize for the Winner of the challenge - there are more details over on the Passion for Markers blog.

I really hope that you have enjoyed my card today and will drop by again to see my next project and don't forget to join in with the challenge over on the Passion for Markers blog


Hasta luego ๐Ÿ‘‹ 


Enjoy the rest of your day !


Card recipe:
All Dressed Up digital stamp - Birthday Monkey
Tonic Studio dies
Cardmaking Magic Dies - 5x7" Alternate Stitched Nestables
Distress Ink - salty ocean, twisted citron, mowed lawn
Polkadoodles Creative Stencil - Leafy
Lawn fawn Clippings Stencil - Slimline Cloudy
Sentiment stamps - Auchan Supermarket
Sugar & Spice sequins - Mojito
Sakura Gelly Roll pens - white, black


Promarkers used :

Ears:        cocktail pink, pale pink, sandstone          
Nose

Eyes:        lemon chiffon, true blue

Monkey:    praline, sandstone, pastel beige
                umber, cocoa, deep mocha

Bird:         true blue, deep mocha, sandstone
                yellow, vanilla

Leaves:    holly, lush green, emerald

Branch:    sandstone, emerald


Thanks for stopping by and reading my blog I would love if you could leave me a comment. 


 Wendy x