Showing posts with label Christmas Tree. Show all posts

Sunday, 26 October 2025

Christmas Tree....Oh! - It wasn't me! - New stamps with Creative Ember Designs

Hello everyone wishing you all a lovely Sunday I hope you're having a good weekend.

We had a great walk yesterday despite having to be up at 5:45 to catch the coach....it was quite a long drive to a town called Zafarraya and a hot day too - we walked 12km followed by a great lunch in the town in a large carpa or marquee specially erected for the event....there were loads of people there walking and two routes a short and a long one....so as you can image today we're both a little tired.   Good job the clocks went back and gave us an extra hour today..... A day to relax so I thought I would share a card I've made using some great new products from a brand new company Creative Ember Designs by Leonie Pujol.

When I saw these fantastic kitties I had to splash out and I love them - so quirky and just like our kitties !


I treated myself to a couple of the  stamps sets and a fab stencil that's definitely not just for Christmas. Todays card is featuring our sweet ginger boy Foxy and we  see him investigating the Christmas Tree each year but thankfully no breakages so far.

I thought I would keep a simple colour palette of greens and oranges and I'm really pleased with the end result.  The background panel was inked with distress inks and then I added some Cosmic Shimmer Pixie Powders for shine.  To finish off the panel I stamped the Christmas tee in green Versafine Clair ink and then splattered the panel with more ink for texture.

Next I used dies to create a frame or window, I wanted it to look like someone looking in at the scene and Foxy saying 'it wasn't me!'

The frame was coloured with inks and then I used the stencil to add some words and texture.

Foxy was stamped using distress Oxide ink and then I've used to water brush to pull out the colour .

I finished Foxy off by using a white pastel pencil to add his stripes and then fussy cut him out.


The frame and Foxy were adhered to the card using foam tape and then I added the sentiment, stamped
on card with inked edges.

Finishing touches were glossy accents to Foxy's eyes and the baubles.


Hasta luego ๐Ÿ‘‹ 


Enjoy the rest of your day !


Card recipe:

Creative Ember Designs stamps- Hap-paw Christmas
Creative Ember Designs stamps - Oh! Christmas Tree
Creative Ember Designs stencil - Wordy
Distress Oxide ink - rusty hinge, lucky clover, scattered straw
Distress ink - peacock feathers, salvaged patina, cracked pistachio, kitsch flamingo, ground espresso
Cosmic Shimmer Pixie Powder - peacock green, silver dream
Derwent pastel pencil - titanium white
Versafine Clair ink - rainforest
glossy accents


Thanks for stopping by and reading my blog I would love if you could leave me a comment. 


 Wendy x


Friday, 25 August 2023

New Release - Bella Bear Christmas - Christmas Tree with Polkadoodles

Hello everyone wishing you all a happy Friday and I'm so excited to share the news of a fabulous new release by Polkadoodles launched today! 

If you are a VIP then you will have received a special email telling you all about this new collection and giving you a special 50% discount code for a limited time so don't miss out.

This is Bella Bear Christmas and she is just so gorgeously cute!  The collection is packed with cuteness and I'm certain you will love it for all of your winter & Christmas projects. 

There are pre-coloured images available too, so don't be put off if colouring isn't your thing!


This is a 5 x 7 faux stepper card (my favourite design at the moment) which I have created with some green cardstock and layered with two of the beautiful papers from the collection.  I used one of my Christmas tree dies to cut two trees from the same cardstock as the base and added these to either side of the card, adding gold confetti to both trees for the baubles.

The snowy bank has been die cut from white Lisa Horton Crafts Euphoria card and is super sparkly.

I chose one of the wonderful sentiments from the collection and mat and layered this to match the card, adhering to the top right corner of the card.

The Bella image was resized in my graphics software to suit the card design and then coloured with my promarkers before fussy cutting out and adhering to the card with foam tape for dimension.

Just a few highlights with a white gel pen and glossy accents on Bella's nose as I think its so cute

I hope that you like my card today and you'll enjoy the next cards I share from the new Bella Bear Christmas Collection by Polkadoodles.


Hasta luego ๐Ÿ‘‹ 


Enjoy the rest of your day !


Card recipe:
Polkadoodles digital stamp - Bella Bear Christmas - Christmas Tree
Polkadoodles digital paper - Bella Bear Christmas - Set 1
Polkadoodles digital Sentiment - Bella Bear Christmas - Sentiment Bundle
Sakura Gelly Roll pen - white, black, clear star
Pretty Pink Posh confetti - gold
Glossy accents


Promarkers Used:

Bella:            cocoa, burnt sienna (nose)
                    salmon pink, pale pink (ears & feet)
                    caramel, praline, sandstone

Coat:            burgundy, poppy, lipstick red, cerise

Hat:              marine, turquoise, pastel green
Scarf             hot pink, carmine, cerise

Tree:             forest green, bright green, leaf green
                    burnt sienna, caramel, praline

Robin:           burgundy, poppy, lipstick red
                    burnt sienna, caramel, praline
                    sunflower, mustard
                    marine, turquoise, pastel green
                    hot pink, carmine, cerise


Thanks for stopping by and reading my blog I would love if you could leave me a comment. 

Wendy x

Monday, 31 July 2023

Happy Holidays with Pink Gem Designs

Hello everyone and a happy Monday... I hope that you had a lovely weekend.

We went out for dinner last night to celebrate the birthday of one of our friends and then cooled off in our pool with music and cocktails - it was a great night but were both feeling a little jaded today - too much heat, food and alcohol, so were currently chilling and snoozing to catch up on some sleep.

It was another hot day up at 38C and I think the heat it taking it's toll now too.

As its the last day of July I had to post another Christmas card as the Christmas in July draws to a close so I  decided to make a card made for for Pink Gem Designs using the newly released Christmas Kittens digital stamp set.


You all know how much we love our kitties so this is the perfect set of stamps for me!

The set of digital stamps and includes 8 black line art images and 2 sentiments for you to use.  

This is a sweet card A2 (US Size), with a simple striped background on the card base. 

I created the design using my graphics software adding one of the kittens the tree and a little mouse, resizing each to suit my design before printing out on alcohol friendly card and colouring with my promarkers (see below for colours)


To create my scene for the card I cut a panel of white cardstock using a stitched edge border die and then blended a little blue ink onto this behind the focal image and used the same distress ink to add snowy hills.

Just a simple strip sentiment and then some sparkle and shimmer were added to the snowflakes, baubles and the star.  I've blended a tiny amount of yellow distress ink behind the star too to give it a glow. 

I really hope that you like my card today and it would be lovely if you you leave me a comment and let me know what you think.

Hasta luego ๐Ÿ‘‹ 


Enjoy the rest of your day !


Card recipe:
Pink Gem Designs digital stamp - Christmas Kittens
Lawn Fawn Clippings Stencil - Slimline Hillside
Distress Ink - tumbled glass, squeezed lemonade
Spectrum Noir Sparkle pen - clear
Sakura Gelly Roll Pens - Black, White
Pinkfresh Studio essentials die - 
Cosmic Shimmer Twinkles - Icicle blue
Lisa Horton Crafts sentiment strip


Promarkers used :

Kitten:                salmon pink, pale pink
                          ice grey 4, 3, 00

Mouse:               warm grey 4, 3, 2, 1
                          salmon pink, pale pink

Clothes:              hot pink, carmine, cerise
                          petrol blue, marine, turquoise

Christmas Tree:    pine, forest green, bright green

Star:                   gold, sunflower, mustard
                    
Baubles:              gold, sunflower, mustard
                          hot pink, carmine, cerise
                          petrol blue, marine, turquoise


Thanks for stopping by and reading my blog I would love if you could leave me a comment. 

Wendy x

Sunday, 18 December 2022

Gingerbread Holly - Oh Snap! with Polkadoodles

Hello everyone happy Sunday! 


I have my penultimate card for this year today, made with the recent digital release Gingerbread Holly  by Polkadoodles

This image is called Oh Snap  and he has been coloured with my Promarkers.

I decided today for a simple easel card but I have created a Christmas tree for my little cute ginger.

The papers I have used are from the Baked with love collection paper heaven 1  and paper heaven 2 and  the newer Gingerbread Holly collection paper 1

I've used triangle dies to create my simplistic Christmas tree and all of the decorations are from the Winnie White Christmas Embellishments 

Such a simple but I think beautiful card.

I hope that you like my card today and you'll enjoy the final card from this Gingerbread Holly collection, coming on Christmas Day, next Monday!


Hasta luego ๐Ÿ‘‹ 


Enjoy the rest of your day !


Card recipe:
Polkadoodles digital stamp - Gingerbread Holly - Oh Snap!
Polkadoodles digital papers - Gingerbread Holly
Polkadoodles digital sentiment and papers  - Winnie white Christmas
Polkadoodles digital papers  - Baked with love
Lisa Horton Crafts Dies - Nested Triangles
Lisa Horton Crafts Euphoria Glitter Cardstock
Sakura Gelly Roll pen - white, black
Glossy accents


Promarkers used :

Ginger:                pastel beige, sandstone, caramel
                           pale pink

Ricrac:                 lavender, ivory

Bow tie:               burgundy, poppy, lipstick red
                          

Thanks for stopping by and reading my blog I would love if you could leave me a comment. 


 Wendy x


Thursday, 1 December 2022

Gingerbread Holly - Putting up the Tree with Polkadoodles

Hello everyone - Happy Thursday and a very happy December!..

It's the first day of December and we are putting up our Christmas decorations today - yeah I love this time of year.

My twisted easel card for today is using a digital stamp very appropriately called Putting Up the Tree from the Gingerbread Holly collection by Polkadoodles.


I love putting up the decorations in the house as it makes it feel warm and cozy  and it looks like Ginger is having fun with his Christmas tree too - I hope he manages to untangle those lights.

My card today is a simple 6" x 6" twisted easel and I've added a ring of flowers and baubles. 

The papers are from the Baked with Love collection - paper heaven 2 , the flowers and leaves are from the foliage set and the sentiment is from the sentiments set

I love how the new Gingerbread Holly stamps work perfectly with the older Baked with Love collection.

To create my circular frame I die cut to circular frames of Kraft card and then die cut a piece of acetate to match - the acetate is adhered between the two circular hoops.  If you wanted you could easily create a shaker panel for this card but I decided to add dots of white acrylic paint to the acetate, to look like snow.

To create the baubles, I imported the digital image into my graphics software and then enlarged the small baubles from the digital stamp, making them large enough to add to my hoop.

The digital stamp and baubles were coloured with my promarkers before being adhered to my card.

I added some Tonic Nuvo drops for the centres of my poinsettias.
 
I hope that you like my card today and you'll enjoy the next cards I share from this cute new  Gingerbread Holly collection


Hasta luego ๐Ÿ‘‹ 


Enjoy the rest of your day !


Card recipe:
Polkadoodles digital stamp - Putting up the tree
Polkadoodles digital papers, embellies and sentiment
Lisa Horton Crafts dies - torn edge circles
Tonic Nuvo Crystal drops - bright gold
Sakura Gelly Roll pen -  white, black
Posca pen - white


Promarkers used :

Ginger:            pastel beige, sandstone, caramel
                       pale pink
                       lavender, ivory 

Tree:                forest green, bright green, leaf green

Baubles:          burgundy, poppy, lipstick red
                       amethyst, lilac, lavender
                       gold, sunflower, buttercup


Thanks for stopping by and reading my blog I would love if you could leave me a comment. 


 Wendy x

Monday, 7 November 2022

Bitty Bear with Last Minute Manda

Hello everyone and happy Monday! 

I hope that you all have a lovely week ahead.  I'm busy making Christmas cards and today I'm here to share a cute scene card that I've made for Last Minute Manda 


This cute little bear is from the Bitty Bear Christmas set

I decided to create a Winter scene card for this cute little bear with his Christmas tree, lights and bauble.

I've had the scene background papers in my stash for far too long and thought they were perfect for a DL card.

I've matted the background onto a piece of navy card and then heat embossed a sentiment onto the panel. Using Navy still gives a great contrast but doesn't look as harsh.

Some simple glittery sparkles added to the background and then I've adhered the bear to my card using some low profile foam tape.  A really easy card but I think perfect when you have loads to make.

If you head over to the new Last Minute Manda store font forget to use my special discount code Wendy25 to get 25% off your shopping.

I really hope that you have enjoyed my cute Christmas card today and it would be lovely if you you leave me a comment and let me know what you think.

Hasta luego ๐Ÿ‘‹ 


Enjoy the rest of your day !


Card recipe:
Last Minute Manda digital stamp - Bitty Bear Christmas
DoCrafts Papers - Forever Friends Christmas
Sentiment Stamp - craft magazine
Versafine Clair ink - Twilight
Cosmic Shimmer Twinkles - icicle blue
Sakura Gelly Roll pen - white, black, metallic grey
Tonic Nuvo Drops - Oyster Grey


Promarkers used :

Bear:              caramel, sandstone, pastel beige
                      pale pink, pale blossom

Tree:               forest green, bright green, leaf green
                      burgundy, poppy, lipstick red  
                      gold, pumpkin, ivory
                       

Lights:            ice grey 5,4,2
                      burgundy, poppy, lipstick red
                      gold, pumpkin, ivory
  
Bauble:           lavender, ivory
                      burgundy, poppy, lipstick red
                      gold, pumpkin, ivory
                      forest green, bright green, leaf green

I am entering this card into the following challenges:

dis digi designs challenge Give Thanks  () (0 of 3)

intaas Christmas #(54) (1 of 3)

lil patch of crafty friends (97) (1 of 3) WINNER DT Top 5


colorful options () unlimited


aud sentiments () (0 of 5)


We love stamping  (69) (1 of 3)


Dragonfly Dreams  (90) (1 of 3)

Crafty Calendar Challenge (124) ( 1 of 3)


not2shabby () (3 of 3)


Thanks for stopping by and reading my blog I would love if you could leave me a comment. 

Wendy x

Tuesday, 2 August 2022

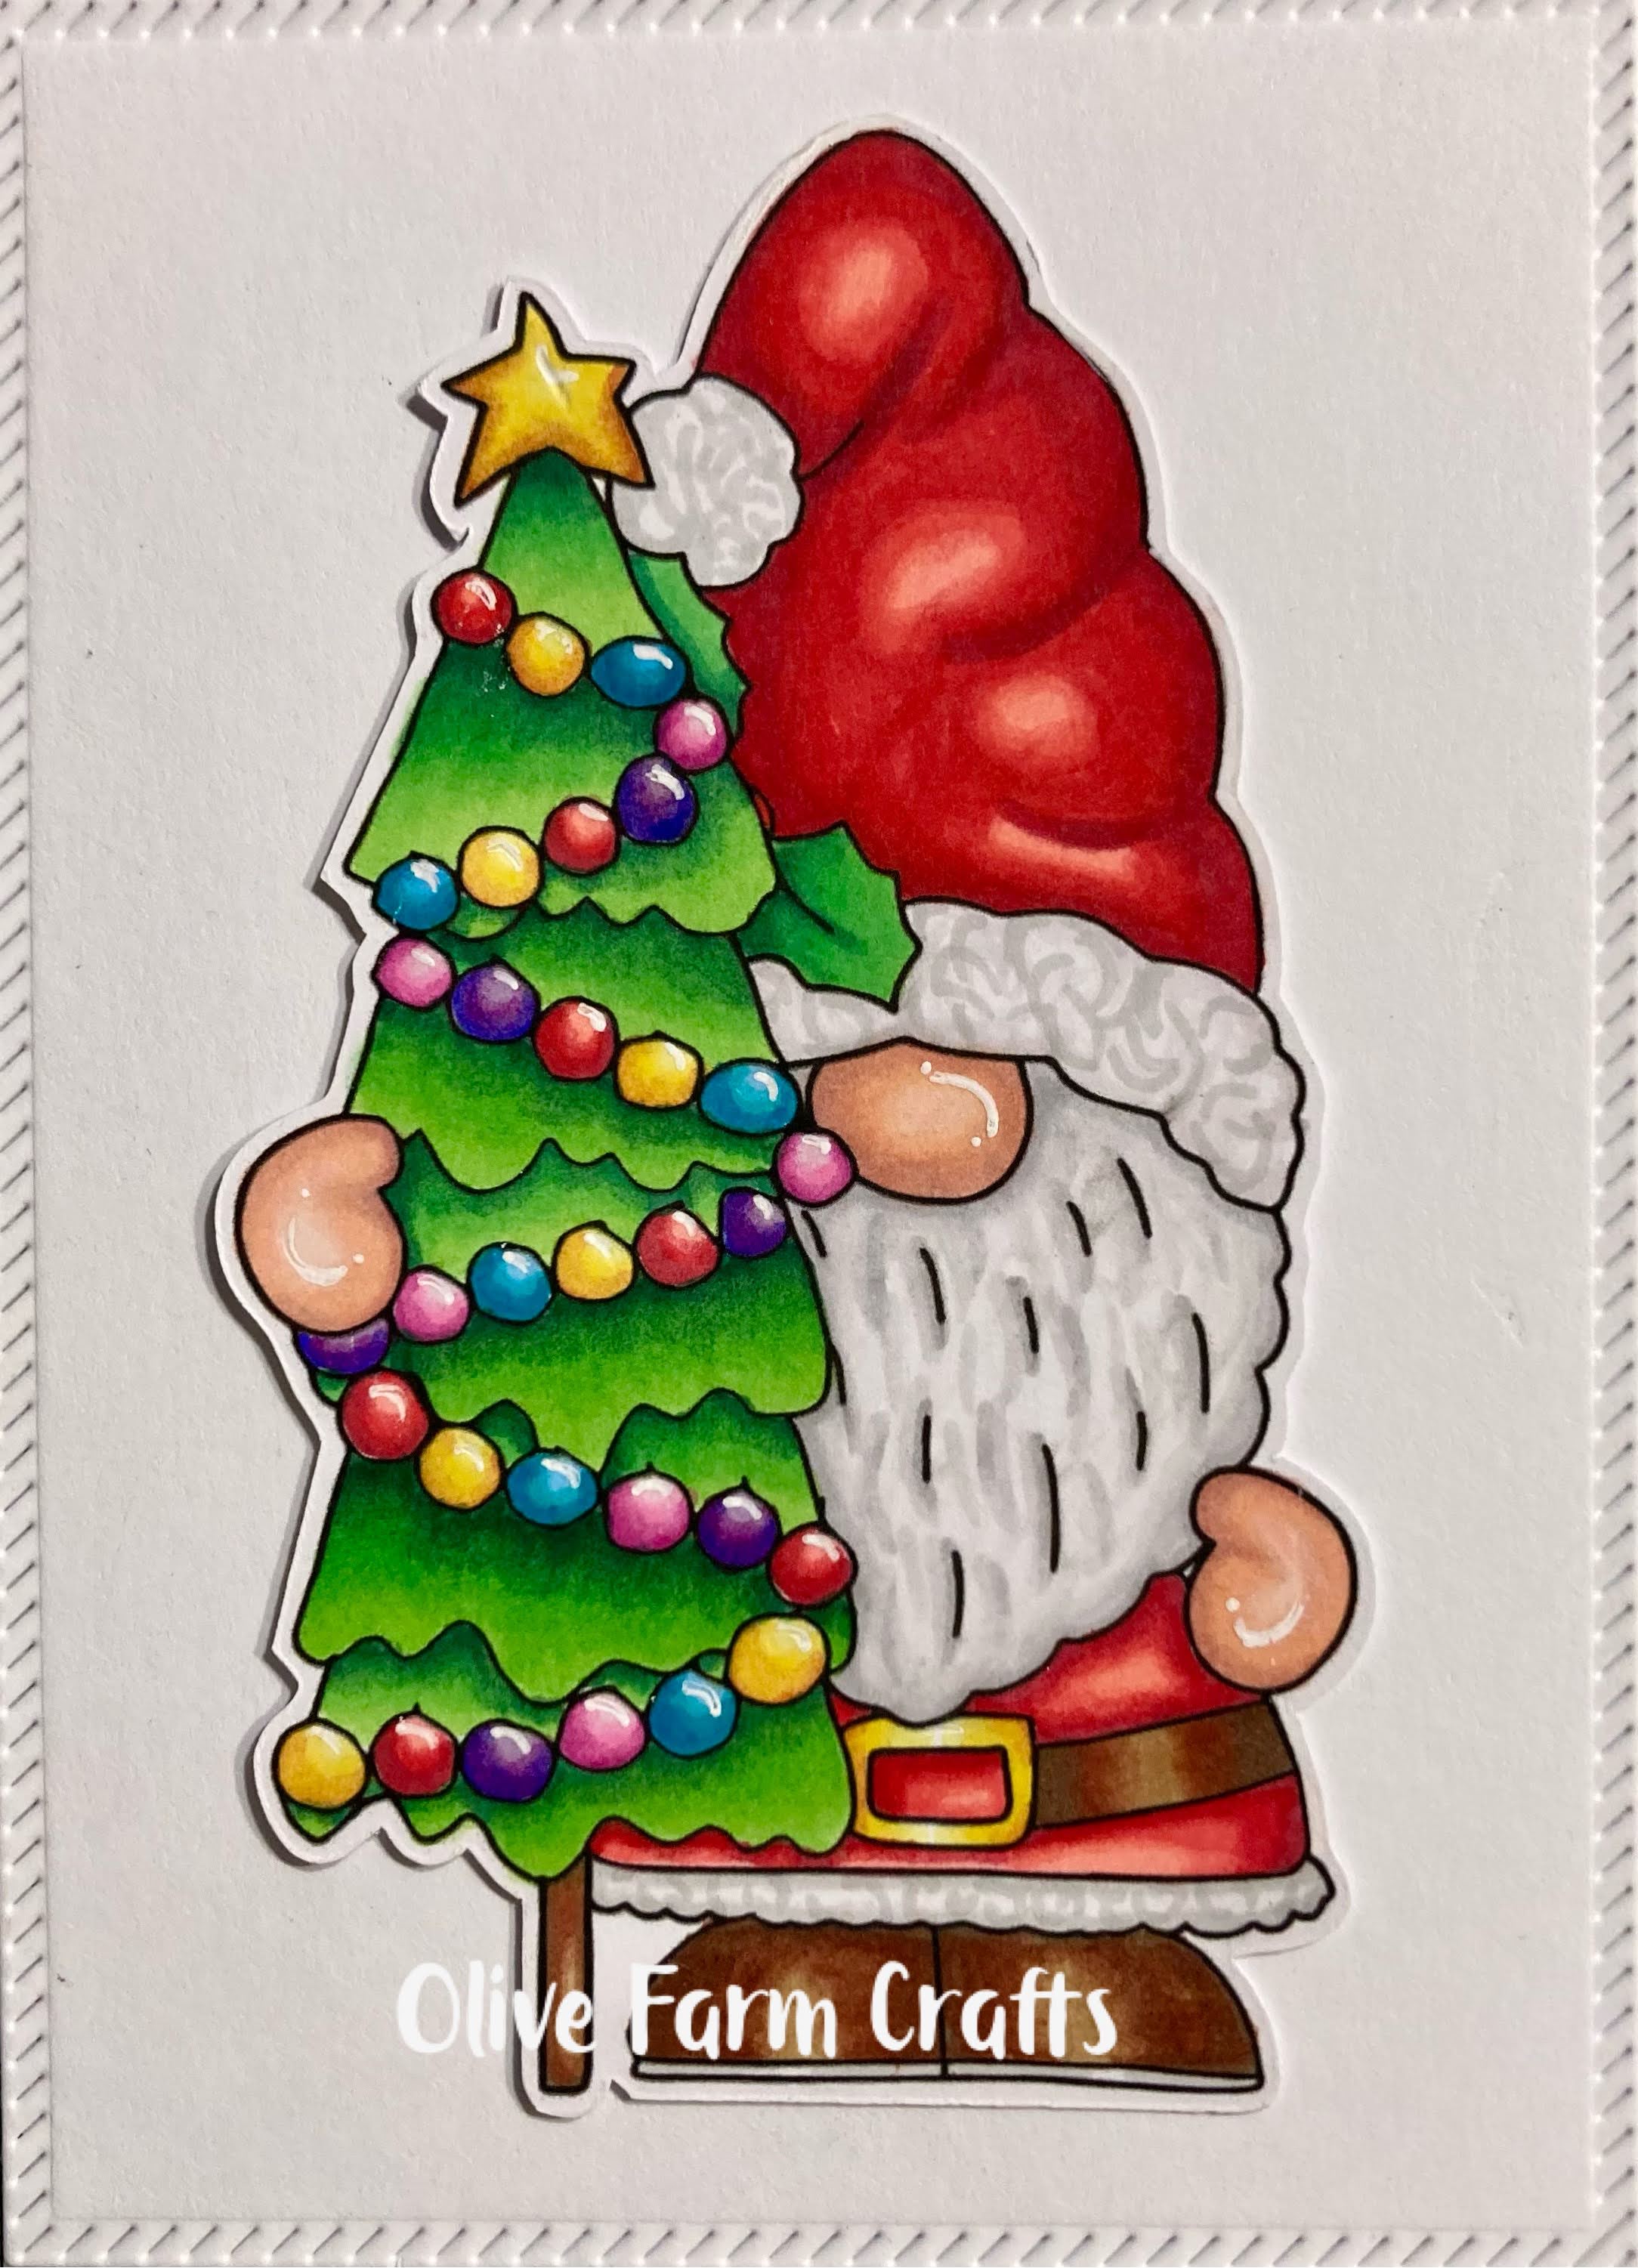
Santa's Little Helper from Last Minute Manda

Hello everyone and a happy August!  

I hope that you all have a lovely month ahead planned.

Did I say no more Christmas cards ?  ha ha - I might have been teasing just a little bit.... but now that I'm on a roll with Christmas makes, I'll be sharing them from time to time in an attempt to get my stash of Christmas cards ready before the big day itself....which will be a first since moving here to Spain...I blame the weather ๐Ÿ˜†๐Ÿ˜†

So with that in mind, here is a cute little card that I've made using a digital stamp from Last Minute Manda.

To be perfectly honest - I've never been that sure about gnomes ! Maybe something from my childhood but I've usually found them a little bit creepy but this little guy is definitely growing on me and I loved colouring him.

The digital stamp was a freebie to all of the members of the Last Minute Manda Facebook group 

There are some fabulous collections of digital stamps over on the Etsy shop which are definitely worth having a look at if you love colouring like me.


I decided to make another snowy scene card for this little chap so started off by colouring him in using my Promarkers. I've listed the colours down below for you.


I chose nice bright Christmassy colours to contrast against the background I was planning on creating


Once he was ready and cut out using my Scan n Cut I created the background scene.


I cut a panel of plain white card stock to roughly 4" x 5 1/2" and then blended over this with 3 different colours of Distress Ink - It didn't have to be a perfectly smooth blend as this was for the sky and I was planning on stencilling over the top of the panel.


It looks quite patchy at the moment but as the ink dries it smooths out more.


Next I used a snowy background stencil from Echo Park and my Lawn Fawn Stencil paste to add texture to the panel.

I like to use a fairly large palette knife with my stencils as its gives a good coverage quickly.

Top Tip ๐Ÿ’ก: don't forget to wash your stencil and pallet knife straightaway after you have finished ans wipe up any excess too, scraping back into the pot if its not picked up any colour from the project.

Once I had removed the stencil and before the stencil paste had dried I sprinkled over my Glitter dust from Lisa Horton Crafts. Its a beautiful interference glitter and picks up colours from the project and surroundings.


I then left the panel for a couple of hours to dry but how long this takes depends on the temperature and humidity where you are.

I used an edged die to cut  a couple of hillsides from white cardstock and then assembled the card using foam tape to give extra height to the the hillside in the foreground.

The hills are drizzled with Cosmic Twinkles glitter glue, Glossy accents on the star of the tree and I used a small sentiment strip from Lisa Horton Crafts to finish off the card.  


I do hope that you like todays card


Hasta luego ๐Ÿ‘‹ !


Enjoy the rest of your day !


๐Ÿ’–

Card recipe:

Last Minute Manda digital stamp - Santa Gnome with Tree 
Distress Oxide Ink - Chipped Sapphire, Prize Ribbon, Seedless Preserves 
Echo Park Stencil - A gingerbread Christmas - Christmas Cheer
Lawn Fawn Stencil Paste - clear
Lisa Horton Crafts Sentiment
LHC Edgecutz dies - Essential Edges
Lisa Horton Crafts Luxury Glitter Dust - Rainbow Sparkle
Cosmic Shimmer Cosmic Twinkles - Icicle Blue
Glossy accents

Promarkers used:

Skin: Almond, Blush, Soft Peach, Dusky Rose, Pastel Pink

Beard & Pompom : Ice Grey 1,2,3

Tree: Olive Green, Holly, Green Pine, Umber, Walnut, Praline

Hat: Crimson, Poppy, Lipstick Red, Salmon pink

Star & Buckle: Spice, Canary, Lemon

Baubles:  Spice, Canary, Lemon + Marine, Turquoise, Sky Blue + Maroon, Cerise, Pink Carnation + Prussian Plum , Amethyst


I am entering this card in the following challenges:


tic tac toe challenge  #tictactoechallenge #tttc172 (Die Cut Free Bright Colours) (20) 


Thanks for stopping by and reading my blog I would love if you could leave me a comment. 

Wendy x