Showing posts with label Inky background. Show all posts

Saturday, 4 October 2025

World Cardmaking Day - Autumn Crafting - Freddy Fox collection with Polkadoodles

Hello everyone and happy Saturday... its also World Card Making day too and I hope that you are joining in with the fun and creating something today.

It might be the 4th October but its a beautiful sunny Autumnal day here today and the temperature is expected to climb to 30C which is lovely but a little unexpected.  

I decided to share a couple of Autumn cards I made recently using the Ephemera bundle from the fantastic Freddy Freddy Fox collection  to celebrate the colours of Autumn.


The ephemera set is jam packed with images for you to colour or comes with pre-coloured images too if you prefer not to colour. 

For the first card I chose a couple of the butterflies from the bundle, colouring with promarkers and fussy cutting out.  For the simply block background I used some pieces of masking tape to create four rectangles on the panel and then used distress oxides to blend colour over these from light to dark - I love the striking look and its such a simple but effective design.  

To create the shadow behind the butterflies I printed the two butterflies onto the base panel before inking and then simply coloured them in with a black marker pen before adhering the butterflies on top.

The sentiment, from the collection was added to the centre of the card before printing too and I applied rose gold foil using my Minc.  The panel was then layered onto my card blank with a mat of black glitter card.

To finish off this simple design I added some rose gold confetti around the the card.


For my second Autumn card I decided to create a fun inky background so on a piece of vellum I scribbles some alcohol markers in patches and then added a little alcohol to this, using my Tim Holtz blower to move the ink around, adding more colour until I was happy with the overall effect.  Once dried I added a splatter of wet glue on the panel and when the glue was tacky I applied gold foil to the splatter - it give a very delicate look but I think this works well with the vellum.

For the main image I chose the bird house with sunflowers and a couple of the little crows from the ephemera bundle, colouring these in again with my promarkers before fussy cutting out and adding to my card.

I printed out one of the sentiments from the collection and adhered this across the bottom of the card to give a ground for my design to sit on.

To finish off the design I added white gelly roll pen highlights around the the card.


I hope that you like my project today and you'll enjoy the next that I share from Polkadoodles.


Hasta luego ๐Ÿ‘‹ 


Enjoy the rest of your day !


recipe: Please note contains some Affiliate links at no cost to you if you purchasing using these.

Polkadoodles digital stamps - Freddy Fox Collection - Ephemera bundle
Polkadoodles digital sentiment - Freddy Fox Collection -  Sentiment bundle
Distress Oxide - dried marigold, wild honey, crackling campfire, festive berries, rusty hinge
Minc foil - rose gold
Crafters Companion foil - gold
Spellbinders confetti - rose gold


Thanks for stopping by and reading my blog I would love if you could leave me a comment. 

Wendy x

Sunday, 13 October 2024

You warm my heart - New Release - Hug in a Mug with Julia McNeil Designs

Hello everyone Happy Sunday I hope you are having a good weekend!

I'm sharing another project today for JMC Designs as part of our Craftober challenge.  

It's Craftober all this month over at JMC Designs so that means another prompt to inspire you to create.

There's still plenty of time for you to join in and you could be in with a chance of a prize from Julia ...the winner will receive an A6 Stamp of their choice and a 30% discount off their next order!  

All you need to do is create a project following the prompt for the day, using JMC Designs products and upload this to the Facebook group album.  JMC's Crazy Crafty Hive  If you don't have any products yet there are plenty of Freebies in the group once you have joined for you to use.

Here is the list of daily prompts.


Today the prompt is 'Purple' - My absolute favourite colour so I had to create something.

I've created a  snowy scene using stamps from the Frosted Marshmallow stamp set using the mirror stamping technique - if you haven't tried this fun and very easy technique then there is a great tutorial over on the YouTube channel that explains how you can reverse or mirror stamp using a gelli plate link here.  

Don't worry if you don't have a gelli plate, you can also use the back of a silicone stamp or a silicone stamp mat to achieve the same mirror stamping technique.


I stamped the snowman twice, reversing one of the images and the sentiment from the stamp set using black alcohol friendly ink.  For my scene I also stamped the flame 3 times and the little chocolate sticks 5 times.  The images were coloured using my promarkers (see below for colours) and then I fussy cut them out.  Don't worry if your cutting isn't perfect as I like to edge the images with a marker pen once cut out and this helps to hide any little mistakes.
Next I created my purple inks smooshed background, using some watercolour card. I sprayed the background with distress spritz to give a lovely purple shimmer and then splattered the panel with white ink from my posca pen before mounting this onto a panel of purple card. 

To create my scene I die cut snowy hills from white glitter card, adhering this to the bottom and then used foam tape to adhere my snowmen toasting their marshmallows over the fire.  I thought the little chocolate sticks were perfect for the fire wood. 

To finish off my card I added glitter to the pompoms and blended a little yellow ink around the fire and onto the snowmen's tummy's to give the effect of a glow from the fire.


I do hope that you like my card for today and I'd love it if you'd leave me a comment. 


Hasta luego ๐Ÿ‘‹ 


Enjoy the rest of your day !


Card recipe:Please note contains some Affiliate links at no cost to you if you purchasing using these.

JMC Designs - Hug in a Mug Collection - Frosted Marshmallow Stamp set
JMC Designs - Hug in a Mug Collection - Coffee & Chocolate Stamp set
Distress Spritz - wilted violet
Cosmic Shimmer - Cosmic Twinkles - Icicle blue
Posca pen - white
Sakura Gelly Roll pen - White Pen
Ecoline Brush Pen - deep grey


Promarkers used:

chocolate sticks:    walnut, henna, caramel
                            caramel, tan, champagne

snowmen:             lavender, blender
                            antique pink, dusky rose, pale pink

hats:                    aubergine, plum, mulberry, orchid
scarves                 prussian, violet, bluebell, blue pearl

flames:                 yellow, pumpkin, ginger, orange


Thanks for stopping by and reading my blog I would love if you could leave me a comment. 


Wendy x

Wednesday, 17 July 2024

Have a grape birthday with Lawn Fawn

Hello everyone wishing you a wonderful Wednesday! 

My goodness it's so hot here at the moment and the winds are making it feel even hotter...its set to get even hotter by the weekend too.  We had a lovely day down on the coast on Monday for my birthday and it was noticeably cooler and fresher so a nice respite.

I'm on my blog today with a fun card made using a new clear stamp - I don't tend to make cards with puns but I saw this and really liked it and I hope you do too.


This is a simple A6 (UK Size) card.  I started by creating a fund inky background with distress inks, smooshing the ink onto watercolour cardstock.

I added a little cosmic shimmer pixie powder to the background which you can just about see in this photo.

I then used the bunch of grapes stamp to create 3 little fun bunches again on watercolour card before colour with distress inks and then fussy cutting out.  

There is a matching die for this stamp but I thought its an easy shape to cut out.

I used the sweet little faces to stamp details onto the grapes - they are so cute.


Next I die cut a simple white circle frame and then assembled the card adding the grapes at different heights for interest.  The sentiment was stamped onto white card, cut out and then I used a purple pen to add an outline to the sentiments before adding these to the card, adhering at a jaunty angle.

Finally I added white gel pen highlights here and there, some purple confetti and I added an extra sentiment, stamped in purple ink directly onto the card.

I really hope that you have enjoyed my card for today and will drop by again to see my next project.


Hasta luego ๐Ÿ‘‹ 


Enjoy the rest of your day !

Card recipe:Please note contains some Affiliate links at no cost to you if you purchasing using these.
Lawn Fawn Clear Stamp - Year Fourteen
Versafine Clair ink - Monarch
Pretty Pink Posh - confetti - Sugar Plum
Sakura Gelly Roll Pen - white


Thanks for stopping by and reading my blog I would love if you could leave me a comment. 


 Wendy x

Saturday, 1 June 2024

Happy Birthday Fairy card with Crafter's Companion

Hello....Happy Saturday and Happy June everyone! I hope you all had a great week and have a lovely weekend planned.  

I have a slightly different card to share with you today - something a little more traditional I suppose but it was made for a commission for an 80th birthday so I've gone a bit old school with a little decoupage combined with a more modern background.


I was asked to make a card with a fairy theme so this is my creation and fingers crossed it was what was wanted.

I started by creating a pretty ink smooshed background with pink distress inks on watercolour card.  I like to let each layer dry before using a different colour as it gives a wonderful layered effect. I splattered the panel with pearl silver watercolour ink and water to create texture and shine.

Then I used some very old but never used stamps from my stash - its a set of Flower Fairies by Crafters Companion - bought many moons ago but unused.  They are even unmounted rubber stamps so I had to cut them out too before I cut used them. How things have changed over the years!

I originally planned to use the main fairy stamp but I just couldn't get it to look how I wanted to decided to use the blossom stamps around the edge of the watercolour panel in a grey Versafine ink. 

I used stamped a few extra onto card to colour and then fussy cut out.  I like to have dimension on my cards.  

I then chose a pre-coloured fairy from a a Fairyopolis cd from Crafters Companion and printed this out, fussy cutting it out and adhering to the card so the fairy is standing on one of the branches.  The licensed images are based on the original Flower Fairies artwork by Cicely Mary Barker


The personalised sentiment was created in my graphics software, printed out and then I blended pink distress ink so it toned with the design.


To finish off I added some clear sparkle to the wings and some clear iridescent sequins around the design.


I hope that you like my card today and you'll enjoy the next card that I share, made using this set.


Hasta luego ๐Ÿ‘‹ 


Enjoy the rest of your day !


Card recipe:

Crafters Companion - Flower Fairies Friends Stamp - Wild Cherry
Distress Inks - tattered rose, spun sugar, worn lipstick, Victorian velvet, kitsch flamingo
Craftelier Watercolour paint - Gold set - pearl silver
Sugar and Spice sequins - candy floss
Crafters Companion CD - Fairyopolis
Spectrum Noir Sparkle pen - clear


Thanks for stopping by and reading my blog I would love if you could leave me a comment. 

Wendy x

Tuesday, 21 May 2024

A Passion for Markers BlogSpot Anniversary Challenge #740 Anything Goes

Hello and a happy Tuesday to you all !


I'm here today to let you know that a new challenge has started over on the Passion for Markers Blog challenge and its a special Anniversary challenge.


This weeks challenge is being sponsored by 7 wonderful and very generous sponsors.


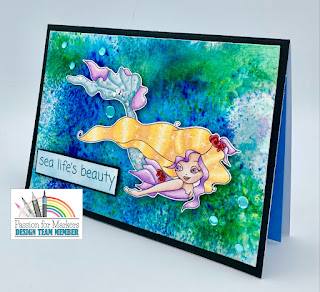
I decided as it's still May and we are celebrating everything Mermaid I would create a card using a gorgeous new digital mermaid from the brand new digital kit Aquatic Adventures from JMC Designs


This gorgeous mermaid is called Aquaria and I have created a simple but beautiful underwater background for her to swim in using distress inks smooshed onto watercolour card stock.  
Once I was happy with the layering I then added some fabulous Brushos and spritzed with water to give the look of the sea.  Next I resized the digital stamp to suit my card before colouring her in with Promarkers and fussy cutting out. 
The sentiment is also from the digital collection, printed out and then foiled with aqua foil.


The mermaid and sentiment have been adhered to the card using foam tape for dimension and then I have added teal confetti around the design.  
The finishing touches are some super sparkly mermaid tails glitter and white gel pen highlights to add sparkle to her hair.

Why not take a look at all these fabulous stores and join in with our Anything goes Anniversary challenge.  Don't forget there will be a prize for the Winner of the challenge - there are more details over on the Passion for Markers blog.


I really hope that you have enjoyed my card today and will drop by again to see my next project and don't forget to join in with the challenge over on the Passion for Markers blog


Hasta luego ๐Ÿ‘‹ 


Enjoy the rest of your day !


Card recipe:
JMC Designs digital stamp - Aquatic Adventures collection
JMC Designs digital sentiment- Aquatic Adventures collection
Distress Ink - villainous potion, shaded lilac, evergreen bough, salvaged patina, salty ocean
Brushos - ultramarine, turquoise,emerald green
Lisa Horton Crafts - Mermaid Tails - Waterfall
Minc Foil - teal
Spellbinders confetti - lagoon
Spectrum Noir - Sparkle pen - clear
Sakura gelly roll pen - white


Promarkers used :

Skin:      almond, blush, oatmeal, soft peach, dusky rose

Blush:    pale pink  

Hair:      gold, sunflower, buttercup
             purple, fuchsia pink, pink pearl

Tail:       verdigris, pebble blue, pastel blue
             purple, fuchsia pink, pink pearl    

Roses:   burgundy, poppy, lipstick red   

          
Thanks for stopping by and reading my blog I would love if you could leave me a comment. 


 Wendy x

Thursday, 4 April 2024

Sending you a warm hug - Altenew - Japanese Anemone

Hello and Happy Thursday everyone! I hope you are having a great week.

If you are anything like me as a crafter, I am always buying new stamps, dies, papers etc that I absolutely NEED but then don't seem to have the time to actually play with them!..I've always been the same even when I was little I absolutely loved stationery and pens and notebooks! (hated using them though as I didn't want to spoil them)

So this year I am going to do my utmost to use my, new purchases and make sure I get use out of them.

My first creation is using a stamp/stencil/die set from Altenew that I bought from Simon Says Stamp with a voucher that I was lucky enough to win last year.  

It's from the Build a Garden collection and this is the Japanese Anemone.  My goal will be to create as many different cards using different techniques and mediums that I can using this set over the next few weeks in between my other DT commitments.


I had some of these beautiful flowers in the garden here when we moved over but no idea what happened to them - flowered for a few years and then disappeared, I must get some more bulbs.

I started by cutting a panel of white Neenah cardstock to fit a 5" x 7" card and then stamped the image using Versafine Onyx black ink. Then I used the stencils from the set and distress inks to colour the flowers and leaves. 


There are 5 stencils that coordinate with the stamped image and its really easy to line up too.  Using different amounts of pressure when applying the ink allows you to build up depth in the flowers (darker at them centres).  

Once I was happy with the coverage I used the coordinating die to cut out the flower stem and put this to one side whilst I created my background.
  
Next I moved on to my background, cutting a piece of white watercolour card to start off and adding the yellows and green distress inks to my silicone mat to ink smoosh these onto the card.  I like to add one colour at a time and build up the layers, drying each one off before adding a new colour. 


Once I was happy with the amount of colour I then added a very small amount of Brushos to the panel and spritzed this with water to let the magic happen - these powders are just amazing and I love the movement they give to a design. 

I dried the panel off completely and then used some nesting dies to cut out the background panel and a slightly larger panel of black card, adhering these to my white card blank. 

I then used one of the sentiments and stamped this in black directly onto the card background.  

The floral peice was adhered to the card with foam tape and then I splattered gold watercolour over the panel.  

To finish off I added some tiny black gems around the design.


I hope that you like my card today and you'll enjoy the next card that I share, made using this set.


Hasta luego ๐Ÿ‘‹ 


Enjoy the rest of your day !


Card recipe:

Altenew -  Build a Garden stamp/stencil/die set - Japanese Anemone
Distress Inks - shaded lilac, wilted violet, villainous potion, ripe persimmon, fossilized amber, mustard seed, mowed lawn, twisted citron.
Brushos - yellow, ultramarine
Craftelier Watercolour paint - Gold set - True gold
Black gems


Thanks for stopping by and reading my blog I would love if you could leave me a comment. 

Wendy x

Tuesday, 14 November 2023

Digi Choosday - Thank you cards with Polkadoodles

Hello everyone and happy Tuesday.  Wishing you all a lovely day today and that you enjoy the week ahead, I hope that you have something nice planned.


It's that time of the week when we launch a brand new 'Anything Goes' challenge over on the Polkadoodles Digi Choosday Blog so I hope you are going to join in and don't forget the amazing discount off all crafty printable downloads until midnight today!


The theme set for the DT this week is Thank you or Thanksgiving so I decided to make a sweet and simple thank you card, what better way to say thankyou to a special friend.  I love to send cards like this, just because and not for a particular event or occasion...but this one is for my BFFs birthday yesterday.

I decided to create an inky background panel to start with using 3 warmer colours of distress inks, using water and watercolour cardstock. I dried this off between each layer of colour and then once completely dry used a simple stitched die to cut out a smaller panel for my A6 card, leaving a large white border around the design.

Next I resized the sweet Noodle Panda image to suit the design and then printed out onto alcohol marker friendly cardstock before colouring with my Promarkers (see below) and then fussy cutting out.

To add interest to the design I mounted the inky panel into the centre of my A6 card blank and added a stitched die cut border to the bottom of the image.

I added a few pieces of sparkly pink confetti around the design to finish it off, all ready for posting to my bestie.


I have a very special DT discount code that you can use for all your shopping on the Polkadoodles online shop at checkout use WENDYJ-10 and you will get 10% of your entire purchase (not in conjunction with other discount codes!)


I hope that you like my card today and you'll enjoy the next cards I share from Polkadoodles.


Hasta luego ๐Ÿ‘‹ 


Enjoy the rest of your day !


Card recipe:
Polkadoodles Digital Stamp - Noodle Panda - Mailing Letters
Polkadoodles Digital Sentiment - Noodle Panda - Sentiment bundle
Distress Inks - picked raspberry, squeezed lemonade, dried marigold
Pretty Pink Posh Confetti - Friendship
Lawn Fawn Lawn Cuts Custom Craft die - Stitched Borders


Promarkers Used:

Noodle:      blue black, ice grey 7, 6
                 warm grey 2, 00, blender   
                 dusky rose, pale pink
                 china blue 

Bow:          antique pink, salmon pink, pastel pink

Butterfly:    antique pink, salmon pink, pastel pink
Flower        sunflower, primrose

Post box:    chocolate, light pecan, tan

Bamboo:    chocolate, light pecan, tan
                  forest green, bright green, meadow green

Letters:      ice grey 00, 1
                 antique pink


Thanks for stopping by and reading my blog I would love if you could leave me a comment. 

Wendy x

Thursday, 9 November 2023

New Release - Digi Deal - Christmas Poinsettias with Polkadoodles


Hello everyone I hope you have a lovely day today.

Here's a more traditional style of Christmas card today with a modern twist, I love using non traditional colors at Christmas.

One of my favourite varieties of Poinsettia is one of the Pink ones - I love how different they are and they grow beautifully here in the garden, as long as there is enough water!

So that's my inspiration for the colouring on todays swag from the new Poinsettia Wreath collection by Polkadoodles.


I created an inky background using distress inks and watercolour cardstock and then used some pink Frantage embossing enamel that I've had for years... perfect I thought teamed with a rose gold card frame.

I love the look of a frame on a design as it helps to draw the eye into the design.

The swag was resized in my graphics software to suit a larger 5" x 7" card and coloured in with my Promarkers (see below for colours), before fussy cutting out and adhering to the design.  

Yes I know very fiddly, but I love it and I find fussy cutting very relaxing!

The sentiment is also from the digi deal, simply printed and cut into a plain strip with a little pink distress ink around the edges to soften the look. 

I hope that you like my Christmas card today and you'll be back to see another card from me very soon.


Hasta luego ๐Ÿ‘‹ 


Enjoy the rest of your day !


Card recipe:
Polkadoodles digital stamp - Poinsettia Wreath
Polkadoodles digital Sentiment - Poinsettia Wreath
Distress Inks - spun sugar, kitsch Flamingo, picked raspberry
Stampendous Frantage - Aged Rose
Sakura Gelly Roll pen - white
Spectrum Noir Sparkle pen - clear


Promarkers Used:

Poinsettia:          cerise, baby pink, lemon
                         chiffon, pale cream
                         forest green, bright green, leaf green

Pine needles:      green

Holly:                 holly, lush green, emerald
            
Bay Leaves:        pesto, olive, marsh green


Thanks for stopping by and reading my blog I would love if you could leave me a comment. 

Wendy x

Sunday, 29 October 2023

Life is not always Black and White

Hello everyone wishing you all a wonderful Sunday!

The bathroom refurb has finally finished thank goodness and were nearly straight again in the house, still got quite a bit of cleaning to do but were getting there.  I've even managed to get most of the craft room tidied although there's still a lot of boxes to unpack/rationalise.

I'm on my blog today to share something a little quirky that I've made using a couple of fun digital stamps by Julia McNeill owner of JMC Designs.

I've had these two stamps for quite some time but not got around to using them so decided it was about time for something a little fun and quirky just for me.


Aren't they adorable - this is Emily and Sophia (both were freebies)  Sophia was a freebie I think from the Kit & Clowder Facebook group and Emily was the June 2022 freebie from Julia's Facebook group JMC's Crazy Craft Hive.

I created a colourful inky background using distress inks adding a doodled border around the edge.

The sentiment strips are from Polkadoodles - Noodle Panda collection and I thought it was a perfect play on words for my definitely not black and white design today. 

Emily and Sophia were coloured with a rainbow of promarkers before fussy cutting out and adhering to the card with foam tape.

To finish of my card I've adhered a few black gems for a touch of sparkle.


I hope that you like my fun and quirky card today and you will come back to see my next design ๐ŸŒž


Hasta luego ๐Ÿ‘‹ 

Enjoy the rest of your day !


Card recipe:
JMC Designs digital stamps 
Distress inks - picked raspberry, squeezed lemonade, dried marigold
Polkadoodles digital sentiment - Noodle Panda - sentiment bundle
Sakura Gelly roll pen - white, black
Pretty Pink Posh gems - midnight black
Glossy Accents


Promarkers used :

antique pink, salmon pink, pale pink

burnt orange, bright orange, pumpkin

sunflower, canary, primrose

forest green, bright green, meadow green

midnight blue, china blue, cloud blue,

aubergine, purple, lilac


Thanks for stopping by and reading my blog I would love if you could leave me a comment. 


Wendy x

Monday, 9 October 2023

Let it Snow - Snowman with Robins with Pink Gem Designs

Hello everyone and a happy Monday... I hope that you all had a good weekend

Today I'm here with a very sparkly snowman card for Pink Gem Designs using the very sweet Snowman with Robins digital stamp set


This set of digital stamps includes  a gorgeous black line and a pre-coloured image a 2 coordinating sentiments.  

This is a sweet card A6 (UK Size).

I created a simple snowy background blending 3 distress inks across my background panel.

Next I used some vary sparkly stencil paste to add snow across the entire panel, allowing this to dry completely before adhering to my A6 card blank.

I used a simple stitched border die to cut out the panel - using dies can help make sure our panels are perfectly cut as I know a lot of people ( including me !) have problems cutting with guillotines and paper trimmers.

Whilst my background is drying I then resized the snowman and sentiment to  fit, printing out on alcohol marker friendly cardstock before printing out, colouring with my Promarkers and then fussy cutting out.

I then simply adhered the snowman to the card using foam tape for dimension and added the sentiment at the bottom of the card.


A very simply and super sparkly card!

I really hope that you like my clean and simple card today and it would be lovely if you you leave me a comment and let me know what you think.

Hasta luego ๐Ÿ‘‹ 


Enjoy the rest of your day !


Card recipe:
Pink Gem Designs digital stamp - Snowman with Robins
Distress Inks - spun sugar, picked raspberry, tumbled glass
Comic shimmer Luna paste - moonlight pearl
echo park designer stencil - Christmas cheer
Lawn Fawn Clippings stencil - hillside
Sakura Gelly Roll Pens - black, white, gold
Card Making Magic A6 Nesting Die set
Glossy accents


Promarkers used :

Poinsettia:        burgundy, poppy, lipstick red    
                       forest green, bright green, meadow green

Robins:            burgundy, poppy, lipstick red
                       caramel, sandstone, pastel beige
                       deep mocha, burnt sienna, caramel

Carrot:            burnt orange, orange, pumpkin

Twigs:             deep mocha, burnt sienna, caramel

Snowman:       cool aqua, blender pen

Hat:                blue black, cool grey 7, 5
                      forest green, bright green, meadow green 


Thanks for stopping by and reading my blog I would love if you could leave me a comment. 

Wendy x