Wednesday, 29 May 2024

I Love Promarkers #560 - Tropical Vibes - Sponsored by Polkadoodles

Hello everyone wishing you a wonderful Wednesday! 

I'm on my blog today for the new bi-weekly I Love Promarkers blog challenge , it would be wonderful if you joined us over there if you love to colour with alcohol markers and don't forget there are prizes up for grabs.  


You can find all of the rules and details for the challenge over on the blog. 


This challenge is being sponsored by Polkadoodles


Here is my inspiration card for the current blog challenge with the theme - Tropical Vibes, using the super cute Noodle Panda digital stamp from the Noodle Panda collection, this is Beach Inflatable Flamingo

I wanted to create a tropical beach scene for my cute panda so I have used one of the fabulous digi deals Beach Scene for my background. 

I started by resizing this to fit a larger 5" x 7" card blank and added a digital sentiment from the Winnie Starfish Sandcastles collection at the bottom left corner.

I printed out the panel onto alcohol friendly card stock and carefully blended distress inks across this to create my waves, sandy beach and the sky, using a lighter hand across the images themselves. 

Next I used promarkers to colour the images - this works really well as long as you choose colours that will disguise the distress ink below.

I used a white gelly roll pen to create foam on the edges of the waves I then resized Noodle, making her larger to fit at the bottom of the card, this helps to give perspective to the design as she's standing at the front of the card.

I assembled the card, matting the background onto a panel of sky blue card and then added Noodle at the bottom right corner with foam tape for extra dimension. 

The finishing touches were some highlights around the design with a white pen and glossy accents to her sunglasses.


I really hope that you like my card today and will drop by again to see my next project and don't forget to join in with the challenge over on the I Love Markers blog


Hasta luego ๐Ÿ‘‹ 


Enjoy the rest of your day !

Card recipe:
Polkadoodles Digital Stamp - Noodle Panda collection - Beach Inflatable Flamingo
Polkadoodles Digital Background - Digi Deal - Beach scene 
Polkadoodles Digital Sentiment - Winnie Starfish & Sandcastles collection - Messages & Quotes
Distress Ink - scattered straw, salty ocean, peacock feathers
Sakura Gelly Roll pen - white
glossy accents


Promarkers used :


Thanks for stopping by and reading my blog I would love if you could leave me a comment. 


 Wendy x

Tuesday, 28 May 2024

A Passion for Markers BlogSpot #741 Go Dotty - Sponsored by Clearly Besotted

Hello again and I'm back today with another card!


I'm here today to let you know that a new challenge has started over on the Passion for Markers Blog challenge.


This weeks challenge theme is 'Go Dotty' chosen for Team 2 by our lovely Karen  We are being sponsored by Clearly Besotted.


I decided for my card today to use something from my favourite collection Rebel by Polkadoodles.  This is Bookworm / study Rebel and  I thought she would be perfect for the dotty theme for the week.


For my dotty card today I've used one of the dotty papers from the collection and di cut this with a scalloped frame die.  

Next I have resized the digital stamp to suit my 5" x 7" card, added one of the sentiments from the collection at the bottom of the panel and then printed this out onto alcohol marker friendly card stock before colouring in with my promarkers.  

To assemble the card I've added a thin strip of striped paper from the Wings of Love collection to the bottom of the design and die cut 3 small hearts, covering these with glossy accents.  

The finishing touches to the design are white polka dots on Rebels bow.


I really hope that you have enjoyed my card today and will drop by again to see my next project and don't forget to join in with the challenge over on the Passion for Markers blog


Hasta luego ๐Ÿ‘‹ 


Enjoy the rest of your day !


Card recipe:
Polkadoodles digital stamp - Rebel Girl collection - Bookworm / Study Rebel 
Polkadoodles digital paper - Rebel Girl collection - paper bundle 1
Polkadoodles digital paper - Wings of Love - Paper set 2
Polkadoodles digital sentiment - Rebel Girl collection - Messages
Glossy accents
Sakura gelly roll pen - white


Promarkers used :


Thanks for stopping by and reading my blog I would love if you could leave me a comment. 


 Wendy x

Ocean themed picture - Coral Mermaid - Digi Choosday - Keep calm and think Beach with Polkadoodles

Hello everyone and happy Tuesday.  I hope that you have a lovely day today and that you enjoy your week ahead.


It's that time of the week when we launch a brand new 'Anything Goes' challenge over on the Polkadoodles Digi Choosday Blog so I hope you are going to join in and don't forget the amazing discount off all crafty printable downloads until midnight today!


The theme set for the DT this week is to create a Ocean themed project but not a square or rectangular card so as it's still May for a few more days and we are still celebrating everything MerMay I decided to make a picture instead of a card. Just a few more days to join in with the MerMay2024 celebrations across the arty world.


I decided to use one of the gorgeous mermaids from the Coral Mermaid collection, this digital stamp is Coral Mermaid on the rocks  I started off by resizing the digital stamp to suit my frame which is 5" x 7" in size and colouring her in with promarkers - don't you just love her hair ! 

Next I chose one of the papers from the collection and used this to cover the background of my picture frame - I've removed the glass that was in the frame as I like being able to touch the design.  

To add more dimension I fussy cut out some of the coral from the paper and adhered these around the design and adhered the mermaid sat on her rock using foam tape for dimension

The sentiment is from the Winnie Starfish & Sandcastles collection and I've used teal foil to add shine and sparkle with a clear sparkle pen. 

This would make a perfect gift for someone (but I might just keep it for myself !)


Finishing touches where some teal confetti around the design, clear sparkle on Corals tail and some of the coral a
nd white  gel pen highlights.  

I hope that you like my project today and you'll enjoy the next cards I share from Polkadoodles


Hasta luego ๐Ÿ‘‹ 


Enjoy the rest of your day !


Promarkers Used:

Skin:           almond, blush, oatmeal, soft peach, dusky rose

Blush:         pale pink

Hair:           orange, mango, peach

Tail:            Verdigris, pebble blue, pastel blue

Starfish:      gold, sunflower, buttercup
top

Flowers:       sunflower, poppy, lipstick red

Coral:          burnt orange, ginger, bisque

Seaweed:     petrol blue, marine, turquoise

Leaves:        pear green, lime green, lime zest

Rocks:         ice grey 00, 3, 5


Card recipe:
Polkadoodles digital stamp - Coral Mermaid collection - Coral Mermaid on Rocks
Polkadoodles digital paper - Coral Mermaid collection - paper bundle
Polkadoodles digital sentiment - Winnie Starfish & Sandcastles Collection - sentiment bundle
Minc Foil - teal
Spectrum Noir sparkle pen - clear
Spellbinders confetti - lagoon
Sakura Gelly Roll Pen - white


Thanks for stopping by and reading my blog I would love if you could leave me a comment. 

Wendy x

Monday, 27 May 2024

Be so awesome people think you're a Myth - New Release - Aquatic Adventures with Julia McNeill Designs

Hello everyone Happy Monday I hope that you had a great weekend.  

It's time for me to post an project for JMC Designs  and also its my final MerMay project. There's still a few days left of May so plenty of time to join in with the challenge and don't forget there will be a prize awarded to someone.


The prompt for today from JMC Designs is 'Mythical & Magical' so I decided to create a magical scene using the pre-coloured images from the brand new digital collection Aquatic Adventures. 

Several years ago we were very lucky to be at a wedding in the Monterey Bay Aquarium California and at the time there was the most amazing jellyfish experience/exhibition with tanks full of the most amazing jellyfish and they were definitely magical with their glowing neon lights.

I started by choosing one of the papers from the collection and then resized this to fit a 5" x 7" card blank.  To give my design dimension I added a couple of jellyfish, and making them smaller to appear in the background. 


I added a third larger jellyfish towards the bottom centre of the design, to appear in the foreground and also resized the gorgeous mermaid Oceania so she would appear to sit on the bridge.  

I added a little starfish at the bottom of the image. 

Then I separated the mermaid and the larger jellyfish from the design and made an exact copy of the coral and rocks at the bottom before printing out. 


Next I fussy cut out the mermaid, the larger jellyfish and some of the coral at the bottom of the design.  

Don't worry if you're not great at fussy cutting, you can always use a dark grey or black marker pen to carefully outline the edge and no one will ever know. 

To assemble the card I adhered the background peice onto a peice of teal metallic card and then used foam squares to adhere the mermaid, jellyfish and the coral at the bottom of the panel.  

I splattered the card with a pearl silver watercolour paint and added extra metallic bubbles around the design.  

The sentiment was printed out and cut into 3 simple strips, blending a little blue ink to tone down the white of the card, before adhering to the card.


The finishing touches to the card were some teal confetti around the design, glossy accents to the bubbles in the water and white gel pen highlights.


I really hope that you like my project today and it would be lovely if you you leave me a comment and let me know what you think.


Hasta luego ๐Ÿ‘‹ 


Enjoy the rest of your day !


Card recipe:
JMC Designs digital collection - Aquatic Adventures 
Spellbinders confetti - lagoon
Distress Ink - salty ocean
Craftelier watercolour paint - gold collection - pearl silver
Sakura Gelly Roll pen -  white, clear star
glossy accents


Thanks for stopping by and reading my blog I would love if you could leave me a comment. 

Wendy x

Tuesday, 21 May 2024

A Passion for Markers BlogSpot Anniversary Challenge #740 Anything Goes

Hello and a happy Tuesday to you all !


I'm here today to let you know that a new challenge has started over on the Passion for Markers Blog challenge and its a special Anniversary challenge.


This weeks challenge is being sponsored by 7 wonderful and very generous sponsors.


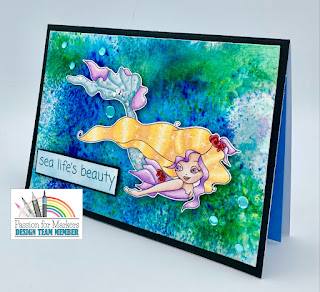
I decided as it's still May and we are celebrating everything Mermaid I would create a card using a gorgeous new digital mermaid from the brand new digital kit Aquatic Adventures from JMC Designs


This gorgeous mermaid is called Aquaria and I have created a simple but beautiful underwater background for her to swim in using distress inks smooshed onto watercolour card stock.  
Once I was happy with the layering I then added some fabulous Brushos and spritzed with water to give the look of the sea.  Next I resized the digital stamp to suit my card before colouring her in with Promarkers and fussy cutting out. 
The sentiment is also from the digital collection, printed out and then foiled with aqua foil.


The mermaid and sentiment have been adhered to the card using foam tape for dimension and then I have added teal confetti around the design.  
The finishing touches are some super sparkly mermaid tails glitter and white gel pen highlights to add sparkle to her hair.

Why not take a look at all these fabulous stores and join in with our Anything goes Anniversary challenge.  Don't forget there will be a prize for the Winner of the challenge - there are more details over on the Passion for Markers blog.


I really hope that you have enjoyed my card today and will drop by again to see my next project and don't forget to join in with the challenge over on the Passion for Markers blog


Hasta luego ๐Ÿ‘‹ 


Enjoy the rest of your day !


Card recipe:
JMC Designs digital stamp - Aquatic Adventures collection
JMC Designs digital sentiment- Aquatic Adventures collection
Distress Ink - villainous potion, shaded lilac, evergreen bough, salvaged patina, salty ocean
Brushos - ultramarine, turquoise,emerald green
Lisa Horton Crafts - Mermaid Tails - Waterfall
Minc Foil - teal
Spellbinders confetti - lagoon
Spectrum Noir - Sparkle pen - clear
Sakura gelly roll pen - white


Promarkers used :

Skin:      almond, blush, oatmeal, soft peach, dusky rose

Blush:    pale pink  

Hair:      gold, sunflower, buttercup
             purple, fuchsia pink, pink pearl

Tail:       verdigris, pebble blue, pastel blue
             purple, fuchsia pink, pink pearl    

Roses:   burgundy, poppy, lipstick red   

          
Thanks for stopping by and reading my blog I would love if you could leave me a comment. 


 Wendy x

Sunday, 19 May 2024

Make Waves, Dive Deep - New Release - Aquatic Adventures with Julia McNeill Designs

Hello everyone Happy Sunday I hope that you are enjoying your weekend.  

It's time for me to post an extra project for JMC Designs  and also my next MerMay creation. There's still plenty of time to join in with the challenge and don't forget there will be a prize awarded to someone.


The prompt for today from JMC Designs is 'Shape of the sea' so I decided to create and underwater cave scene for the gorgeous mermaid Serephina from the brand new digital collection Aquatic Adventures.  


I think she reminds me of Marilyn Monroe, with her gorgeous shapely curves.  I started by choosing one of beautiful papers from the collection that looks like a cave and resized this to fit an A7 5" x 7" card blank. 

I printed the paper out twice as I wanted to fussy cut some of the coral at the bottom of the paper to decoupage for extra dimension.  I cut a piece of black cardstock to fit my card blank and then handcut a cave shape.  This card would create a frame around the design. 


Next I resized Serephina to fit inside the frame of the underwater cave and coloured her with Promarkers before fussy cutting out.

The sentiments at the top and bottom of my design are also from the collection,  printed out and adhered to the design after adding a little blue distress ink to tone down the white of the card. 

I used some black stickles to add details around the edge of the cave frame for a bit of extra sparkle. 


The finishing touches to the card were some clear iridescent sequins around the design to add sparkle and shine, white gel pen to highlight Serephina's hair and I've added extra sparkle to the mermaid tail  and to some of the coral at the bottom.


I really hope that you like my project today and it would be lovely if you you leave me a comment and let me know what you think.


Hasta luego ๐Ÿ‘‹ 


Enjoy the rest of your day !


Card recipe:
JMC Designs digital collection - Aquatic Adventures 
Sugar & Spice Sequins - Enchanted
Distress Ink - prize ribbon
Stickles - black diamond
Sakura Gelly Roll pen -  white, clear star
Lisa Horton Crafts - Mermaid Tails - Waterfall
 

Promarkers Used:

Skin:    almond, blush, oatmeal, soft peach, dusky rose

Hair:    gold, sunflower, buttercup

Tail:     verdigris, pebble blue, pastel blue
            lime zest, lime green, pear green

Shell:    mandarin, buttercup


Thanks for stopping by and reading my blog I would love if you could leave me a comment. 

Wendy x

Wednesday, 15 May 2024

I love Promarkers #559 - Cute card sponsored by Paper Nest Dolls

Hello everyone wishing you a wonderful Wednesday! 

I'm on my blog today for the new bi-weekly I Love Promarkers blog challenge , it would be wonderful if you joined us over there if you love to colour with alcohol markers and don't forget there are prizes up for grabs.  

You can find all of the rules and details for the challenge over on the blog. 


This challenge is being sponsored by Paper Nest Dolls


Here is my inspiration card for the current blog challenge with the theme - Cute, using the very cute Party Chicks digital stamp.  They definitely look ready for a birthday party.


Todays card as a 5" x 7" card with a very simple bright yellow die cut scalloped frame around the main design panel. 

I resized the image to suit my card and then coloured using Promarkers (see below for colours),
before using a die to cut this out.  

Next I have used a couple of birthday sentiment stamps and stamped the sentiments onto the design in black ink. 

 To finish off this simple but very cute card I've added some mixed foil confetti around the design and added gold and white gelly roll pen highlights and clear sparkle to the ribbon and the party hats.

I really hope that you like my card today and will drop by again to see my next project and don't forget to join in with the challenge over on the I Love Markers blog


Hasta luego ๐Ÿ‘‹ 


Enjoy the rest of your day !

Card recipe:
Paper Nest Dolls - Party Chicks
Auchan Birthday Stamps
mixed confetti
Sakura Gelly Roll Pen - white, gold
Spectrum Noir Sparkle pen - clear


Promarkers used :

Chicks:        gold, sunflower, buttercup
                   mandarin, gold

Present:       plum, mulberry
                   prussian, violet, bluebell
                   Egyptian blue, indigo blue, cobalt blue

Hats:           burgundy, poppy, lipstick red
                   gold, sunflower, buttercup
                   Egyptian blue, indigo blue, cobalt blue

Balloon:       burgundy, poppy, lipstick red


Thanks for stopping by and reading my blog I would love if you could leave me a comment. 


 Wendy x

Tuesday, 14 May 2024

May Birthstone card - Emerald - Easel Card - Octavia collection - Digi Choosday - Big Bunches of Love with Polkadoodles

Hello everyone and happy Tuesday.  I hope that you have a lovely day today and that you enjoy your week ahead...


It's that time of the week when we launch a brand new 'Anything Goes' challenge over on the Polkadoodles Digi Choosday Blog so I hope you are going to join in and don't forget the amazing discount off all crafty printable downloads until midnight today!


The theme set for the DT this week is to create an easel card for a May Birthday with the birthstone Emerald.  I have to say green isn't my first choice for a colour palette but I do love the colour.  

I started off with a 6" 6" Kraft card base and folded this to create a twisted easel card. I then chose a couple of papers, one with gorgeous leaves from the Noodle Panda collection and the purple polka dot paper is from a new Winnie Collection due to be released very soon.  

I used these papers along with some green and emerald green card to created mats and layers on the card and also to choose my colour palette for the main focal image, with Promarkers (see below for colours).
 

I wanted to use a beautiful image from the Octavia collection.  It's not a collection I have used before but there are some gorgeous digital images and papers that you will love.  

I'm loving this bright and colourful combination of purple and emerald and I think her emerald green hair is amazing.  

I used a little distress ink around the edges of the leafy paper to take away some of the whiteness.
Finishing touches where some super sparkly purple and green sequins from my stash, a piece of recycled green twine and white and metallic green gel pen highlights.  

I hope that you like my card today and you'll enjoy the next cards I share from Polkadoodles


Hasta luego ๐Ÿ‘‹ 


Enjoy the rest of your day !


Promarkers Used:

Skin:      almond, blush, oatmeal, soft peach, dusky rose

Blush:     pale pink

Eyes:      lush green, emerald, mint green

Hair:       holly, pine, emerald, mint green

Dress:     plum, mulberry, wild orchid

Owl:        amber, bisque
               cocoa, caramel, bisque, pastel beige


Card recipe:
Polkadoodles digital stamp - Octavia collection - Best Friends
Polkadoodles digital paper - New Winnie collection - 
Polkadoodles digital paper - Noodle Panda collection - Sentiment bundle
Polkadoodles digital sentiment - Noodle Panda collection - Set 3
Distress Ink - mowed lawn
Craftelier Basics Crafts Dies - Nested Hexagons
Sakura Gelly Roll Pen - white, black, metallic green
Sequins - green, magenta
green twine


Thanks for stopping by and reading my blog I would love if you could leave me a comment. 


Wendy x

Monday, 13 May 2024

Ocean Whispers, hugs and fishes - New Release - Aquatic Adventures with Julia McNeill Designs

Hello everyone Happy Monday I hope that you had a lovely weekend.  

It's time for me to post my next project for JMC Designs  and also my MerMay creation.  

The prompt for today from JMC Designs is 'Something Fishy !' so I've gone overboard with loads of fishy ephemera from the brand new digital collection Aquatic Adventures 

I love all these bright colours it makes such a fun design I think


I decided for my project with this new collection to make a multi- tiered Popup Box card to create another underwater scene. I thought this style would be prefect and look like lots of layers of waves in the sea.  The card is very simple to create.  I cut the card pieces to start off from a light aqua card stock.  To create the same size you need the following pieces.

For the main box panel a piece of card 9 1/2" x 6", scored at 1 3/4" & 7 3/4"

For the different tiers I cut 5 additional pieces from the same aqua card,

  • 5" x 6 1/2"
  • 4" x 6 1/2"
  • 3" x 6 1/2"
  • 2 1/2" x 6 1/2"
Each of these tier panels is scored identically at 1/4" & 6 1/4"

If you have never made one of these cards before then I would highly recommend watching one of Sam Calcott of Mixed Up Crafts YouTube videos as she explains how to assemble the card really clearly and once you understand the mechanism you can adapt the measurements to suit the card you want to create.  Here is the link to the video 


Next I printed out one of the wave style papers from the collection, I chose the Bubbled Waves paper and used this to cover the back of the card base and the tier sections. 
You don't need to cover each tier completely as they wont be visible once the card is assembled and I don't like to waste my papers.  Each strip I used was about 1 1/2" in width.


Next I printed out the pre-coloured fish ephemera from the collection and a few pieces of seaweed fussy cutting  these out.  I used a dark grey pen to cover the white edges ( great if you aren't too good at fussy cutting as it hides any mistakes! ) 

The ephemera was then adhered to the card, some flat, some with foam tape to create my underwater scene. I love the little startled fish hiding in the seaweed at the bottom, isn't he a cutie.  


The sentiments, top and bottom are also from the collection,  printed out and simply matted on the aqua card.  

I used a blue metallic pen to draw a squiggly line around them for a bit of sparkle. 

The finishing touches to the card were some white iridescent sequins around the design to add sparkle and shine, white gel pen to highlight some of the bubbles on the paper, glossy accents to the fish eyes and I've added stickles to the fish for extra sparkle.  Definitely a very fishy card !

I really hope that you like my project today and it would be lovely if you you leave me a comment and let me know what you think.


Hasta luego ๐Ÿ‘‹ 


Enjoy the rest of your day !


Card recipe:
JMC Designs digital collection - Aquatic Adventures 
Sugar & Spice Sequins - Under the Sea
Stickles - Star Dust
Sakura Gelly Roll pen - blue metallic, white
Glossy accents 


Thanks for stopping by and reading my blog I would love if you could leave me a comment. 

Wendy x