Wednesday, 27 November 2024

Digi Choosday - Wednesdays - Christmas Adult birthday with Polkadoodles

Hello everyone and happy Wednesday... 


It's that time of the week when we share some inspiration for the current 'Anything Goes' challenge over on the Polkadoodles Digi Choosday Blog so I hope you are going to join in.  We've had a few changes to the blog challenge and its now a month long challenge and you can enter up to 4 times.  The design team will still be sharing weekly inspiration for you all

 and don't forget the amazing discount off all crafty printable downloads until midnight today!


The theme set for the DT this week is to create a Christmas birthday card for an adult.  I've always felt quite sorry for anyone with a birthday at Christmas as I think far too often their celebration gets lumped in with Christmas so I'm pleased mine is in July.  This card will be winging its way over to the UK for my cousins birthday at the end of December.

Because we have been so busy lately with the olives and I haven't had much time for crafting, I decided for my card today to use one of the gorgeous pre-coloured images poinsettia swags from the Poinsettia Wreath bundle.  

In my graphics software, I started with a piece of digital paper from the Jolly Santa collection, resizing this to suit a 5" x 7" or A7 card blank.  Next I added the poinsettia swag, resizing to suit the panel and also added one of the sentiments from the new Theo Penguin collection.  To create extra dimension I decided to print out two extra poinsettias and then fussy cut these out, adding to my design using 3D glue gel.

The panel was layered onto gold mirri card and I then splattered gold and silver metallic watercolour paint over the design.

To finish off my card I added some stickles to the centre of the flowers for a little extra sparkle.


I hope that you like my card today and you'll enjoy the next cards I share from Polkadoodles.


Hasta luego ๐Ÿ‘‹ 


Enjoy the rest of your day !


Card recipe:Please note contains some Affiliate links at no cost to you if you purchasing using these.

Polkadoodles digital stamp - Poinsettia Wreath
Polkadoodles digital papers - Jolly Santa - Paper Pack 1
Polkadoodles digital sentiment - new Theo penguin collection
Craftelier Watercolours - gold collection
Stickles - diamond


Thanks for stopping by and reading my blog I would love if you could leave me a comment. 

Wendy x

Tuesday, 26 November 2024

A Passion for Markers BlogSpot #767 - Fall or Winter - Sponsored by Colour of Love

Hello everyone wishing you all a lovely Tuesday and a wonderful week!

Well we have started pruning the olive trees... OK, I have to admit its been John pruning so far as I haven't felt too good lately with one thing and another but I'm starting to have a bit more energy so hoping to get outside this morning to help.

Today I'm here to let you know that a new challenge has started over on the Passion for Markers Blog challenge and I hope that you will join in.


This weeks challenge theme of 'Fall or Winter' has been chosen by Kitty for team 2 and is being sponsored by Colour of Love


For my card today I chose to use a sweet digital image called Little Pumpkin Fairy  I'm probably a little late with an Autumn or Fall card in some parts but its definitely Autumnal here during the day time with lovely sunshine to work in...definitely more Wintery at night though...brr  

But its Thanksgiving in the USA on 28th November so perfect timing for any of my US friends, it can be a virtual card for them !


This is a simple A6 card. The image was resized to suit the card and printed out onto alcohol friendly card stock  before being coloured with my Promarkers.

I then adhered the entire panel to a card blank behind an arched frame cut from green patterned paper that was left over from an earlier project.

Once finished I added some clear sparkle to the little fairies wings and a very simple strip sentiment.  I was going to add a few extra die cut leaves to the design but I decided less is more as its such a pretty image on its own.

I hope that you join in with the challenge as there is a prize from the sponsor for our lucky winner!


I really hope that you have enjoyed my card today and will drop by again to see my next project and don't forget to join in with the challenge over on the Passion for Markers blog


Hasta luego ๐Ÿ‘‹ 


Enjoy the rest of your day !


Card recipe:
Colour of Love digital stamps - 
Little Pumpkin Fairy
Craftwork Cards Paper - Hedgerow collection
Spectrum Noir Sparkle Pen - Clear


Promarkers used :

Skin:            almond, blush, oatmeal, soft peach, dusky rose

Hair:            umber, caramel, sandstone, vanilla

Eyes:            french navy, storm cloud

Wings:          pastel green, tea green

Jumper:        marine, turquoise, sky blue, pastel green
                    burnt orange, orange, pumpkin

Pumpkins:     burnt orange, orange, pumpkin
                    lavender, lemon chiffon
                    khaki, caramel
                    pesto, moss, pear green

Sunflowers:    sunflower, tulip yellow, buttercup
                    saddle brown, deep mocha

Flowers:        french navy, storm cloud
                    burnt orange, pumpkin
                    
Sky:              sky blue, cool aqua


Thanks for stopping by and reading my blog I would love if you could leave me a comment. 


 Wendy x

Friday, 22 November 2024

New Release - Stamps - Happy Christmas with Lili of the Valley (LOTV)

Hello everyone wishing you all a lovely Monday.... I hope you had a great weekend.... 


I'm here today to share my next design team project for Lili of the Valley (LOTV) using the super cute new A5 stamp set is called Happy Christmas , its available to buy in the Etsy shop.

My next card is an A6 card with two die cut out apertures, filled with circles from the Frosty Christmas 8" x 8" paper pad.  I adhered the white panel onto the card base using foam tape and then adhered the two sweet characters into the apertures.

The sentiment is from the general and Christmas greetings set

The finishing touches were then added using glitter on Santa's hat a few drops around the design and a hand drawn stitched border around the circle apertures.

A really sweet clean and simple card.


Hasta luego ๐Ÿ‘‹ 


Enjoy the rest of your day !


Card recipe:
LOTV polymer stamps - Happy Christmas set
LOTV Digital Paper - Frosty Christmas backing papers
LOTV Digital sentiment - general and Christmas greetings set
Cosmic Shimmer - cosmic twinkles - icicle blue


Promarkers used :

Santa:                    burgundy, poppy, lipstick red
                              almond, blush, oatmeal, soft peach, dusky pink
                              gold, sunflower, buttercup
                              warm grey 7, 5, 4
                              chocolate, cinnamon, tan

Reindeer:               salmon pink, pale pink
                             saffron, lemon chiffon, pale cream
                             chocolate, cinnamon, tan
                             warm grey 7, 5, 4


Thanks for stopping by and reading my blog I would love if you could leave me a comment. 


 Wendy x

Rasha Reindeer - Freebie Digital Stamp - with Julia McNeil Designs

Hello everyone Happy Friday! I hope that you've had a great week and the weather has been kind where you are.... I know there has been a lot of snow over in the UK and its been very cold in some areas.  It's still really sunny and warm here during the day so great weather for working outside but colder in the evenings, not quite cold enough for the fire yet!

JJ has started pruning the trees while the work continues on the era ! I've not been great lately with bad tinnitus for several weeks and then I had my flu and COVID jabs this week which have somewhat floored me but apart from a sore arm I'm feeling a lot better today, so fingers crossed I can get outside and start helping with the pruning.

Today I'm back to share a Christmas card for JMC Designs  that I've made using the November freebie digital stamp - this is Rasha Reindeer and he looks like hes having a few problems with his boots in the snow, hope he masters them before Christmas Eve.


Every month Julia McNeill very generously gives away a fabulous digital stamp, which is available to everyone in her Facebook group JMC's Crazy Crafty Hive and also to her followers via Instagram, all you need is to use your email address to register for the stamp. 

Here is the link to register and download this months digital stamp.

If you have missed any of the previous freebies then Julia has kindly put together a list of them all with the links for each so you can download them and don't forget to share your projects in the group as we would love to see them.  Here is the full list of the freebies 

I do hope that you like my card for today and I'd love it if you'd leave me a comment. 


Hasta luego ๐Ÿ‘‹ 


Enjoy the rest of your day !


Card recipe:Please note contains some Affiliate links at no cost to you if you purchasing using these.
LOTV - Frosty Christmas Paper pad
Polkadoodles Digital Sentiment - The Snowy Days - Sentiment bundle 
Distress Inks - peacock feathers
Cosmic Shimmer - Cosmic Twinkles - Icicle Blue
Glossy accents
Sakura Gelly roll - White Pen


Thanks for stopping by and reading my blog I would love if you could leave me a comment. 

Wendy x

Monday, 18 November 2024

New Release - Stamps - Happy Christmas with Lili of the Valley (LOTV)

Hello everyone wishing you all a lovely Monday.... I hope you had a great weekend.... we had a wonderful meal yesterday with friends, trying out a new (to us) restaurant that has been created in an old train carriage.  It was also an opportunity to take the new car out for a little spin too.

What an amazing experience and the food was delicious so we'll definitely be returning I'm sure.


I'm here today to share my next design team project for Lili of the Valley (LOTV) using the super cute new A5 stamp set is called Happy Christmas , its available to buy in their Etsy shop and its so versatile and very easy to colour.  Perfect timing for those last minute Christmas cards.


I decided to create a landscape slimline gingerbread card, stamping and colouring three gingerbread men onto alcohol marker friendly card, colouring them with my promarkers (see below for colours) and then fussy cutting them out by hand.


For the background of the card I used some distress oxide inks to create my dreamy looking  snow landscape, blending over Kraft card and adding snowy dots and highlights here and there with a posca pen.

I die cut the letters from the Krafty Christmas 8" x 8" paper pad - I have been hoarding these papers since I first bought them many many moons ago as they were too scrumptious to use but as they are also now available digitally on the website I thought perfect time to use them, as there will always be more now!

The background panel was adhered to a loopy panel of brown glitter card and the card assembled first adding the letters flat to the card and then the gingerbread  using foam tape for dimension.

I then created my scene, adding the stamped images, some flat to the card and others adhered using foal tape to add dimension to the card.

The finishing touches were then added, glossy accents to the icing on the gingerbread of sparkly iridescent sequins  around the design.


Hasta luego ๐Ÿ‘‹ 


Enjoy the rest of your day !


Card recipe:
LOTV polymer stamps - Happy Christmas set
LOTV Digital Paper - Krafty Christmas backing papers
LHC Large Stitched Alphabet dies
LHC Slimline loops and bubbles die
Lisa Horton Crafts dye based ink - falling snow
Distress Oxide inks - speckled eggpicked raspberry
Craftelier Watercolour Metallic paints - Gold set
Posca pen - white
Sugar & Spice sequins - Candy Floss mix


Promarkers used :

Gingerbread:          praline, caramel, pastel beige
                             salmon pink, pale pink
                             burgundy, poppy, lipstick red


Thanks for stopping by and reading my blog I would love if you could leave me a comment. 


 Wendy x

Sunday, 17 November 2024

New Release - Snowy Days - Theo Penguin - with Polkadoodles

Hello everyone and happy Sunday I hope that your having a good weekend.

I hope you have heard the news already in your VIP email from Polkadoodles but if not then you are going to love this - everyone's favourite penguin Theo is back in a brand new collection of adorable images.....and for a limited time there is a 45% discount.

The brand new Snowy Days collection is perfect for all of those Winter celebrations, definitely not just for Christmas! and is packed with 28 adorable characters, icy scenes, and snowy designs—perfect for Christmas, Winter birthdays, and seasonal celebrations. 

The collection includes colouring pages, pre-coloured clipart, greeting stamps, paper patterns and more for card making, digital scrapbooking, junk journals, and printable craft stickers. 

There's loads of inspiration from the Polkadoodles Design team on the website in the gallery if you are looking for more ideas


Today I'm sharing my first card  perfect for all those Winter celebrations and very easy to create.  It's an adorable and super sparkly A6 landscape (UK size) card.

I've used one of the wonderful wintery scenes from the collection, resizing this for my card before printing out.  Then I have added a peice of double sided sticky sheet over the entire background before covering with super sparkly fine glitter. 

Its an old bit magical technique called the Cracked Ice technique and perfect for those hoards of glitter that I'm sure we all have!  If you want a demonstration of this technique then there is a great YouTube video from 3 years ago by Jamie Rodgers that's worth a watch - here is the link

Once the background scene was complete and all the glitter completely burnished onto the card I adhered this panel to my card blank.  Theo with his ice cream was resized and printed out onto alcohol friendly card before colouring with my Promarkers (see below for colours) and then fussy cutting out by hand.

I added a die cute frame of silver mirri card to the card before adhering Theo at the bottom of the scene with foam tape for dimension.

The winter sentiment was layered onto more silver mirri card and added to the top left corner of the card.

The finishing touches were some white gelly roll pen highlights to Theo.  A super simple and very sparkly Winter card.
 
I hope that you like my card today and you'll enjoy the next cards I share from the new Snowy Days collection by Polkadoodles.


Hasta luego ๐Ÿ‘‹ 


Enjoy the rest of your day !


Card recipe:Please note contains some Affiliate links at no cost to you if you purchasing using these.

Polkadoodles digital stamp - Snowy Days collection - Ice Skating
Polkadoodles digital Sentiment - Snowy Days collection - Greetings bundle
Polkadoodles digital background - Snowy Days collection - Pre-coloured scenes
Sakura Gelly Roll pen - white


Promarkers Used:

Theo:            lavender, ivory, warm grey 1
                    pale pink
                    blue black, cool grey 7,5
                    gold, ivory

Scarf:           burgundy, poppy, lipstick red

Ice cream:    pear green, lime green, lime zest
                    caramel, pastel beige


Thanks for stopping by and reading my blog I would love if you could leave me a comment. 

Wendy x

Friday, 15 November 2024

Christmas is coming ! - Advent Calendar - Calendario de Adviento with Craftelier

Hello everyone happy Friday ! I hope you have had a great week and something nice planned over the weekend.

Were going out for lunch on Sunday with friends, trying out a new restaurant that's had loads of great reviews.  Fingers crossed x

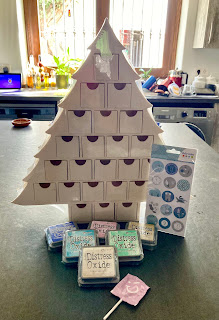
A few weeks back I ordered a wooden advent calendar from Craftelier - we always buy a calendar and I was getting fed up of the little chocolates and generally quite naff pictures so decided we would have our own that we could fill with yummy chocolates - 1 each every day rather then having to share.


The calendar made by Artemio comes pre-assembled and I was really pleased with the quality!  I only had a little sanding around some of the edges to do before I could start to paint it.

I also bought some of the little stickers to add to the drawers once painted.... IT took me a few weeks to find some quite time to get on with it but after a couple of afternoons work its now finished and ready...


I'm really pleased with how it looks - I painted it with some acrylic paints in shades of blues, greens and silver and cream and added a little silver gilding wax around the edges of the drawers and a few sparkly sequins here and there to catch the light.

It's now filled with yummy chocolates too all ready for 1st December!


I hope that you like my project today and you'll come back to see my next project 


Hasta luego ๐Ÿ‘‹ 


Enjoy the rest of your day !


Project recipe:Please note contains some Affiliate links at no cost to you if you purchasing using these.

Artemio Advent Calendar - Calendario de adviento รrbol
acrylic paints -
Pebeo gilding wax - silver


Thanks for stopping by and reading my blog I would love if you could leave me a comment. 

Wendy x


Wednesday, 13 November 2024

Digi Choosday - Wednesdays - Christmas with metallic matts and layers with Polkadoodles

Hello everyone and happy Wednesday I hope that your having a good week so far, I cant believe  we are almost at the middle of November  I hope that  if you make your own Christmas cards like me you are cracking on with it as the month is disappearing fast and you need to remember to get them posted too!


It's that time of the week when we launch a brand new 'Anything Goes' challenge over on the Polkadoodles Digi Choosday Blog so I hope you are going to join in and don't forget the amazing discount off all crafty printable downloads until midnight today!


The theme set for the DT this week is to create a Christmas card with metallic mats and layers.

I have to admit that I don't tend to use much metallic card stock these days - its used to be very trendy years ago but I tend to use it only as accents and for frames now and mostly for Christmas cards, but i think it fits the bill.

I chose to use another cutie from the new Gingerbread Cookie collection.  This card has been made using one of the cute digital stamps, 2 papers , a sentiment and the pre-coloured mittens and earmuffs from the Snow Day Bundle,

I used gold mirri card to create an arched frame, adding vellum behind this and layered the sentiment onto a piece of gold mirri card too.

I used a white Posca pen to add snow to the vellum panel and to add a little sparkle some iridescent sequins have been adhered around the design, along with glossy accents on the gingerbread girls icing.


I hope that you like my card today and you'll enjoy the next cards I share from Polkadoodles.


Hasta luego ๐Ÿ‘‹ 


Enjoy the rest of your day !


Card recipe:Please note contains some Affiliate links at no cost to you if you purchasing using these.

Polkadoodles digital stamp - Gingerbread Cookie - Snow Day Bundle
Polkadoodles digital papers - Gingerbread Cookie - Snow Day Bundle
Polkadoodles digital sentiment - Gingerbread Cookie - Snow Day Bundle
Polkadoodles digital ephemera - Gingerbread Cookie - Snow Day Bundle
Posca pen - white
sequins


Promarkers Used:

Gingerbread:    vanilla, lavender
                       burnt sienna, caramel, sandstone
                       antique pink, bright green, ginger

dress:              burnt orange, orange, ginger
                       antique pink, salmon pink, misty rose
                       gold, sunflower, buttercup

Hat:                 gold, sunflower, buttercup
scarf

Holly:               forest green, bright green, leaf green
                       burgundy, poppy, lipstick red

skates:            ice grey 5, 3


Thanks for stopping by and reading my blog I would love if you could leave me a comment. 

Wendy x

Tuesday, 12 November 2024

A Passion for Markers BlogSpot #765 - Die cuts/punches - Sponsored by All Dressed Up

Hello everyone wishing you all a lovely Tuesday and a wonderful week!

It feels so good to have finished picking our olives - I know we didn't have as many as normal this year to collect, its been a bad year for our area but its now all been pressed at the mill and we have lots of lovely extra virgin olive oil for the next year...just need some lovely homemade crusty bread now hmm! 

Next job is pruning...never ending

Today I'm here to let you know that a new challenge has started over on the Passion for Markers Blog challenge and I hope that you will join in.


This weeks challenge theme of 'Die cuts / punches' has been chosen by Karen for team 2 and is being sponsored by All Dressed Up stamps


For my card today I chose to use a sweet digital image called Potted Plants - I can think of quite a few friends this would be perfect for.


This is a simple A6 card. The image was  resized to suit the card and printed out onto alcohol friendly card stock along with a gardening themed digital sentiment.

The image was coloured with my Promarkers and then added to a card blank behind an arched frame cut from green card.... I wanted the card to look like we are looking through a window.

For the die cuts I used a set from Sizzix called potted plants, cut from coloured card and then ink blended for dimension.


Once finished I added white gelly roll pen highlights and a scattering of sequins to the design.

I hope that you join in with the challenge as there is a prize from the sponsor for our lucky winner!


I really hope that you have enjoyed my card today and will drop by again to see my next project and don't forget to join in with the challenge over on the Passion for Markers blog


Hasta luego ๐Ÿ‘‹ 


Enjoy the rest of your day !


Card recipe:
All Dressed up stamps -
 Potted Plants
Sizzix Thinlits - Potted Plants
Polkadoodles digital sentiment - Gnome feeding bird bundle
Sakura Gelly Roll Pen - white
Distress ink - salty oceanrustic wilderness
Sugar & Spice sequins - mojito mix


Promarkers used :

Skin:    almond, blush, oatmeal, soft peach, dusky rose

Hair:    caramel, sandstone, pastel beige

Dungarees:    pear green, lime green, lime zest

Boot:             royal blue, cobalt blue, powder blue
Flowers

Blouse:          lemon chiffon, pale cream

Leaves:         forest green, bright green

Kitty:            pale pink
                    spice, ginger, bisque

Pots:             cedar brown, terracotta, ginger
     

Thanks for stopping by and reading my blog I would love if you could leave me a comment. 


 Wendy x

Monday, 11 November 2024

New Release - Stamps - Happy Christmas with Lili of the Valley (LOTV)

Hello everyone wishing you all a lovely Monday.... I hope you had a great weekend....The sun is still shining here and its lovely being outside working in the garden but its getting cooler at night and I'm going to get our first fire ready today - just in case!  

It's supposed to get a lot cooler over the next few days and possibly a little rain too so better to be prepared.

I'm so excited today to share my first project as a design team member for Lili of the Valley (LOTV) and such perfect timing as there is a new set of polymer stamps being launched today.  

It's so so cute and perfect for your Christmas makes and very easy to colour too!

This A5 stamps set is called Happy Christmas and I know you will love it.

For my first card I decided to create a circular card using nested dies, creating my card base first... it fits neatly into a 6" x 6" envelope.


I used a small circle of post it note to create my little moon and then used distress inks to create my sky to start with adding snow with a posca pen one the ink was dry.

next I stamped out the images for my little scene onto alcohol marker friendly card, colouring them with my promarkers (see below for colours) before fussy cutting them out by hand.

To create my scene I die cut two extra circle and die cut a wavy stitched edge to create two snow banks, adhering these to my circular card using foam tape to add dimension.


I then created my scene, adding the stamped images, some flat to the card and others adhered using foal tape to add dimension to the card.

The finishing touches were then added, glossy accents to Rudolph's nose and the baubles on the tree and lots of sparkly glitter to the trees and the snow.


Hasta luego ๐Ÿ‘‹ 


Enjoy the rest of your day !


Card recipe:
LOTV polymer stamps - Happy Christmas set 
LOTV digital sentiment - General & Christmas greetings
LHC Nested torn circles dies
Lawn Fawn -Lawn cuts custom craft dies -  stitched simple Wavy Borders
Distress ink - speckled egg, prize ribbon, tumbled glass, peacock feathers, uncharted mariner
Derwent Academy pencils - dark green , light green
Lisa Horton Crafts dye based ink - falling snow
cosmic shimmer - cosmic twinkles - icicle blue
Posca pen - white


Promarkers used :

Little trees:            holly, green, soft green
                            gold, sunflower, buttercup
                            deep mocha, burnt sienna, raw sienna

Rudolph:                salmon pink, pale pink
                             saffron, lemon chiffon, pale cream
                             chocolate, cinnamon, tan
                             warm grey 7, 5, 4
                             burgundy, poppy, lipstick red

Christmas tree:      forest green, bright green, meadow green
                             gold, sunflower, buttercup
                             burgundy, poppy, lipstick red
                             marine, turquoise, pastel green


Thanks for stopping by and reading my blog I would love if you could leave me a comment. 


 Wendy x