Tuesday, 27 June 2023

Digi Choosday - Anything but a card - Rebel Girl Soaking Wet with Polkadoodles

Hello everyone wishing you a very happy Tuesday.  Wishing you all a lovely day today and that you enjoy the week ahead.


It's that time of the week when we launch a brand new 'Anything Goes' challenge over on the Polkadoodles Digi Choosday Blog so I hope you are going to join in and don't forget the amazing discount off all crafty printable downloads until midnight today!


The theme set for the DT this week is to make Anything but a card!  

I decided to use a pre-coloured digital image from one of my favourite recent collections Rebel Girl to create a 3D picture using an old picture frame in my stash.

To start with I painted the blue frame using a cream coloured chalky finish paint.  It needed several coats to cover the blue frame leaving each coat to dry before adding another layer.


Whilst the frame was drying I could prepare my image.

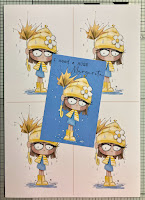
I chose to use one of the pre-coloured sketchy images for my project - shes called Rebel Girl Soaking Wet.  I started by adding the image to my graphics software, resizing the image to fit the aperture of my frame, I added her to a plain blue background and chose one of the sentiments to add to the design too before printing this out.

I also printed the same identical image out 4 more times, as I wanted to create my own decoupaged version of the image to add to the frame.

I use software on my computer called CraftArtist2 but Nikky has recently created a great video tutorial showing how to use a great easy to use app called
CANVA.  If you haven't seen it then here is the link to the tutorial over on YouTube.

I started off by adding the entire image with the blue background and the sentiment to a panel of card to fit the frame. 

I layered up Rebel's hat, boots, umbrella and the flower. 
Next I created the decoupaged layers by fussy cutting some of the elements of the images and layering these onto my base image using adhesive foam squares. 
To finish off the image I have added some stickles to the flower centre, raindrops and the puddle.
 

Once the frame had dried I used a small amount of gilding wax gently rubbed over the frame to give it a distressed look, before adding my completed Rebel decoupaged image to the frame


I have a very special DT discount code that you can use for all your shopping on the Polkadoodles online shop at checkout use WENDYJ-10 and you will get 10% of your entire purchase (not in conjunction with other discount codes!)


I hope that you like my upcycled project today using Rebel Girl by Polkadoodles and you'll enjoy the next cards I share from Polkadoodles.


Hasta luego ๐Ÿ‘‹ 


Enjoy the rest of your day !


Card recipe:
Polkadoodles pre-coloured digital image - Rebel Girl Soaking Wet - Sketchy
Frame
Rust-Oleum Chalky Finish Furniture paint - Clotted Cream
Pebeo Gilding Wax - Empire Gold
Stickles - Diamond


Thanks for stopping by and reading my blog I would love if you could leave me a comment. 

Wendy x

Sunday, 25 June 2023

Majestic Butterflies Rainbow card

Hello everyone, happy Sunday to you all....we've had such a busy weekend, Friday day/night with friends in the nearby town of Lanjaron for the San Juan Water festival and then last night at our favourite restaurant listening to live music...these are definitely some of the things I love about living here but today I'm shattered and its all about recouping energy today before next week!

I hope you are having a lovely weekend too and hopefully enjoying the sun and its not too hot for you....were expecting 35C today so plenty of water !

Today I am here to share another beautiful butterfly card made for the  Jitterbug in June challenge in a Facebook group that I belong to.  This time I've used one of my all time favourite butterfly stamps from Lisa Horton Crafts.

This is the Majestic Butterflies set of stamps - drawn by the extremely talented Ann Ruffles


I wanted to create a rainbow card so started by blending distress inks on a panel of white card to create my rainbow background and then splattered with a little water for detail.  


Once the panel was dry I've used a beautiful floral embossing folder again from Lisa Horton Crafts to add texture, adding a little gilding wax to the raised areas of the card.

I stamped one of the butterflies from the set onto card using Versafine Clair ink which is perfect for any water based colouring mediums before colouring them using my Spectrum Noir sparkle pens.
The butterflies were mounted onto the embossed card panel using small foam square to give lift to the wings.

Finally I have added simple sentiment strip from Lisa Horton Crafts to the card, mounted onto a white strip of card. 


I hope that you like my card today and you'll enjoy the next cards I share.


Hasta luego ๐Ÿ‘‹ 


Enjoy the rest of your day !


Card recipe:
Lisa Horton Crafts stamp - Majestic Butterflies
Versafine Clair - pine cone, twilight
Spectrum Noir Sparkle pens - pink garnet, firefly, tangerine, lichen, watermelon, barn red, cotton candy, orchid, pistachio, sea spray, cornflower blue, soft jade
Distress Inks - festive berries, carved pumpkin, mustard seed, crushed olive, broken china, wilted violet
Wink of Stella - black sparkle
Sakura Gelly Roll Pen - White, Black
Pebeo Gilding Wax - Empire Gold
Lisa Horton Crafts 3D Embossing Folder - Ditsy Florals
Lisa Horton Crafts sentiment strips


Thanks for stopping by and reading my blog I would love if you could leave me a comment. 

Wendy x

Thursday, 22 June 2023

Good Things Come in Little Packages - Lily Bug Ladybird with Polkadoodles

Hello everyone - Happy Thursday to you ....I hope you are all doing ok and are enjoying the week.

Today I'm here to share a sweet card made using the recent Lily Bug Ladybird collection.

The collection includes black line art digital stamps, pre-coloured digital stamps, papers, sentiments toppers, embellishments and  so absolutely something for everyone's style of crafting and for loads of different occasions too!

If you are looking for more inspiration then don't forget to have a look at the Ideas Gallery for this new collection 


For my card today I decided to make a relatively clean and simple 5" x 7"  card using a couple of the digital ladybirds in the collection combined with a paper and one of the sentiments.

I love that the collection includes extra elements that can be used on their own or with the Lily bug characters.

Just a little layering on red card stock, simple stencilling with distress ink and some card candi to finish off today's simple but I think striking card.

I hope that you like my card today and you'll enjoy the next cards I share from this sweet new Lily Bug Ladybird collection


Hasta luego ๐Ÿ‘‹ 


Enjoy the rest of your day !


Card recipe: (Contains affiliate links )

Polkadoodles digital stamp - Lily Ladybug -  digi stamps
Polkadoodles digital paper - Lily Ladybug  papers collection 2
Polkadoodles digital sentiment - Lily Ladybug messages
Polkadoodles Stencil - Funky Vortex Grid
Distress ink - candied apple


Promarkers used :


Lady bugs:    burgundy, poppy, lipstick red
                    cool grey, 6,5,4


Thanks for stopping by and reading my blog I would love if you could leave me a comment. 

Wendy x

Wednesday, 21 June 2023

Let's Eat Cake from Celebration Hamsters by Mama Elephant

Happy Wednesday everyone…… wishing you all a lovely day today.

I was at my Spanish ladies group last night and I cant wait to show you what I am working on - I'm loving learning another new skill and this is definitely something I will do again.

We had more wonderful rain and amazing thunder and lightning last night which is fantastic for the garden but not as good for sleeping and it's definitely very hot and humid today. 

JJ has been busy in the garden re-routing some of the watering system and building new steps - he never stops !

Today I am sharing a sweet shaker card that I've made using a set of clear stamps by Mama Elephant called Celebration Hamsters.

The card design has been inspired by a card sketch challenge for the month of June in a Facebook group I belong to. 

I stamped the sweet little hamsters onto alcohol marker friendly cardstock using memento ink and then used my Promarkers to colour them in (see below for colours used) before fussy cutting out with my scissors. A little fiddly but that's part of the challenge that was set.

I've used my new stitched dies to create the shaker panel, adding a piece of pink striped paper to the card base to begin with.

I used 2 other dies to create the shaker window, the larger dies to cut the outside edge and then one of the smaller dies in the set to cut 4 windows.  

Its really easy to create this look without having to use an expensive die plate - just a little careful measuring and preparation for the shaker window.   Each window has ben filled with a different colour of sequin / confetti.

I hope that you like my card today.

Hasta luego ๐Ÿ‘‹ 

Enjoy the rest of your day ☀️


Card recipe: (Contains some Affiliate links)

Mama Elephant Stamps - Celebration Hamsters
Promarkers (see below for colours)
Designer Series Paper - from a craft magazine
Stickles - diamond
Clay confetti
Craftelier sequins


Promarkers used:

Hamster:        spice, henna, chestnut
                     satin, almond
                     pastel pink  

Presents:       lemon, tulip yellow
                     prussian, violet
                     cyan, sky blue

Hats:             prussian, violet.
                     cerise, pink carnation
                    lemon, tulip yellow

Sparklers:     lemon, tulip yellow


Thanks for stopping by and reading my blog I would love if you could leave me a comment. 

 Wendy x

Tuesday, 20 June 2023

A Passion for Markers BlogSpot Challenge #695 - Use dies and/or Punches

Hello and a happy Tuesday to you all !


I'm here today to let you know that a new challenge has started over on the Passion for Markers Blog.


This weeks challenge is being sponsored by The Colour of Love

There are loads of lovely digital images and colouring pages by the very talented Heather Valentin in the on line store so I would highly recommend taking a look as I'm sure you will find loads that you love.


The theme this week chosen by Linda for Team 2 is use Dies and/or punches.

I chose to use a sweet image called Lil Cassi Boo's Butterflies for my card, coloured with my Promarkers.

Don't forget there will be a prize for the Winner of the challenge - there are more details over on the Passion for Markers blog.


I coloured the sweet image with my promarkers, used a stitched die to cut out the panel to fit an A6 card blank and then fussy cut the top portion of the image. Next I have created a cloudy background using a stitched die to cut a panel the exact size of the coloured image.

Next I have used foam tape to adhere the image over the cloudy background.

Finally I have used a butterfly die to cut out 3 small butterflies, adding these around the design with small gems for detail.  I added lots of clear sparkle to the image and stickles to the flowers in the grass.

The sentiment strip at the bottom of the card is from Lisa Horton Crafts, mounted on card for height.

I really hope that you have enjoyed my card today and will drop by again to see my next project and don't forget to join in with the challenge over on the Passion for Markers blog


Hasta luego ๐Ÿ‘‹ 


Enjoy the rest of your day !


Card recipe:
Colour of Love digital stamp - Lil Cassie Boo's Butterflies 
Card Making Magic A6 Nesting Die Set
Distress Ink - Story Sky
Lawn Fawn stencil - Cloudy
Tonic Studios Butterfly die
Stickles - Stardust
Lisa Horton Crafts Sentiment Strip
Spectrum Noir Sparkle pen - clear, tangerine
orange gems
Sakura Gelly Roll pens - black, white


Promarkers used :

Skin:        almond, blush, oatmeal, soft peach, dusky rose

Hair:        vanilla, caramel, sandstone, umber

Eyes:        midnight blue, true blue, sky blue

Lips:         antique pink, pale pink

Dress:       bisque, apricot, ginger
shoes

Tights:      sunflower, tulip, buttercup

Flowers:    sunflower, buttercup
                antique pink, pale pink
                bisque, apricot, ginger
    
          
Thanks for stopping by and reading my blog I would love if you could leave me a comment. 


 Wendy x

Monday, 19 June 2023

Sending a hug in an envelope with Last Minute Manda

Hello everyone wishing you all a happy Monday - I hope that you all had a great weekend - its been very hot here so really felt like summer - great for drying the washing.  

Our poorly little kitty Foxy went out into the garden on Saturday morning for the first time after 3 weeks inside and he's loved exploring - he's walking a lot better now although he knows he cant do trees and other jumping  just yet - fingers crossed he'll get his strength back as he heals and builds up his muscles again.

I'm back to my normal day to post for Last Minute Manda 

I have made today's card using the very sweet set of digital stamps called Get Well Wishes 

It's a simple A6 (UK size) card.

I have used a striped embossed folder hearts stencil for my background today. I started by blending 3 distress inks over a card stock panel to create an ombre effect and then used  the embossed folder to add the  striped texture.

Next I have used the darkest of the inks to carefully swipe over the raised embossed areas of the card to highlight the texture.

The final step for my background was to use a white Posca pen and a ruler and to add white stripes to the panel.

The sweet nurse mouse was coloured with my promarkers and I have then fussy cut him out, adding to my card with low profile foam tape.

I chose a sentiment strip from Lisa Horton crafts and sat the mouse on top of the sentiment towards the bottom of the card 

To keep the card simple just a few white and iridescent sequins scattered around the design to finish it off.

Don't forget if you head over to the new Last Minute Manda store use my special discount code Wendy25 to get 25% off your shopping.

I really hope that you like my card today and it would be lovely if you you leave me a comment and let me know what you think.

Hasta luego ๐Ÿ‘‹ 


Enjoy the rest of your day !


Card recipe:
Last Minute Manda digital stamp - Get Well Wishes
Darice Embossing Folder - candy stripes
Distress Ink - tattered rose. worn lipstick, candied apple
Posca Paint pen - white
Lisa Horton Crafts sentiment strip
Sakura Gelly Roll pen - black, white
Sugar & Spice sequins - enchanted
glossy accents


Promarkers used :

Mouse:         warm grey 4,3,2,1
                   pale pink, cocktail pink

Hat:            ice grey 3, 1, 00

Plaster:        bisque, apricot, ginger


Thanks for stopping by and reading my blog I would love if you could leave me a comment. 


 Wendy x

Sunday, 18 June 2023

Sending Paper Hugs - Woodware Craft Collection - Butterfly Dream

Hello everyone, happy Sunday to you all.

I hope you are having a lovely weekend and hopefully the sun is shining where you are today.

I am here on my blog to share a butterfly card that I've made for a challenge in a Facebook group that I belong to - it's all about Jitterbug June.  

Its ages since I've made a card just for me, to play and not for a specific company or a designer and its been lovely just to play with what I have in my stash.

I love playing with my inks and pens and creating and haven't made this type of card for ages.


I'm sure you all know how much I love to upcycle, so my card today uses one of my inky mop up kitchen roll sheets for my background and the butterflies. I have a sheet of kitchen roll on my desk for a few weeks and use it to wipe up any residual inks, then when it looks pretty I use it to create a card. No waste and it's free, unique and beautiful !

I adhered a piece of my inky mop up kitchen roll to some thin card, I use a basic glue stick to do this. Then when this was completely dry I used one of my favourite stamps from Woodware and Versafine onyx black ink to stamp the design onto the kitchen roll card.

I stamped the image again onto another peice of kitchen roll card - this will be for the extra butterflies.

I added a little more colour and sparkle to the butterflies using Spectrum Noir Sparkle pens and a waterproof black pen for the outline before fussy cutting out

When you have fussy cut out the butterflies, if there are any pale card edges you can use a black marker to carefully cover these if you like. - I use a water based pen rather than an alcohol marker.

I mounted the butterflies onto the card base using small foam square to give lift to the wings.

Finally I have added stickles to the butterflies abdomens and onto the background panel - after all you can never have enough sparkle.

The sentiment strip is from Lisa Horton Crafts - adhered onto several layers of card for extra dimension.

I hope that you like my card today and you'll enjoy the next cards I share.


Hasta luego ๐Ÿ‘‹ 


Enjoy the rest of your day !


Card recipe:
Woodware Craft Collection stamp - Butterfly Dream
Spectrum Noir Sparkle pens - pink garnet, garden green, firefly, tangerine, lichen, watermelon
Stickles - black diamond
Lisa Horton Crafts sentiment strips

These are the challenges I am entering

dis digi designs challenge Weekly Beverages (4) (1 of 3) 
lil patch of crafty friends Weekly (45) (1 of 3)
Creative Fingers challenge (95) (3 of 3)
Jan's Digi Stamps Challenge - Anything Goes - (39) ( 5 of 5)
Moving Along With The Times  Man or a boy (70) (3 of 5)
Pearly Sparkles Challenge Man or boy (49)
A Perfect Time To Craft Open Challenge - Anything Goes unlimited (244)
Crafts Galore Encore Challenge - Anything Goes (98) (3 of 3)
Classic Design Challenge - Anything Goes (208) unlimited
Avenue 613 Anything Goes (175) (8 of 8)
Sheep ski designs Anything Goes man or boy (39) (3 of 3)
Mirtillamente Challenge -   (7) (5 of 5)
LeAnn's World 101 Challenge (on hold) unlimited
colorful options peach () unlimited
through the purple haze Buttons / flowers () ( of 3)
Critter Crazy Challenge (103) (5 of 5)
We love stamping CAS or AG (39) (2 of 3)
Crafty Catz Weekly Challenge AG (42) (3 of 3)
Dragonfly Dreams fancy folds (11) (2 of 3)
Crafty Calendar Challenge Summertime (104) (3 of 3)

Thanks for stopping by and reading my blog I would love if you could leave me a comment. 

Wendy x

Saturday, 17 June 2023

Rebel - Reach for the Stars with Polkadoodles

Hello and happy Saturday everyone...I hope that you are all enjoying the weekend.

I'm back today on my blog to share another of my cards using the fabulous Rebel Girl Collection by Polkadoodles , definitely one of my favourites collections, she is so sassy and I love to colour her with attitude.


Rebel Girl is a huge collection of digital stamps, topper sheets, planner elements, papers and sentiments and I think you will love them as there is definitely something for everyone especially if you like a little sassy attitude. 

For todays card I have used Rebel Reach for the Stars  to make a larger 5" x 7" card

With this new collection, Rebel comes as a clean lines or sketchy lines digital stamp and is also available as a pre-coloured digital too if you don't want to colour.

I have added the digital image of Rebel to a funky background paper that coordinated with my colour palette and one of the fabulous sentiments before printing out onto alcohol marker friendly cardstock.  Rebel was then coloured with my Promarkers (see below for colours) to create a flat panel, don't you just love her hair.   

I wanted to add an offset panel of star embossed card to my card but I don't have an embossing folder so decided to create a faux embossed panel by die cutting lots of different stars and adhering these to the piece of purple cardstock. I really like the effect this gives.

Just a touch of stickles was added to the stars in the image, some glossy accents to the flower on her hat and an additional sentiment strip that comes in the collection. 

There are some beautiful new papers and fabulous sassy sentiments in the collection - I'm sure you will find something perfect!

I hope that you like my card today and you'll enjoy the next cards I share from the Rebel - Girl with Attitude collection by Polkadoodles.


Hasta luego ๐Ÿ‘‹ 


Enjoy the rest of your day !


Card recipe:
Polkadoodles digital stamp - Rebel Reach for the Stars
Polkadoodles digital paper - 
Polkadoodles digital sentiment sentiment bundle
Stitched star dies
Sakura Gelly Roll pen - white, black
Stickles - Diamond
Glossy accents


Promarkers used :

Skin:                 ivory, almond, satin, dusky pink, sunkissed pink
                        pale pink, antique pink

Eyes:                ivory, pale pink

Hair:                 amethyst, lilac, lavender

Hat:                 soft green, mint green, pastel green

Boots:              amethyst, lilac, lavender
                          
Dress:              salmon pink, pastel pink, pale pink

Flower:            salmon pink, pastel pink, pale pink
                       gold, pastel yellow, buttercup


These are the challenges I am entering

dis digi designs challenge Weekly Beverages (4) (1 of 3) 
lil patch of crafty friends Weekly (45) (1 of 3)
Creative Fingers challenge (95) (3 of 3)
Jan's Digi Stamps Challenge - Anything Goes - (39) ( 5 of 5)
Moving Along With The Times  Man or a boy (70) (3 of 5)
Pearly Sparkles Challenge Man or boy (49)
A Perfect Time To Craft Open Challenge - Anything Goes unlimited (244)
Crafts Galore Encore Challenge - Anything Goes (98) (3 of 3)
Classic Design Challenge - Anything Goes (208) unlimited
Avenue 613 Anything Goes (175) (8 of 8)
Sheep ski designs Anything Goes man or boy (39) (3 of 3)
Mirtillamente Challenge -   (7) (5 of 5)
LeAnn's World 101 Challenge (on hold) unlimited
colorful options peach () unlimited
through the purple haze Buttons / flowers () ( of 3)
Critter Crazy Challenge (103) (5 of 5)
We love stamping CAS or AG (39) (2 of 3)
Crafty Catz Weekly Challenge AG (42) (3 of 3)
Dragonfly Dreams fancy folds (11) (2 of 3)
Crafty Calendar Challenge Summertime (66) (2 of 3)

Thanks for stopping by and reading my blog I would love if you could leave me a comment. 

Wendy x
 

Friday, 16 June 2023

Wishing you a Happy Birthday with Pink Gem Designs

Hello everyone wishing you all a happy Friday... I hope that you have had a great week.

Today I am sharing a sweet Flip card that I have made for for Pink Gem Designs using the very cute Bunnies digital stamp set   


It's a fabulous set of digital stamps and includes 7 black Line art images and 2 sentiments for you to use.


I decided for todays card to create an easy kinetic
 6" x 6" flip card and I've incorporated a square flip panel although you can make flip cards with different shapes and without dies too if you don't have any.
The card folds flat for posting but when you open it the heart panel flips over to reveal a hidden message.

For my flip panel card I have used a 6" x 6" card blank and have used a pencil to make a feint pencil line at 3" on one of the card panels.

On the panel with the pencil line position the die, a square in my case over this, lining up the die centrally over the pencil line.

The card can then be passed through the die cutting machine to partially cut the chosen shape.  I only want the square shape cut on the left part of my front panel so you can do this easily by lining up the top cutting plate with the part that you want to be cut.


There are loads of excellent video tutorials showing how to do this and how to create different sizes of cards.  This is one I like by Sam Calcott of Mixed Up Craft that is great for explaining how to recreate these simple cards.


I chose two of the sweet bunnies from the set, one with her eyes closed and the next with them open and coloured them using my promarkers before fussy cutting out.

Once the card base is ready the fun part is decorating it.  I chose some pretty papers from my stash that I've had for years and a happy birthday sentiment strip.

I added a little gold sparkle to the flowers and some card candi covered with glossy accents to add extra detail.

I really hope that you like my card today and it would be lovely if you you leave me a comment and let me know what you think.

Hasta luego ๐Ÿ‘‹ 


Enjoy the rest of your day !


Card recipe:
Pink Gem Designs digital stamp - Hoppy Birthday Bunnies
Kaiser craft Paper collection - Confetti
Lisa Horton Crafts - sentiment strips
Craftwork Cards candy
Stickles - diamond
Glossy accents


Promarkers used :

Bunny:               warm grey 4, 3, 2, 1
                         cocktail pink, pale pink

Flower pot:         

Flowers:            

These are the challenges I am entering

dis digi designs challenge Weekly Beverages (4) (1 of 3) Milk for the kitties
lil patch of crafty friends Weekly (45) (1 of 3)
Creative Fingers challenge (95) (3 of 3)
Jan's Digi Stamps Challenge - Anything Goes - (39) ( 5 of 5)
Moving Along With The Times  Man or a boy (70) (3 of 5)
Pearly Sparkles Challenge Man or boy (49)
A Perfect Time To Craft Open Challenge - Anything Goes unlimited (242)
Crafts Galore Encore Challenge - Anything Goes (98) (3 of 3)
Classic Design Challenge - Anything Goes (207) unlimited
Avenue 613 Anything Goes (174) (7 of 8)
Sheep ski designs Anything Goes man or boy (39) (3 of 3)
Mirtillamente Challenge -   (7) (5 of 5)
LeAnn's World 101 Challenge (on hold) unlimited
colorful options peach () unlimited
through the purple haze Buttons / flowers () ( of 3)
Critter Crazy Challenge (103) (5 of 5)
We love stamping CAS or AG (39) (2 of 3)
Crafty Catz Weekly Challenge AG (42) (3 of 3)
Dragonfly Dreams fancy folds (11) (2 of 3)
Crafty Calendar Challenge Summertime (66) (2 of 3)


Thanks for stopping by and reading my blog I would love if you could leave me a comment. 

Wendy x