Hello everyone……wishing you all a lovely Tuesday with lots of lovely sunshine....
The Summer seems to be flying by so fast and it wont be long before the start of the new term at School! so with that in mind I'm back today with my Polkadoodles Design Team project for the Digi Choosday Tuesday Challenge
💖Every Tuesday is DIGI CHOOSDAY! over at Polkadoodles which means not only a brand new crafty 'Anything goes' challenge but also that you get an amazing discount off all crafty printable downloads until midnight today!
To take advantage of the offer head over to the blog to find the discount offer for today and also to enter the challenge!
DON'T MISS IT!
💖
This week the DT was asked to make a 'Back to School' themed card so I decided to use the Lou the Teacher digital stamp bundle.
I decided to make a larger 5" x 7" card for today's project so started off by resizing the black and white digital stamp in my graphics software before printing her out. I coloured her in using my Promarkers (see below for the colours I've used)
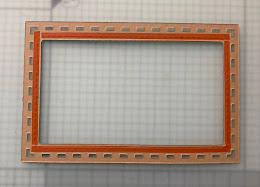
I've then added some extra strong tape to the reverse of this frame and cut a piece of acetate to fit this frame.
To make the frame look like woodgrain I've used my distress inks to swipe across the frame - I used Tea Dye and Ground Espresso inks to get the effect and colour that I wanted.
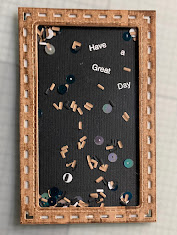
For the back panel of my shaker I die cut a rectangle of black cardstock using the same panel die as before but this time I didn't cut out the centre piece and I have stamped the words from my new Blooming Blossoms stamps in white embossing powder before heat setting.
Top Tip 💡: don't forget to wipe anti static powder over the card before stamping in embossing ink as this will stop any unwanted embossing powder from sticking to your card.
I like to build my shaker panels from the bottom up, so once the embossing had cooled I wiped off any excess antistatic powder from the card using a dry cloth and then added foam tape around the edge of the panel to form a well for my sprinkles.
Top Tip 💡: remove the protective backing from the foam before adding the sprinkles onto the panel to prevent any from sticking to the foam tape. If you look closely I've used the off cuts from the panels that I die cut and added some sequins to my shaker well. I also like to stick a few of the shaker elements to the back of the panel so there will always be some visible when the card is stood upright !
Next, I carefully lined up the top frame with the acetate window to cover my panel and encase the shaker elements.
Top Tip 💡: don't forget to cut out a panel from the card that will be hidden below the designer paper, there's no point wasting it after all and it will be completely hidden once the card is finished !
The simple sentiment strip is from the Winnie Daisy Fairy greeting bundle matted onto a strip of black card.
Any finally, I adhered Lou to my card, adding some star sequins around the card for a little extra sparkle and used glossy accents to fill the glass in her glasses.
💖
I hope you liked my card for today and don't forget to join in with the 'Anything goes' challenge over at the DIGI CHOOSDAY BLOG!
Hasta luego 👋
Enjoy the rest of your day !
Card recipe:
Polkadoodles digital stamp - Lou the Teacher
Polkadoodles digital stamp - Lou the Teacher
Polkadoodles Sentiment - Winnie Daisy Fairy greetings bundle
Blooming Blossoms Stamps - small sentiment in shaker panel
LHC Mini Slimline Die - Decreasing Stripes
Promarkers - see below
Distress Inks - Tea Dye, Ground espresso
Star confetti & sequins
Sakura Gelly Roll pen - white, black
Glossy accents
.
.
.
💖
Promarkers used:
Skin: Ivory, Almond, Satin, Dusky Pink, Sun kissed Pink
Hair:
Hangar: Cool Grey 1,3
Shoes:
Dress: Pumpkin, Orange, Sunflower, Yellow
Blush: Pale Pink, Dusky Rose
Hair: Pastel Yellow, Buttercup, Sandstone, Caramel
💖
I am entering this card in the following challenges:
Wendy x


.jpg)


Sweet card and even sweeter card design. Thanks for sharing your project and this tutorial with all of us at The Jan's Digi Stamps Challenge!
ReplyDeleteThank you so much I'm really glad that you like it xx
DeleteFabulous shaker card and beautifully coloured image.Thank you for joining us at Pearly Sparkles
ReplyDeleteCarol DT x
thanks so much I'm glad you like it
DeleteDarling shaker for new teacher, Wendy! Thank you for sharing your beautifully colored creation with us at Jan's Digi Blog Challenge. Hope you will join us each month for a NEW challenge. Good Luck and Happy Crafting!
ReplyDeleteHugs,
Jan
(Owner & Illustrator of Jan's Digi Stamp Shop)
Thanks so much and yes I will be there again x
DeleteSo cute love it -Thank you for sharing your creation with us over at 613 Avenue Create and we would love to see you in our future challenges
ReplyDeleteElaine DT
AAA Birthday DT
Mix it UP DT
613 Avenue Create DT
Love to Craft DT
Love to Scrap DT
Peace on Earth DT
Merry Little Christmas DT
Great shaker card! You coloring is spot on! Thanks for dropping this into our mailbox at 613 Avenue Create!
ReplyDeleteHugz,
Chana Malkah, Owner
Thanks I’m glad you like it xx
DeleteCongratulations! You were selected as a TOP ROCKER for the week of August 7th – 14th, 2022 at
ReplyDelete613 Avenue Create ! Please stop by our blog and grab your badge
The Design Team
I love your card. Thank you for sharing it with us over here at LeAn's World 101 and best of luck with your entry.
ReplyDeleteIlonka DT Member
Thanks so much Llonka xx
DeleteWow love this card and also your detailed tutorial of how you do your shaker cards. Thank you for sharing with us over here at Sheepski Designs and best of luck with your entry.
ReplyDeleteGail DT for https://sheepski-designs-challenges.blogspot.com/
Thanks so much I’m so happy you liked it xx
DeleteFabulous colouring and a super card design. Thank you for sharing your project with us at the Crafts Galore Encore “Anything Goes” August Challenge. Good Luck and hope to see you again soon!
ReplyDeleteCarole x DT Craftilicious Creations
Thanks so much Carole for your lovely comment x
DeleteOh how wonderful thank you so much xxx
ReplyDeleteThis comment has been removed by the author.
ReplyDeleteThanks for joining us at Mirtillamente-Challenge Blog!
ReplyDelete\\Eve*mlj °owner & designer°° mirtillamente.com