Wednesday, 30 October 2024

Digi Choosday - Wednesdays - Gift Wrapping with Polkadoodles

Hello everyone and happy Wednesday I hope that your having a good week so far, I cant believe its the end of October already - my goodness time flies!


It's that time of the week when we launch a brand new 'Anything Goes' challenge over on the Polkadoodles Digi Choosday Blog so I hope you are going to join in and don't forget the amazing discount off all crafty printable downloads until midnight today!


The theme set for the DT this week is to create some gift wrapping so i decided to make a small gift bag for Christmas.  

I don't often make gift bags but this is such a simple one to create - even I could do it. For the base of the bag I used some red cardstock (about 160 GSM).  

These are the measurements and then score lines I made  started with 2 pieces of red card measuring

  • 2 pieces of 8 1/4 x 11 red card

  • Score along the 8 1/4 side at 4 1/2 & 7 3/4

  • Score along the 11 side at 7 3/4

Fold and burnish the score lines and then you will need to cut along the bottom edge on both pieces for the corners of the bag before assembling it.  Sam Calcott has a great tutorial  that explains how the gift bag is made.  Here is the link  to the instructions.  I decided not to create the outer wrapper in the tutorial opting to decorate the bag simply and then use my eyelet tool to add eyelets to the top of bag to allow it to be closed with some pretty red ribbon

To decorate the bag I cut two pieces of patterned paper from the new Gingerbread Cookie collection from the Gingerbread Cookie Snow Day bundle.  From the red cardstock I have die cut a scalloped panel and then adhered one of the pre-coloured toppers from the Jingle Bells bundle to decorate the front of the bag.

The gift tag I have added is from the Sweet Gingerbread bundle, with a piece of simple twine through the hole at the top. 

To add a little sparkle I have added glitter glue to the Christmas tree baubles.


I hope that you like my card today and you'll enjoy the next cards I share from Polkadoodles.


Hasta luego ๐Ÿ‘‹ 


Enjoy the rest of your day !


Card recipe:Please note contains some Affiliate links at no cost to you if you purchasing using these.


Polkadoodles digital papers - Gingerbread Cookie - Snow Day Bundle
Polkadoodles digital gift tag- Gingerbread Cookie - Sweet Gingerbread Bundle
Polkadoodles digital topper - Gingerbread Cookie - Jingle Bells Bundle
Cosmic Shimmer Cosmic Twinkles - Icicle Blue


Promarkers Used:


Thanks for stopping by and reading my blog I would love if you could leave me a comment. 

Wendy x

Tuesday, 29 October 2024

A Passion for Markers BlogSpot #763 - Birthdays - Sponsored by Beccy's Place

Hello everyone wishing you all a lovely day !

Today I'm here to let you know that a new challenge has started over on the Passion for Markers Blog challenge and I hope that you will join in.


This weeks challenge theme of 'Birthdays' has been chosen by Elaine for team 2 and is being sponsored by Beccy's Place


For my card today I chose to use a fun digital image of a goat from the Goat club set collection of stamps - I thought this was the perfect image for a cheeky birthday card.


This is a simple A6 card. The image was  resized to suit the card and printed out along with one of the digital sentiments from the collection onto alcohol friendly card stock. 

coloured the goat with my Promarkers, giving him a shaggy coat.  The image was then layered onto a layer of fabulous teal mirrored card that I've been hoarding for years. To tie in with the challenge theme of birthdays I've used a stencil to add green and blue confetti into the background.

Once finished I used pencils, a black Fineliner and a white gelly roll pen to add some highlights and detail to the design.

I hope that you join in with the challenge as there is a prize from the sponsor for our lucky winner!


I really hope that you have enjoyed my card today and will drop by again to see my next project and don't forget to join in with the challenge over on the Passion for Markers blog


Hasta luego ๐Ÿ‘‹ 


Enjoy the rest of your day !


Card recipe:
Beccy's Place Digital stamp -
 goat club collection
Sakura Gelly Roll Pen - white
Distress ink - salty oceantwisted citron


Promarkers used :

Ears:            antique pink, coral, muted pink

Fur:              warm grey 7, 5, 4
                    

Horns:          praline, pastel beige, ivory
Hooves
     

Thanks for stopping by and reading my blog I would love if you could leave me a comment. 


 Wendy x

Sunday, 27 October 2024

New Release - Gingerbread Cookie - Hot Chocolate Cocoa with Polkadoodles

Hello everyone and happy Sunday I hope that your having a good weekend...we've had loads of wonderful rain the past couple of days and we can even see the first snow of the year on the mountains behind the house.

In my efforts to get my Christmas cards ready to be sent out this year I've used the fabulous new Gingerbread Cookie collection for my project today... if you haven't seen it yet I'm certain you will love it.   

There are 10 different kits to choose from as well as 3D templates and loads of cooking themed SVGs if you use an electronic cutting machine. As well as the small kits which are excellent value you can also buy individual digital stamps.... I think the hardest part will be to choose what you need. 

There's loads of inspiration from the Polkadoodles Design team on the website in the gallery if you are looking for some ideas


Today I'm sharing a very sweet and extremely easy to create split panel or split front  A6 (UK size) card.

To create this simple card I've started off by creating a tent fold white card base and then on the front panel cut across the card at 2 1/2", for the bottom section of the card I have cut a piece of the waste card removed from the card base that measures 1 1/2"

I have used the Sweet Gingerbread kit  to create this card choosing 2 of the papers, the very cute digital stamp and I have added one of the sentiments into the inside of the card with a fun surprise pop up mechanism.  

I resized the main image, printing out onto alcohol marker friendly card before colouring with my promarkers and then fussy cutting out.

The digital stamp image was adhered to the card, spanning the missing section of the card to create this fun design.

The finishing touches were some glossy accents, white gelly roll pen highlights and a scattering of teal confetti around the design.
 
I hope that you like my card today and you'll enjoy the next cards I share from the new Gingerbread Cookie collection by Polkadoodles.


Hasta luego ๐Ÿ‘‹ 


Enjoy the rest of your day !


Card recipe:Please note contains some Affiliate links at no cost to you if you purchasing using these.

Polkadoodles digital stamp - Gingerbread Cookie - Sweet Gingerbread Kit
Polkadoodles digital Sentiment -  Gingerbread Cookie - Sweet Gingerbread Kit
Polkadoodles digital paper - Gingerbread Cookie - Sweet Gingerbread Kit
spellbinder confetti - lagoon
Sakura Gelly Roll pen - white


Promarkers Used:

Gingerbread:    vanilla, lavender
                       burnt sienna, caramel, sandstone
                       antique pink, salmon pink, misty rose

Mug:                spice, ginger, soft peach
                        burgundy, poppy, lipstick red
                        forest green, bright green, leaf green

Holly:               forest green, bright green, leaf green     
                        burgundy, poppy, lipstick red


Candy Cane:      antique pink, salmon pink, misty rose
                        spice, ginger, soft peach

chocolates:      burgundy, poppy, lipstick red
                       deep mocha, burnt sienna, cocoa
                        pastel beige, sandstone, caramel  
                        forest green, bright green, leaf green


Thanks for stopping by and reading my blog I would love if you could leave me a comment. 

Wendy x

Friday, 25 October 2024

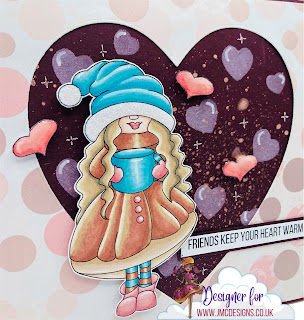
Friends keep your heart warm - New Release - Hug in a Mug with Julia McNeil Designs

Hello everyone Happy Friday! The work on the renovation of the era or stone threshing circle at the front of the house is going well, its so dusty and been really noisy with the removal of the original stone work this week, countless skips to take away what we cant reuse, the breaker going to break up the walls around the circle and the huge digger breaking up the stone and scooping!  Oh my goodness no wonder my head is suffering so to keep calm I've tried a little crafting although its hard to find somewhere quiet and dust free.

Today I'm back to share my final project for the JMC Designs  our Craftober challenge.  

All this month over at JMC Designs we've been celebrating with a fabulous list of daily prompts to help inspire you to get creating.

There's still plenty of time to join in and you could win a prize from Julia...the winner will receive an A6 Stamp of their choice and a 30% discount off their next order!  

All you need to do is create a project following the prompt for the day, using JMC Designs products and upload this to the Facebook group album.  JMC's Crazy Crafty Hive  If you don't have any products yet there are plenty of Freebies in the group once you have joined for you to use.

Here is the list of daily prompts for you to follow and the link to the fabulous friendly.


Today the prompt is to create a 'Add Sparkle' - who can resist sparkle - i definitely cant .
I've used the sweet little girl stamp from the Iced Coffee set of stamps and the little heart stamp, stamped out three times and then coloured with my Promarkers, before fussy cutting out.

To create my card background I started by stenciling a selection of hearts using the Stencil Suite collection, using distress oxide ink onto a chocolate brown card. Next I spritzed the panel with a pink distress spritz, adding white Posca pen highlights to the hearts.  I used my gelly roll pen to make some of the little splatter dots into sparkly stars. Once dry the panel was adhered to a 6" x 6" card blank.


I chose one of the pretty papers from the and used a simple heart die to cut out a heart from the centre of the paper - saving for another card !

I then assembled the card, adhering the patterned paper over the chocolate card panel and used foam tape to adhere the little girl and the 3 hearts.  

The sentiment also from the stamp set was stamped onto white card with a simple mat of the chocolate card.


To finish off the card and add yet more sparkle I added cosmic shimmer glitter gel to the little girls hat and glossy accents to the hearts.


I do hope that you like my card for today and I'd love it if you'd leave me a comment. 


Hasta luego ๐Ÿ‘‹ 


Enjoy the rest of your day !


Card recipe:Please note contains some Affiliate links at no cost to you if you purchasing using these.

JMC Designs - Hug in a Mug Collection - Iced Coffee Stamp set
JMC Designs - Stencil Suite Collection 
Distress  Oxide - Kitsch flamingo
Distress Spritz - work lipstick
Cosmic Shimmer - Cosmic Twinkles - Icicle blue
Glossy Accents
Posca pen - white
Sakura Gelly roll - White Pen


Promarkers used:

Skin:    ivory, blush, soft peach, dusky rose

Hair:    vanilla, caramel, sandstone, umber

Lips:        dusky rose, antique pink

hearts:    antique pink, dusky rose, baby pink
boots    
gloves

Hat:        marine, turquoise, sky blue, pastel green

Skirt:        caramel, tan, champagne

Coat:        walnut, henna, caramel, vanilla


Thanks for stopping by and reading my blog I would love if you could leave me a comment. 


Wendy x

Tuesday, 22 October 2024

Hug in a mug - New Release - Hug in a Mug with Julia McNeil Designs

Hello everyone Happy Tuesday! Work has finally started on the renovation of the era or stone threshing circle at the front of the house...needless to say its going to take quite a few weeks and the noise and dust won't be pleasant but it needed doing...hopefully it will be the last big job at the farmhouse since we bought it and moved over 7 years ago.

I'm sharing a project today for JMC Designs as part of our Craftober challenge.  

All this month over at JMC Designs we've been celebrating with a fabulous list of daily prompts to help inspire you to get creating.

I hope that you've been joining in but there's still plenty of time and you could be in with a chance of a prize from Julia...the winner will receive an A6 Stamp of their choice and a 30% discount off their next order!  

All you need to do is create a project following the prompt for the day, using JMC Designs products and upload this to the Facebook group album.  JMC's Crazy Crafty Hive  If you don't have any products yet there are plenty of Freebies in the group once you have joined for you to use.

Here is the list of daily prompts for you to follow and the link to the fabulous friendly.


Today the prompt is to create a 'Clean & Simple' - another of my favourite styles but definitely not an easy style - I'm terrible at knowing when to stop.  I couldn't resist adding some shiny confetti to my design which probably breaks all of the CAS rules but hey ho its my design  and I love it!

It's similar to my one layer card with the stamp set, but I love this look.


I stamped the design and the sentiment from the stamp set using black onto alcohol friendly card before colouring with my promarkers (see below for colours) and then fussy cutting out.  I used a stitched die to die cut the sentiment.

I then splattered pink ink across the panel of card and blended a little more pink ink behind where the cup would be positioned.  I adhered the cup to the panel using foam tape for dimension, adding the sentiment below flat to the card to ground the image.

To finish off my card I couldn't resist adding a little shine, adhering rose pink coloured confetti around the design and glossy accents to the face on the cup.

I do hope that you like my card for today and I'd love it if you'd leave me a comment. 


Hasta luego ๐Ÿ‘‹ 


Enjoy the rest of your day !


Card recipe:Please note contains some Affiliate links at no cost to you if you purchasing using these.

JMC Designs - Hug in a Mug Collection - Coffee & Chocolate Stamp  set
Spellbinders confetti - rose
Ecoline Brush Pen - deep grey


Promarkers used:

Cup:                pastel green, sky blue, turquoise, marine
                       walnut, henna, caramel

Chocolates:      walnut, henna, caramel

hearts:             antique pink, dusky rose, baby pink
bubbles

Thanks for stopping by and reading my blog I would love if you could leave me a comment. 


Wendy x

Wednesday, 16 October 2024

Digi Choosday - Wednesdays - November birthday Easel card with Polkadoodles

Hello everyone and happy Wednesday I hope that your having a good week so far....


It's that time of the week when we launch a brand new 'Anything Goes' challenge over on the Polkadoodles Digi Choosday Blog so I hope you are going to join in and don't forget the amazing discount off all crafty printable downloads until midnight today!


The theme set for the DT this week is to create an easel card for a November birthday with no red.  

It's my best friends birthday in November and we both love a witchy film called Practical Magic, it might be the Midnight Margaritas half way through the film but I decided to make her a card using Matilda from the Spellbinding Witches collection.  I have included a link for you to watch the film clip just in case - here 

Who says witches are just for Halloween !

I created the simple easel card from a 6" x 6" Kraft card blank and then chose several papers from a couple of collections to add to the card base, matting each with black card.  I used the papers to choose my colours for the witch colouring with Promarkers (see below for colours used)


I added a sentiment from the Rebel Girl collection as it was perfect for our midnight margaritas song.

To add some extra witchyiness (is that actually a word ?) to the card I added a black cat, a couple of potion flasks and extra sentiments from the Hocus Pocus Witches collection.

The die cut stars cut from black card have been given extra sparkle and I have scattered black sparkly gems around the design along with some glitter pen on her hat buckle and laces and a few touches of white gelly roll pen.

I hope that you like my card today and you'll enjoy the next cards I share from Polkadoodles.


Hasta luego ๐Ÿ‘‹ 


Enjoy the rest of your day !


Card recipe:Please note contains some Affiliate links at no cost to you if you purchasing using these.

Polkadoodles digital stamp - Spellbinding Witches - Matilda
Polkadoodles digital sentiment - Rebel Girl - Sentiment bundle
Polkadoodles digital papers - Gnome Trick or Treat - paper set 2
Polkadoodles digital papers - Winnie Wednesday Halloween - paper set 1
Polkadoodles digital sentiment - Hocus Pocus bundle
Polkadoodles digital sentiment - Autumn/Fall Halloween treats bundle
Pretty Pink Posh gems - Midnight black
Wink of Stella pen - glitter black
Ecoline Brush pen - deep grey
Sakura Gelly Roll pen - white, black , gold


Promarkers Used:

Skin:        ivory, blush, soft peach, dusky rose

Hair:        warm grey 7, 5, 4

Dress:       lime zest, lime green, bright green, forest green
                yellow, pumpkin, ginger, orange
                aubergine, plum, mulberry, orchid

Bow:        yellow, pumpkin, ginger, orange
Bag

tights:     lime zest, lime green, bright green, forest green

Boots:     aubergine, plum, mulberry, orchid
               yellow, pumpkin, ginger, orange

Broom:     honeycomb, raw sienna, burnt sienna, umber    
belt

Hat:        aubergine, plum, mulberry, orchid
               lime zest, lime green, bright green, forest green


Thanks for stopping by and reading my blog I would love if you could leave me a comment. 

Wendy x

Tuesday, 15 October 2024

A Passion for Markers BlogSpot #761 - Autumn Friends - Di's Digi Stamps

Hello everyone wishing you all a lovely day and welcome to October !

Today I'm here to let you know that a new challenge has started over on the Passion for Markers Blog challenge and I hope that you will join in.


This weeks challenge theme of 'Autumn Friends' has been chosen by Me for team 2 and is being sponsored by Di's Digi Stamps


For my card today I have used a very sweet digital image that was a freebie from Di Carubia in the Kit & Clowder Facebook group in August 2022.


This is an A7 or 5" x 7" scene card, with a simple scalloped frame die cut from sky blue card.

The image was resized to suit the card and printed on alcohol friendly card stock, no fussy cutting with this card.  I have coloured with my Promarkers (see below for colours used).

To create my scene I used a blue distress ink to add clouds into the background and die cut a tree adding green ink to the bottom edge of the leaf clusters and brown ink to the trunk of the tree for dimension.

The sentiment is from Polkadoodles, with a little brown distress ink blended over the edges.

The finishing touches were some glossy simple white gel pen highlights around the design.


I hope that you join in with the challenge as there is a prize from the sponsor for our lucky winner!


I really hope that you have enjoyed my card today and will drop by again to see my next project and don't forget to join in with the challenge over on the Passion for Markers blog


Hasta luego ๐Ÿ‘‹ 


Enjoy the rest of your day !


Card recipe:Please note contains some Affiliate links at no cost to you if you purchasing using these.

Polkadoodles Digital Sentiment - Freddy Fox Collection - sentiment bundle
Lisa Horton Crafts Dies - Set the scene - garden greenery
Sakura Gelly roll - White Pen


Promarkers used :


Thanks for stopping by and reading my blog I would love if you could leave me a comment. 


 Wendy x

Sunday, 13 October 2024

You warm my heart - New Release - Hug in a Mug with Julia McNeil Designs

Hello everyone Happy Sunday I hope you are having a good weekend!

I'm sharing another project today for JMC Designs as part of our Craftober challenge.  

It's Craftober all this month over at JMC Designs so that means another prompt to inspire you to create.

There's still plenty of time for you to join in and you could be in with a chance of a prize from Julia ...the winner will receive an A6 Stamp of their choice and a 30% discount off their next order!  

All you need to do is create a project following the prompt for the day, using JMC Designs products and upload this to the Facebook group album.  JMC's Crazy Crafty Hive  If you don't have any products yet there are plenty of Freebies in the group once you have joined for you to use.

Here is the list of daily prompts.


Today the prompt is 'Purple' - My absolute favourite colour so I had to create something.

I've created a  snowy scene using stamps from the Frosted Marshmallow stamp set using the mirror stamping technique - if you haven't tried this fun and very easy technique then there is a great tutorial over on the YouTube channel that explains how you can reverse or mirror stamp using a gelli plate link here.  

Don't worry if you don't have a gelli plate, you can also use the back of a silicone stamp or a silicone stamp mat to achieve the same mirror stamping technique.


I stamped the snowman twice, reversing one of the images and the sentiment from the stamp set using black alcohol friendly ink.  For my scene I also stamped the flame 3 times and the little chocolate sticks 5 times.  The images were coloured using my promarkers (see below for colours) and then I fussy cut them out.  Don't worry if your cutting isn't perfect as I like to edge the images with a marker pen once cut out and this helps to hide any little mistakes.
Next I created my purple inks smooshed background, using some watercolour card. I sprayed the background with distress spritz to give a lovely purple shimmer and then splattered the panel with white ink from my posca pen before mounting this onto a panel of purple card. 

To create my scene I die cut snowy hills from white glitter card, adhering this to the bottom and then used foam tape to adhere my snowmen toasting their marshmallows over the fire.  I thought the little chocolate sticks were perfect for the fire wood. 

To finish off my card I added glitter to the pompoms and blended a little yellow ink around the fire and onto the snowmen's tummy's to give the effect of a glow from the fire.


I do hope that you like my card for today and I'd love it if you'd leave me a comment. 


Hasta luego ๐Ÿ‘‹ 


Enjoy the rest of your day !


Card recipe:Please note contains some Affiliate links at no cost to you if you purchasing using these.

JMC Designs - Hug in a Mug Collection - Frosted Marshmallow Stamp set
JMC Designs - Hug in a Mug Collection - Coffee & Chocolate Stamp set
Distress Spritz - wilted violet
Cosmic Shimmer - Cosmic Twinkles - Icicle blue
Posca pen - white
Sakura Gelly Roll pen - White Pen
Ecoline Brush Pen - deep grey


Promarkers used:

chocolate sticks:    walnut, henna, caramel
                            caramel, tan, champagne

snowmen:             lavender, blender
                            antique pink, dusky rose, pale pink

hats:                    aubergine, plum, mulberry, orchid
scarves                 prussian, violet, bluebell, blue pearl

flames:                 yellow, pumpkin, ginger, orange


Thanks for stopping by and reading my blog I would love if you could leave me a comment. 


Wendy x