Showing posts with label stamping. Show all posts

Friday, 8 May 2026

New Release - Peeping Animals - Peeping Cat & Peeping Dog - with Lili of the Valley LOTV

Hello everyone wishing you all a lovely Friday - I hope that you have had a great week and are looking forward to the weekend ahead.  Another busy week here and lunch out with friends yesterday to a lovely Sushi restaurant on the coast - ate far too much but that seems to be the norm LOL.

We are at the hospital tomorrow to see a consultant about JJs cough which he's had since November and then were taking some friends to Granada on Saturday for lunch at a wonderful vegetarian restaurant we like.  

The weather has been very mixed again with cloudy days and spots of rain but I'm not going to complain as it will be too hot soon.

I'm back today with two cuties using the new Peeping Animals collection by Lili of the Valley (LOTV)available now from the Etsy shopThere are 6 peeping animals to choose from and they are so easy to colour you'll love them.

Whichever animal you choose I'm sure you will find them very easy to colour and personalise as you like.  

Each animal stamp includes some coordinating sentiments 


Both cards today  are very simple, combining patterned papers from my stash on each.

For the Peeping Cat I have cut around the kitties paw and then adhered the entire panel with foam tape onto the card with a layer of pretty floral paper.  The Kitty has been coloured in grey with a blue wash as it will be a friends birthday card and they have two absolutely gorgeous Russian Blue cats.

For the Peeping Dog I cut the right side off the panel and added the patterned paper to the inside of the card.

Both are really quick to create and I'm sure both will be loved by their recipients.


Finishing touches were some little clay hearts for the cat and stamped hearts for the dog, white gel pen highlights and glossy accents to the dog's nose and cats eyes.


I hope that you like my cards today and you'll enjoy the next cards I share from Lili of the Valley (LOTV)


Hasta luego ๐Ÿ‘‹


Enjoy the rest of your day !
                  
Card recipe:

LOTV Digital stamp  - Peeping Dog
LOTV Digital stamp  - Peeping Cat
Patterned Papers - Me to You with Love, Papermania Verde Capsule Collection 
Glossy accents
Crafters Companion Sparkle Pen - clear, lichen
Sakura Gelly Roll pen - white
Clay hearts
     

Thanks for stopping by and reading my blog I would love if you could leave me a comment. 


 Wendy x


Wednesday, 7 January 2026

Digi Choosday - Darling Buds collection - Thank you card - with Polkadoodles

Hello everyone and happy Wednesday... I hope that you all had a Wonderful Christmas and New Year! 

The Polkadoodles DT has been taking a well earned break and I'm hoping that Nikky got to enjoy Christmas too but it must be so difficult when its your own business to get a good balance between work and relaxation.

Today the team is back and we're here to kick off the new Digi Choosday challenges for 2026 - I hope you will join in as you could win a fantastic prize.


It's that time of the week to share some more inspiration for our current 'Anything Goes' challenge over on the Polkadoodles Digi Choosday Blog so I hope you are going to join in and don't forget the amazing Digi Choosday discount off all crafty printable downloads!  

Don't Forget that our challenges our now 4 weekly so there's loads of time for you to join in and more chances to win too!


The theme set for the DT this week is Thank you so I d4ecided to create a special card for my best friend back in the UK - to say thank you for being such a wonderful friend.  I don't get to see her much since we moved to Spain and she doesn't really like to travel so I miss her loads but I know that she is there if I need her and we do chat from time to time via messenger.

I chose to use one of the beautiful girls from the Darling Buds collection - this is one of my absolute favourites - Crocus Flower girl.  I adore crocuses especially the yellow and purple ones.  We have a few in our garden here that I brought with us when we moved and they are just so pretty in bloom.  I was hoping they would spread more but I think the pesky fruit rats eat the bulbs - naughty things!  My BFF loves the garden and flowers so I think she'll love this card - fingers crossed.

I resized the Crocus girl to suit my DL card before colouring in with promarkers, using a yellow and purple colour palette before fussy cutting out.

Next I decided to create a fresh looking background directly onto the card base starting with one of the Switchable stencils.  I used the Triptych Square  stencils and yellow and purple distress ink to create my design.
 
I splattered a little yellow and purple ink across the panel and  then blended more yellow ink around the edge of the card.

To finish off the background I used one of the Funky Borders stamps and purple Distress Oxide ink to stamp into each of the corners, adding some very sparkly glitter to the little circles.

Next I adhered my little Crocus girl to the card base using foam tape for dimension and the sentiment was tucked into the design towards the bottom.

To finish the card I added some sparkly gems, more stickles to the dress, white pen highlights and clear sparkle pen to the flowers.  I wish you could see the sparkle as its so pretty but photos don't do it justice.


I hope that you like my project today and you'll enjoy the next that I share from Polkadoodles.


Hasta luego ๐Ÿ‘‹ 


Enjoy the rest of your day !


Card recipe: 

Polkadoodles digital stamp - Darling Buds collection  - Crocus Flower girl
Polkadoodles digital sentiment - Darling Buds collection  - sentiment bundle
Polkadoodles Creative Stencil - Switchable - Triptych Squares
Polkadoodles Craft Stamp - Funky Borders
Distress Oxide ink - wilted violet
Distress ink - fossilized amber, villainous potion
stickles - diamond
Crafters Companion sparkle pen - clear
Gems


Thanks for stopping by and reading my blog I would love if you could leave me a comment. 

Wendy x

Thursday, 12 December 2024

Happy Christmas from All of Us- Snowmen - Happy Christmas with Lili of the Valley (LOTV)

Hello everyone wishing you all a lovely Thursday.... Oh my goodness our Christmas decorations still aren't up - that's a first in I don't know how many years... there's been so much going on and I've not really felt up to it but hopefully over the weekend.

I'm back today with a card project for Lili of the Valley (LOTV) using one of the gorgeous sets of digital stamps, this is a cute set of Snowmen from the Etsy shop. and I decided to create a landscape DL card.


The set includes 8 different snowmen and I loved the way they were peeking over a snowy bank.  I combined two images to  create this card, reversing one of the images before printing out and colouring with Promarkers.

The sentiment that I have used is from the Snow Cute set  and I used a piece snowflake of paper from the Frosty Christmas backing paper set.  The frame was die cut from white glitter card and I blended a little blue distress ink over the patterned paper.

Finishing touches were some glitter to the snowmen's hats.


Hasta luego ๐Ÿ‘‹ 


Enjoy the rest of your day !
                  
Card recipe:Please note contains some Affiliate links at no cost to you if you purchasing using these.

LOTV digital stamp - Snowmen 
LOTV digital sentiment - Snow Cute set 
LOTV digital paper - Frosty Christmas backing paper
Distress ink - salty ocean
Comic Shimmer - Cosmic Twinkles - icicle blue


Promarkers Used:

Snowmen:       cool aqua
                      pale blossom
                      orange, bright orange, ginger

Hats:              burgundy, poppy, lipstick red
                      lavender, ivory


Thanks for stopping by and reading my blog I would love if you could leave me a comment. 


 Wendy x


Sunday, 1 December 2024

New Release - Stamps - Happy Christmas with Lili of the Valley (LOTV)

Hello everyone wishing you all a lovely Sunday .... Oh my goodness December is finally here, this year has gone so fast x

I'm back today with some design team projects for Lili of the Valley (LOTV) using the super cute A5 stamp set called Happy Christmas , sadly this has now sold out, but there are lots of super cute stamps and digital stamps in the Etsy shop.


Hasta luego ๐Ÿ‘‹ 


Enjoy the rest of your day !


Thanks for stopping by and reading my blog I would love if you could leave me a comment. 


 Wendy x


Friday, 22 November 2024

New Release - Stamps - Happy Christmas with Lili of the Valley (LOTV)

Hello everyone wishing you all a lovely Monday.... I hope you had a great weekend.... 


I'm here today to share my next design team project for Lili of the Valley (LOTV) using the super cute new A5 stamp set is called Happy Christmas , its available to buy in the Etsy shop.

My next card is an A6 card with two die cut out apertures, filled with circles from the Frosty Christmas 8" x 8" paper pad.  I adhered the white panel onto the card base using foam tape and then adhered the two sweet characters into the apertures.

The sentiment is from the general and Christmas greetings set

The finishing touches were then added using glitter on Santa's hat a few drops around the design and a hand drawn stitched border around the circle apertures.

A really sweet clean and simple card.


Hasta luego ๐Ÿ‘‹ 


Enjoy the rest of your day !


Card recipe:
LOTV polymer stamps - Happy Christmas set
LOTV Digital Paper - Frosty Christmas backing papers
LOTV Digital sentiment - general and Christmas greetings set
Cosmic Shimmer - cosmic twinkles - icicle blue


Promarkers used :

Santa:                    burgundy, poppy, lipstick red
                              almond, blush, oatmeal, soft peach, dusky pink
                              gold, sunflower, buttercup
                              warm grey 7, 5, 4
                              chocolate, cinnamon, tan

Reindeer:               salmon pink, pale pink
                             saffron, lemon chiffon, pale cream
                             chocolate, cinnamon, tan
                             warm grey 7, 5, 4


Thanks for stopping by and reading my blog I would love if you could leave me a comment. 


 Wendy x

Monday, 18 November 2024

New Release - Stamps - Happy Christmas with Lili of the Valley (LOTV)

Hello everyone wishing you all a lovely Monday.... I hope you had a great weekend.... we had a wonderful meal yesterday with friends, trying out a new (to us) restaurant that has been created in an old train carriage.  It was also an opportunity to take the new car out for a little spin too.

What an amazing experience and the food was delicious so we'll definitely be returning I'm sure.


I'm here today to share my next design team project for Lili of the Valley (LOTV) using the super cute new A5 stamp set is called Happy Christmas , its available to buy in their Etsy shop and its so versatile and very easy to colour.  Perfect timing for those last minute Christmas cards.


I decided to create a landscape slimline gingerbread card, stamping and colouring three gingerbread men onto alcohol marker friendly card, colouring them with my promarkers (see below for colours) and then fussy cutting them out by hand.


For the background of the card I used some distress oxide inks to create my dreamy looking  snow landscape, blending over Kraft card and adding snowy dots and highlights here and there with a posca pen.

I die cut the letters from the Krafty Christmas 8" x 8" paper pad - I have been hoarding these papers since I first bought them many many moons ago as they were too scrumptious to use but as they are also now available digitally on the website I thought perfect time to use them, as there will always be more now!

The background panel was adhered to a loopy panel of brown glitter card and the card assembled first adding the letters flat to the card and then the gingerbread  using foam tape for dimension.

I then created my scene, adding the stamped images, some flat to the card and others adhered using foal tape to add dimension to the card.

The finishing touches were then added, glossy accents to the icing on the gingerbread of sparkly iridescent sequins  around the design.


Hasta luego ๐Ÿ‘‹ 


Enjoy the rest of your day !


Card recipe:
LOTV polymer stamps - Happy Christmas set
LOTV Digital Paper - Krafty Christmas backing papers
LHC Large Stitched Alphabet dies
LHC Slimline loops and bubbles die
Lisa Horton Crafts dye based ink - falling snow
Distress Oxide inks - speckled eggpicked raspberry
Craftelier Watercolour Metallic paints - Gold set
Posca pen - white
Sugar & Spice sequins - Candy Floss mix


Promarkers used :

Gingerbread:          praline, caramel, pastel beige
                             salmon pink, pale pink
                             burgundy, poppy, lipstick red


Thanks for stopping by and reading my blog I would love if you could leave me a comment. 


 Wendy x

Monday, 11 November 2024

New Release - Stamps - Happy Christmas with Lili of the Valley (LOTV)

Hello everyone wishing you all a lovely Monday.... I hope you had a great weekend....The sun is still shining here and its lovely being outside working in the garden but its getting cooler at night and I'm going to get our first fire ready today - just in case!  

It's supposed to get a lot cooler over the next few days and possibly a little rain too so better to be prepared.

I'm so excited today to share my first project as a design team member for Lili of the Valley (LOTV) and such perfect timing as there is a new set of polymer stamps being launched today.  

It's so so cute and perfect for your Christmas makes and very easy to colour too!

This A5 stamps set is called Happy Christmas and I know you will love it.

For my first card I decided to create a circular card using nested dies, creating my card base first... it fits neatly into a 6" x 6" envelope.


I used a small circle of post it note to create my little moon and then used distress inks to create my sky to start with adding snow with a posca pen one the ink was dry.

next I stamped out the images for my little scene onto alcohol marker friendly card, colouring them with my promarkers (see below for colours) before fussy cutting them out by hand.

To create my scene I die cut two extra circle and die cut a wavy stitched edge to create two snow banks, adhering these to my circular card using foam tape to add dimension.


I then created my scene, adding the stamped images, some flat to the card and others adhered using foal tape to add dimension to the card.

The finishing touches were then added, glossy accents to Rudolph's nose and the baubles on the tree and lots of sparkly glitter to the trees and the snow.


Hasta luego ๐Ÿ‘‹ 


Enjoy the rest of your day !


Card recipe:
LOTV polymer stamps - Happy Christmas set 
LOTV digital sentiment - General & Christmas greetings
LHC Nested torn circles dies
Lawn Fawn -Lawn cuts custom craft dies -  stitched simple Wavy Borders
Distress ink - speckled egg, prize ribbon, tumbled glass, peacock feathers, uncharted mariner
Derwent Academy pencils - dark green , light green
Lisa Horton Crafts dye based ink - falling snow
cosmic shimmer - cosmic twinkles - icicle blue
Posca pen - white


Promarkers used :

Little trees:            holly, green, soft green
                            gold, sunflower, buttercup
                            deep mocha, burnt sienna, raw sienna

Rudolph:                salmon pink, pale pink
                             saffron, lemon chiffon, pale cream
                             chocolate, cinnamon, tan
                             warm grey 7, 5, 4
                             burgundy, poppy, lipstick red

Christmas tree:      forest green, bright green, meadow green
                             gold, sunflower, buttercup
                             burgundy, poppy, lipstick red
                             marine, turquoise, pastel green


Thanks for stopping by and reading my blog I would love if you could leave me a comment. 


 Wendy x

Friday, 8 November 2024

Dragon Dreams - Limited Edition Stamp - Colouring with Crayons with Julia McNeil Designs

Hello everyone Happy Friday! I hope that you've had a great week and the weather has been kind where you are.  We've finished picking the olives - yeah...just got to get them to our local mill for pressing....its not been a great year so not sure yet how much oil well get back...

Time for a breather before we start pruning ! 

Today I'm back to share a project for JMC Designs  and its something a little different.

I've used one of the fabulous limited edition stamps for my card today - the set is called Dragon Dreams and is still available on the website

For my card today I decided to use crayons to colour the sleeping dragon and the clouds - yes that's right...an inexpensive actually very cheap colouring medium and i'm so happy with the result.  

If you would like to learn more then Julia has an excellent tutorial on YouTube that will give you a few pointers - it's super easy though. Here is the link

I stamped the images onto Bristol card - its got more of a texture or tooth than the card I would normally use for alcohol pens.  Once coloured and burnished, I fussy cut out the dragon and the 3 extra clouds ready for my card along with the sentiment.

Next I created my background - I wanted a galaxy style background so started with a peice of watercolour card.  I randomly blended 3 colours of distress inks over the watercolour card and then spritzed with water to let the colours mix and blend together.  

Once the card was completely dry I used my black soot distress ink, applying this over the coloured sections.  To finish the panel I splattered silver metallic paint and white posca pen.  The clouds and the dragon were adhered to the card some flat and some on foam tape for dimension.

To finish off the card and add sparkle I used a sparkle pen over the clouds  and used the white posca pen to create little stars.

I do hope that you like my card for today and I'd love it if you'd leave me a comment. 


Hasta luego ๐Ÿ‘‹ 


Enjoy the rest of your day !


Card recipe:Please note contains some Affiliate links at no cost to you if you purchasing using these.

JMC Designs - Limited Edition Stamp set - Dragons Dreams
Distress Inks - squeezed lemonade, picked raspberry, wilted violet, black soot
Metallic silver paint
Spectrum Noir Sparkle pen - clear
Posca pen - white
Sakura Gelly roll - White Pen


Thanks for stopping by and reading my blog I would love if you could leave me a comment. 

Wendy x

Friday, 25 October 2024

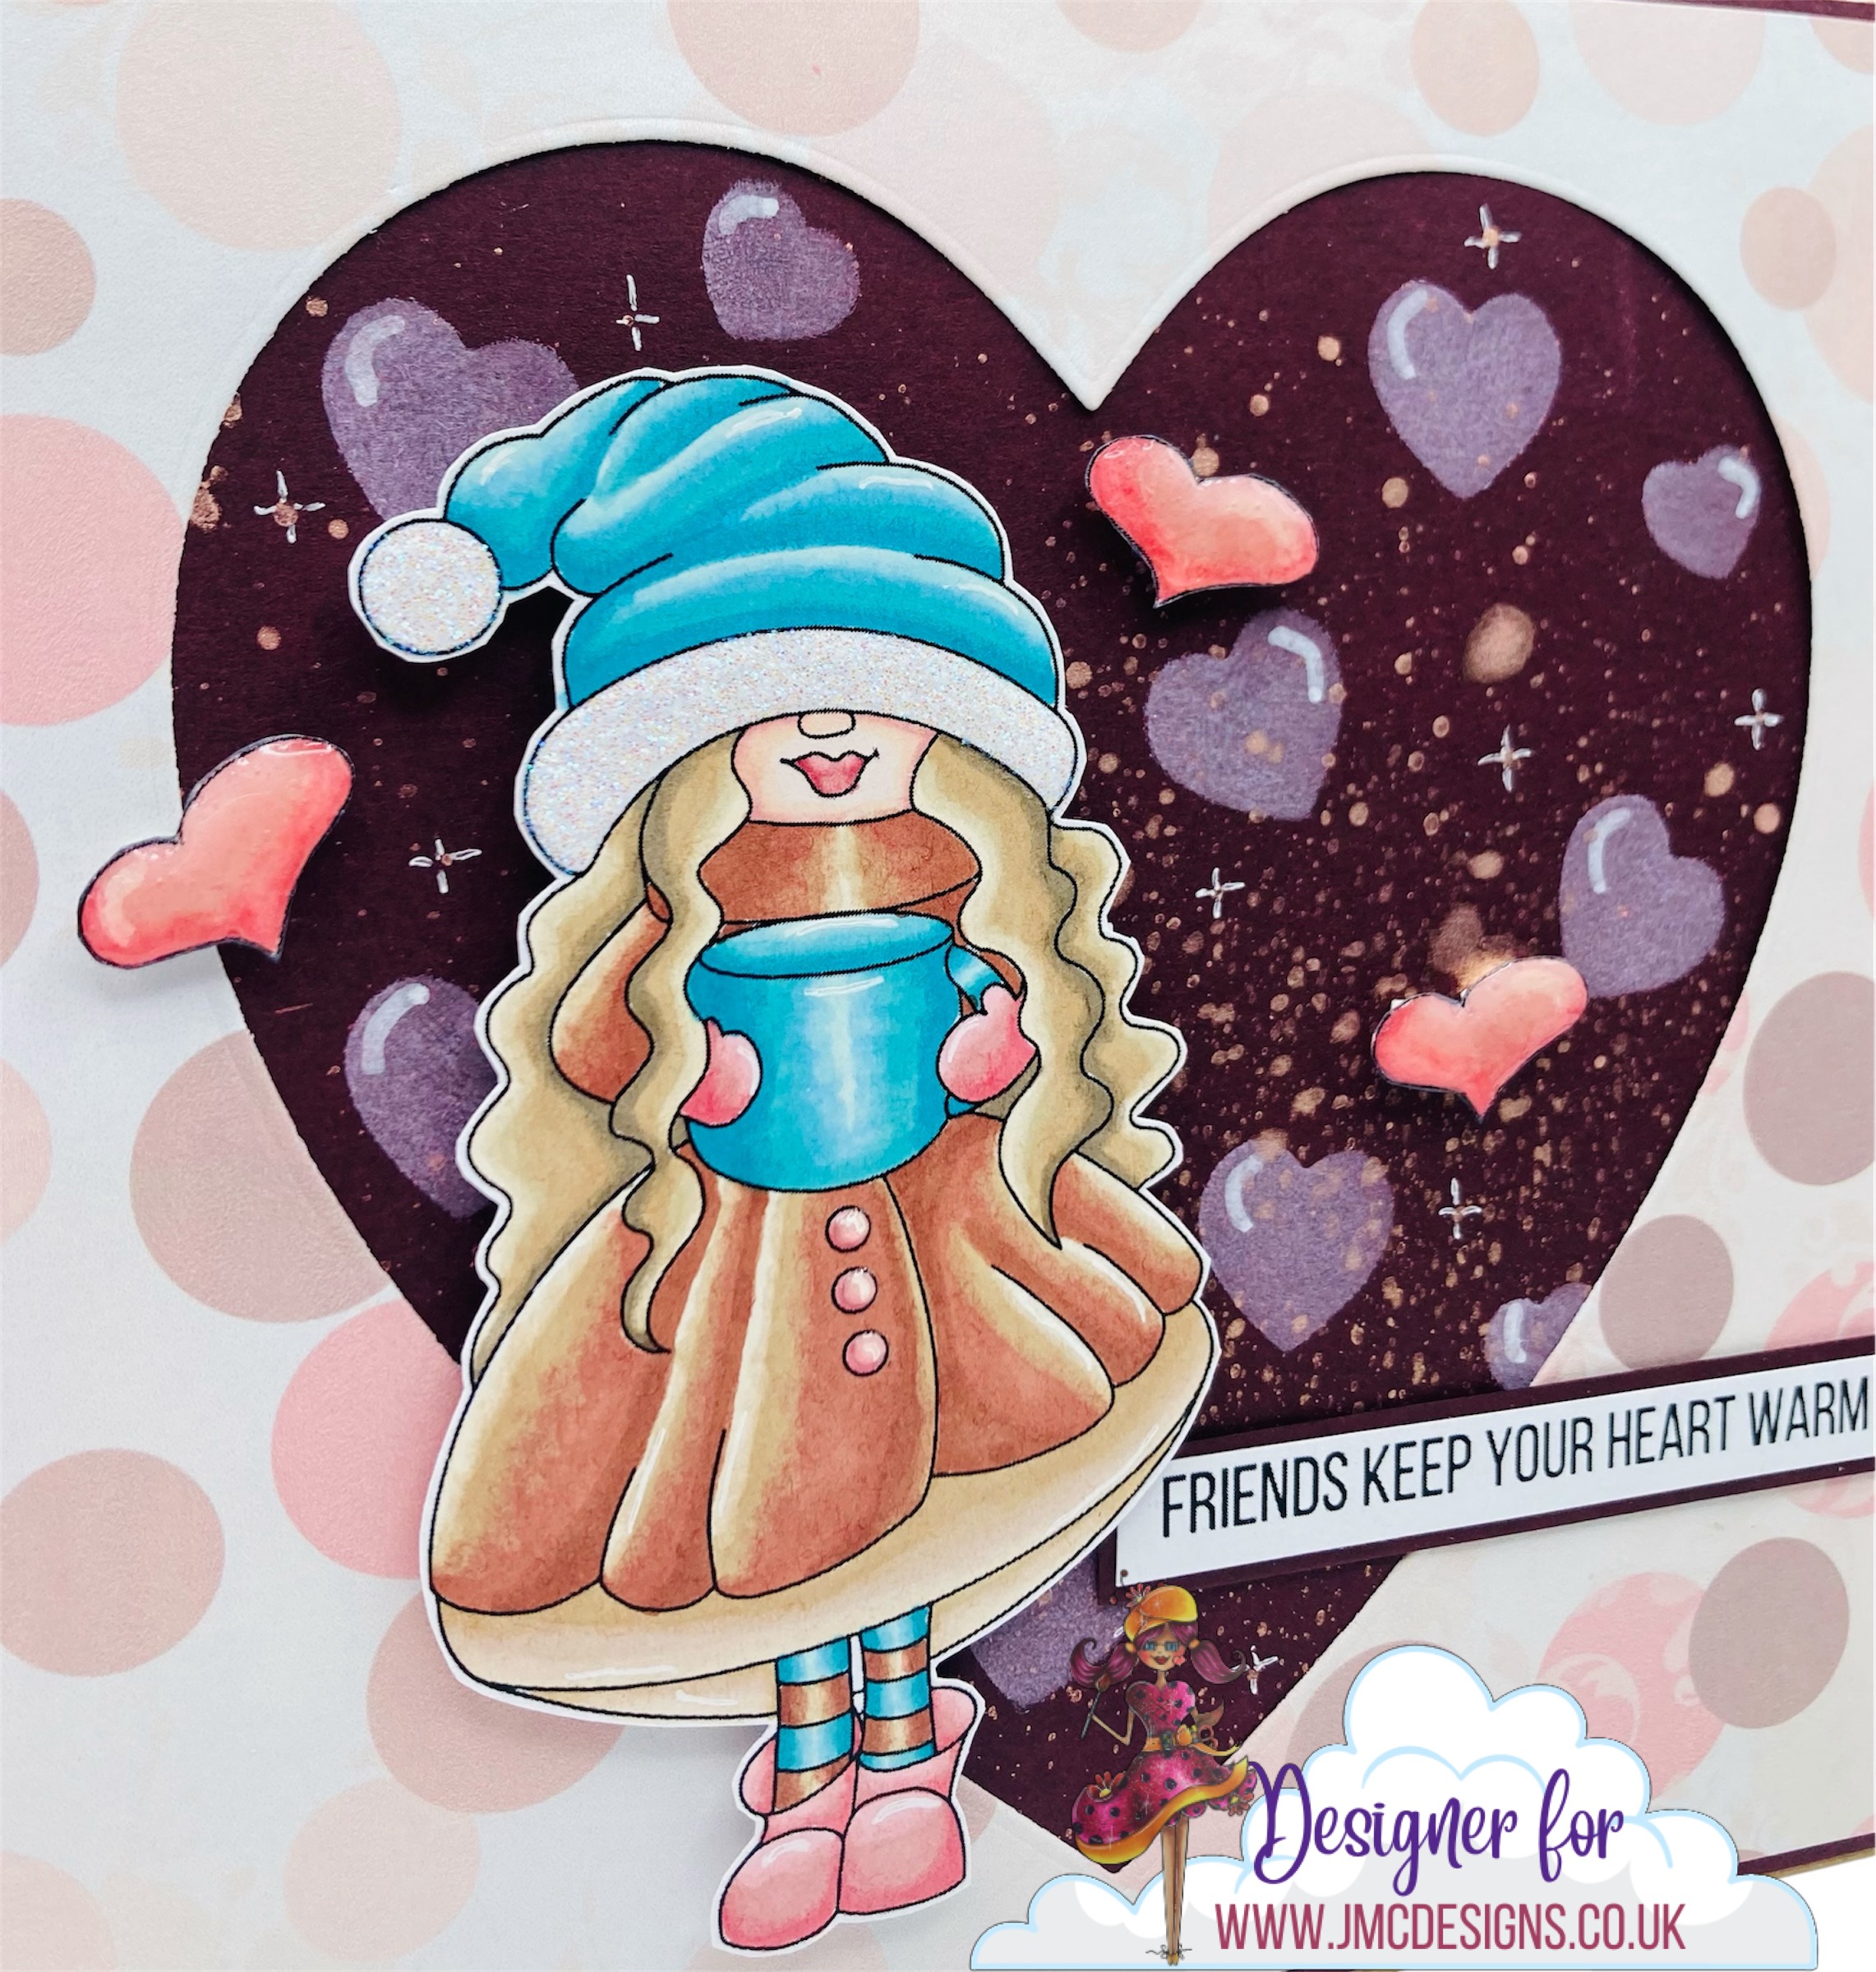
Friends keep your heart warm - New Release - Hug in a Mug with Julia McNeil Designs

Hello everyone Happy Friday! The work on the renovation of the era or stone threshing circle at the front of the house is going well, its so dusty and been really noisy with the removal of the original stone work this week, countless skips to take away what we cant reuse, the breaker going to break up the walls around the circle and the huge digger breaking up the stone and scooping!  Oh my goodness no wonder my head is suffering so to keep calm I've tried a little crafting although its hard to find somewhere quiet and dust free.

Today I'm back to share my final project for the JMC Designs  our Craftober challenge.  

All this month over at JMC Designs we've been celebrating with a fabulous list of daily prompts to help inspire you to get creating.

There's still plenty of time to join in and you could win a prize from Julia...the winner will receive an A6 Stamp of their choice and a 30% discount off their next order!  

All you need to do is create a project following the prompt for the day, using JMC Designs products and upload this to the Facebook group album.  JMC's Crazy Crafty Hive  If you don't have any products yet there are plenty of Freebies in the group once you have joined for you to use.

Here is the list of daily prompts for you to follow and the link to the fabulous friendly.


Today the prompt is to create a 'Add Sparkle' - who can resist sparkle - i definitely cant .
I've used the sweet little girl stamp from the Iced Coffee set of stamps and the little heart stamp, stamped out three times and then coloured with my Promarkers, before fussy cutting out.

To create my card background I started by stenciling a selection of hearts using the Stencil Suite collection, using distress oxide ink onto a chocolate brown card. Next I spritzed the panel with a pink distress spritz, adding white Posca pen highlights to the hearts.  I used my gelly roll pen to make some of the little splatter dots into sparkly stars. Once dry the panel was adhered to a 6" x 6" card blank.


I chose one of the pretty papers from the and used a simple heart die to cut out a heart from the centre of the paper - saving for another card !

I then assembled the card, adhering the patterned paper over the chocolate card panel and used foam tape to adhere the little girl and the 3 hearts.  

The sentiment also from the stamp set was stamped onto white card with a simple mat of the chocolate card.


To finish off the card and add yet more sparkle I added cosmic shimmer glitter gel to the little girls hat and glossy accents to the hearts.


I do hope that you like my card for today and I'd love it if you'd leave me a comment. 


Hasta luego ๐Ÿ‘‹ 


Enjoy the rest of your day !


Card recipe:Please note contains some Affiliate links at no cost to you if you purchasing using these.

JMC Designs - Hug in a Mug Collection - Iced Coffee Stamp set
JMC Designs - Stencil Suite Collection 
Distress  Oxide - Kitsch flamingo
Distress Spritz - work lipstick
Cosmic Shimmer - Cosmic Twinkles - Icicle blue
Glossy Accents
Posca pen - white
Sakura Gelly roll - White Pen


Promarkers used:

Skin:    ivory, blush, soft peach, dusky rose

Hair:    vanilla, caramel, sandstone, umber

Lips:        dusky rose, antique pink

hearts:    antique pink, dusky rose, baby pink
boots    
gloves

Hat:        marine, turquoise, sky blue, pastel green

Skirt:        caramel, tan, champagne

Coat:        walnut, henna, caramel, vanilla


Thanks for stopping by and reading my blog I would love if you could leave me a comment. 


Wendy x