Showing posts with label scene. Show all posts

Tuesday, 15 October 2024

A Passion for Markers BlogSpot #761 - Autumn Friends - Di's Digi Stamps

Hello everyone wishing you all a lovely day and welcome to October !

Today I'm here to let you know that a new challenge has started over on the Passion for Markers Blog challenge and I hope that you will join in.


This weeks challenge theme of 'Autumn Friends' has been chosen by Me for team 2 and is being sponsored by Di's Digi Stamps


For my card today I have used a very sweet digital image that was a freebie from Di Carubia in the Kit & Clowder Facebook group in August 2022.


This is an A7 or 5" x 7" scene card, with a simple scalloped frame die cut from sky blue card.

The image was resized to suit the card and printed on alcohol friendly card stock, no fussy cutting with this card.  I have coloured with my Promarkers (see below for colours used).

To create my scene I used a blue distress ink to add clouds into the background and die cut a tree adding green ink to the bottom edge of the leaf clusters and brown ink to the trunk of the tree for dimension.

The sentiment is from Polkadoodles, with a little brown distress ink blended over the edges.

The finishing touches were some glossy simple white gel pen highlights around the design.


I hope that you join in with the challenge as there is a prize from the sponsor for our lucky winner!


I really hope that you have enjoyed my card today and will drop by again to see my next project and don't forget to join in with the challenge over on the Passion for Markers blog


Hasta luego ๐Ÿ‘‹ 


Enjoy the rest of your day !


Card recipe:Please note contains some Affiliate links at no cost to you if you purchasing using these.

Polkadoodles Digital Sentiment - Freddy Fox Collection - sentiment bundle
Lisa Horton Crafts Dies - Set the scene - garden greenery
Sakura Gelly roll - White Pen


Promarkers used :


Thanks for stopping by and reading my blog I would love if you could leave me a comment. 


 Wendy x

Sunday, 13 October 2024

You warm my heart - New Release - Hug in a Mug with Julia McNeil Designs

Hello everyone Happy Sunday I hope you are having a good weekend!

I'm sharing another project today for JMC Designs as part of our Craftober challenge.  

It's Craftober all this month over at JMC Designs so that means another prompt to inspire you to create.

There's still plenty of time for you to join in and you could be in with a chance of a prize from Julia ...the winner will receive an A6 Stamp of their choice and a 30% discount off their next order!  

All you need to do is create a project following the prompt for the day, using JMC Designs products and upload this to the Facebook group album.  JMC's Crazy Crafty Hive  If you don't have any products yet there are plenty of Freebies in the group once you have joined for you to use.

Here is the list of daily prompts.


Today the prompt is 'Purple' - My absolute favourite colour so I had to create something.

I've created a  snowy scene using stamps from the Frosted Marshmallow stamp set using the mirror stamping technique - if you haven't tried this fun and very easy technique then there is a great tutorial over on the YouTube channel that explains how you can reverse or mirror stamp using a gelli plate link here.  

Don't worry if you don't have a gelli plate, you can also use the back of a silicone stamp or a silicone stamp mat to achieve the same mirror stamping technique.


I stamped the snowman twice, reversing one of the images and the sentiment from the stamp set using black alcohol friendly ink.  For my scene I also stamped the flame 3 times and the little chocolate sticks 5 times.  The images were coloured using my promarkers (see below for colours) and then I fussy cut them out.  Don't worry if your cutting isn't perfect as I like to edge the images with a marker pen once cut out and this helps to hide any little mistakes.
Next I created my purple inks smooshed background, using some watercolour card. I sprayed the background with distress spritz to give a lovely purple shimmer and then splattered the panel with white ink from my posca pen before mounting this onto a panel of purple card. 

To create my scene I die cut snowy hills from white glitter card, adhering this to the bottom and then used foam tape to adhere my snowmen toasting their marshmallows over the fire.  I thought the little chocolate sticks were perfect for the fire wood. 

To finish off my card I added glitter to the pompoms and blended a little yellow ink around the fire and onto the snowmen's tummy's to give the effect of a glow from the fire.


I do hope that you like my card for today and I'd love it if you'd leave me a comment. 


Hasta luego ๐Ÿ‘‹ 


Enjoy the rest of your day !


Card recipe:Please note contains some Affiliate links at no cost to you if you purchasing using these.

JMC Designs - Hug in a Mug Collection - Frosted Marshmallow Stamp set
JMC Designs - Hug in a Mug Collection - Coffee & Chocolate Stamp set
Distress Spritz - wilted violet
Cosmic Shimmer - Cosmic Twinkles - Icicle blue
Posca pen - white
Sakura Gelly Roll pen - White Pen
Ecoline Brush Pen - deep grey


Promarkers used:

chocolate sticks:    walnut, henna, caramel
                            caramel, tan, champagne

snowmen:             lavender, blender
                            antique pink, dusky rose, pale pink

hats:                    aubergine, plum, mulberry, orchid
scarves                 prussian, violet, bluebell, blue pearl

flames:                 yellow, pumpkin, ginger, orange


Thanks for stopping by and reading my blog I would love if you could leave me a comment. 


Wendy x

Sunday, 7 July 2024

Christmas in July - Caroling Snowman with Paper Nest Dolls

Hello everyone wishing you a wonderful Sunday! I hope that you are having a lovely weekend. 

I'm on my blog today with another Christmas in July card and this today I've used an image that I previously coloured with alcohol markers but again I've reached for my coloured pencils to colour a gorgeous image called Caroling Snowman by Paper Nest Dolls


This is an A7 or  5" x 7"  card created with a simple mat layer of black card.  

I started off by resizing the sweet image and printing out onto Neenah Desert Storm cardstock, before using my Spectrum Noir pencils to colour the image.

For my wintery scene I have blended distress inks around the background to create a nighttime sky.  I used a hillside stencil and some white dye based ink at the bottom of the panel for my snow scene and then to finish of the card I splattered white pearlescent paint for the snow.

I added white gel pen highlights here and there to finish off my card for today.

I really hope that you have enjoyed my  card for today and will drop by again to see my next project.


Hasta luego ๐Ÿ‘‹ 


Enjoy the rest of your day !

Card recipe:
Paper Nest Dolls digital stamp - Caroling Snowman
Distress Ink - salty ocean, chipped sapphire
Craftelier Watercolour paints - gold selection - pearl silver
Sakura Gelly Roll Pen - white, black


Thanks for stopping by and reading my blog I would love if you could leave me a comment. 


 Wendy x

Tuesday, 25 June 2024

A Passion for Markers BlogSpot #745 - Add a number - Sponsored by The Paper Shelter

Hello and a happy Tuesday to you all !


I'm here today to let you know that a new challenge has started over on the Passion for Markers Blog challenge.


This weeks challenge is being sponsored by the wonderful The Paper Shelter and don't forget there will be a prize for the Winner of the challenge - there are more details over on the blog.


The theme for Team 2 this week, chosen by the lovely Linda is to Add a number.  

I have used the fabulous image Very Summery to create my beach themed card for today.

My sentiment is from the Rebel girl collection from Polkadoodles and I can just hear this gorgeous girl saying  "Oh My Goodness its just so hard work being this gorgeous !"


This sweet image was coloured with my Promarkers (see below for colours used) and I have created a simple scene, using distress inks to create the sky, sea and the sandy beach.  The palm trees are die cut from white card, coloured first with distress inks then details added with my promarkers.

The two simple sentiments were printed onto vellum and adhered to the design using a simple glue stick.

I really hope that you have enjoyed my card today and will drop by again to see my next project and don't forget to join in with the challenge over on the Passion for Markers blog


Hasta luego ๐Ÿ‘‹ 


Enjoy the rest of your day !


Card recipe:
The paper shelter digital stamp - Very Summery
Polkadoodles digital sentiment - Rebel message bundle
Studiolight - Take me to the ocean dies - Summer Sunshine
Sakura Gelly Roll pen - white
distress inks - salty ocean, scattered straw, twisted citron, mowed lawn, vintage photo, walnut stain
Glossy accents


Promarkers used :

Skin:             ivory, almond, satin, dusky rose, sunkissed pink

Blush:           pale pink

Hair:             vanilla, caramel, sandstone, deep mocha

sunglasses:   ice grey 4, 3, 1

Bikini:           hot pink, carmine, cerise

Hat:              honeycomb, saffron, vanilla
                    hot pink, carmine, cerise

Cup:             honeycomb, saffron, vanilla
Straw            hot pink, carmine, cerise


Thanks for stopping by and reading my blog I would love if you could leave me a comment. 


 Wendy x

Sunday, 19 May 2024

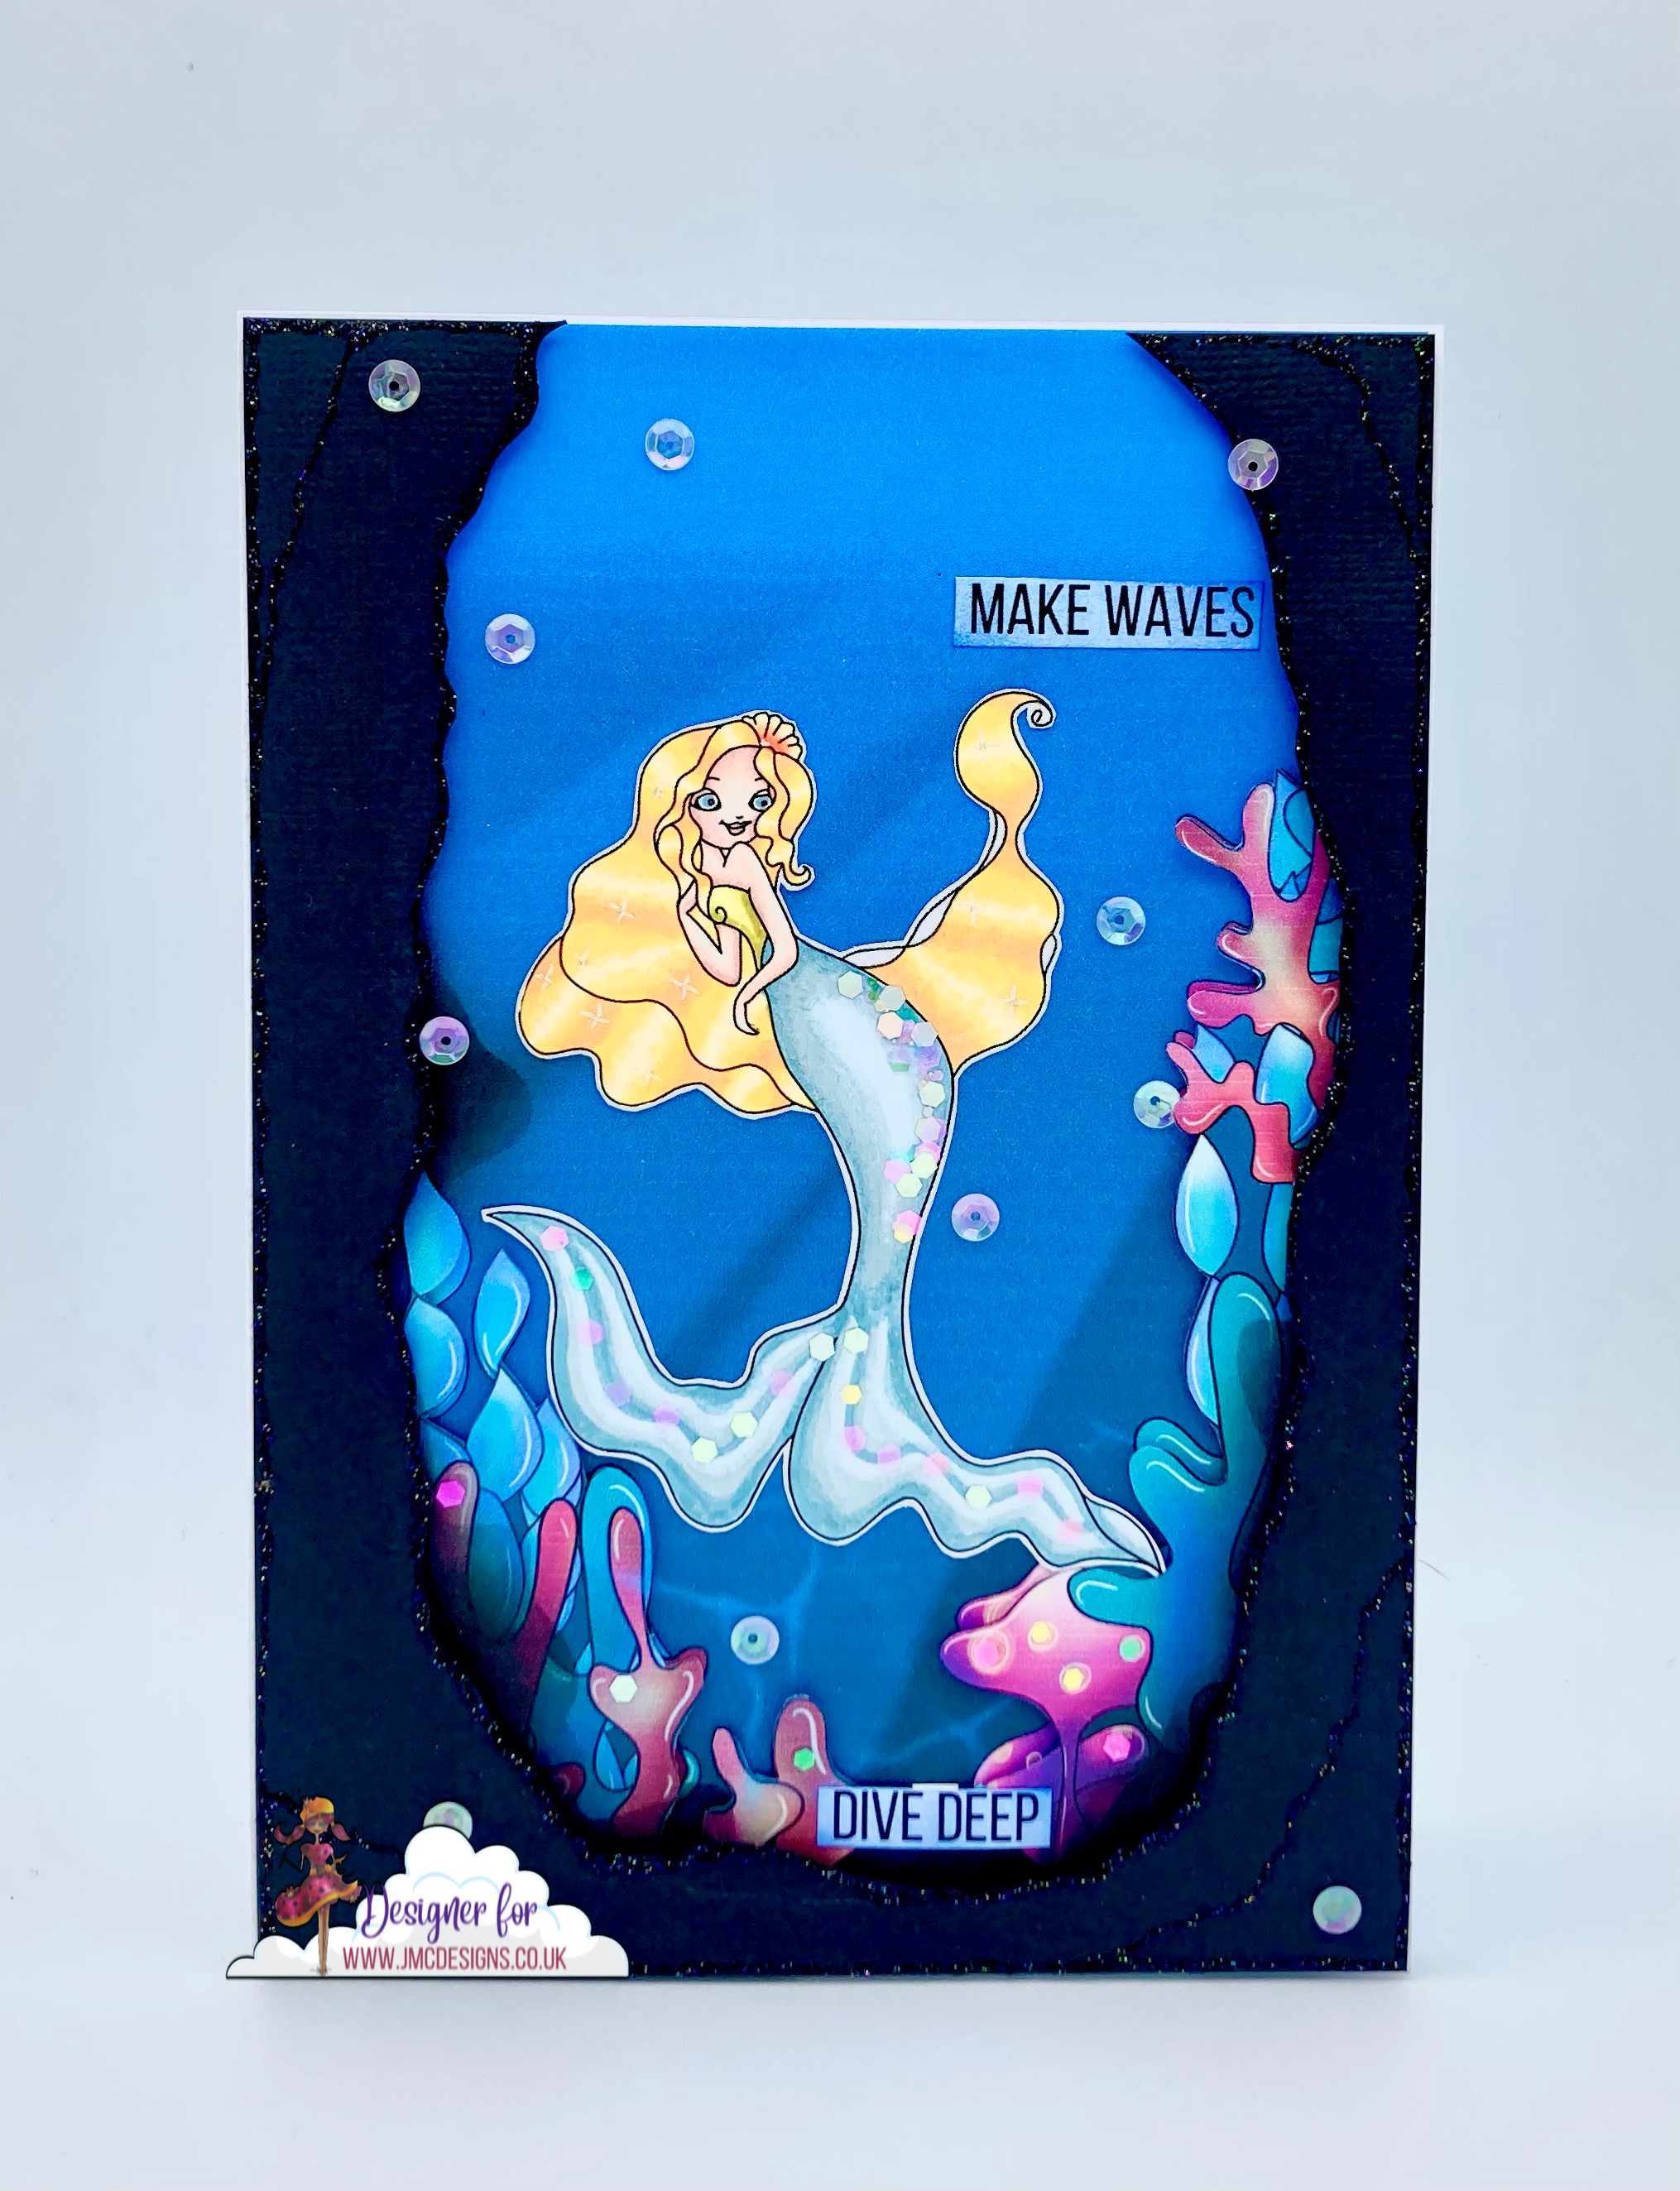
Make Waves, Dive Deep - New Release - Aquatic Adventures with Julia McNeill Designs

Hello everyone Happy Sunday I hope that you are enjoying your weekend.  

It's time for me to post an extra project for JMC Designs  and also my next MerMay creation. There's still plenty of time to join in with the challenge and don't forget there will be a prize awarded to someone.


The prompt for today from JMC Designs is 'Shape of the sea' so I decided to create and underwater cave scene for the gorgeous mermaid Serephina from the brand new digital collection Aquatic Adventures.  


I think she reminds me of Marilyn Monroe, with her gorgeous shapely curves.  I started by choosing one of beautiful papers from the collection that looks like a cave and resized this to fit an A7 5" x 7" card blank. 

I printed the paper out twice as I wanted to fussy cut some of the coral at the bottom of the paper to decoupage for extra dimension.  I cut a piece of black cardstock to fit my card blank and then handcut a cave shape.  This card would create a frame around the design. 


Next I resized Serephina to fit inside the frame of the underwater cave and coloured her with Promarkers before fussy cutting out.

The sentiments at the top and bottom of my design are also from the collection,  printed out and adhered to the design after adding a little blue distress ink to tone down the white of the card. 

I used some black stickles to add details around the edge of the cave frame for a bit of extra sparkle. 


The finishing touches to the card were some clear iridescent sequins around the design to add sparkle and shine, white gel pen to highlight Serephina's hair and I've added extra sparkle to the mermaid tail  and to some of the coral at the bottom.


I really hope that you like my project today and it would be lovely if you you leave me a comment and let me know what you think.


Hasta luego ๐Ÿ‘‹ 


Enjoy the rest of your day !


Card recipe:
JMC Designs digital collection - Aquatic Adventures 
Sugar & Spice Sequins - Enchanted
Distress Ink - prize ribbon
Stickles - black diamond
Sakura Gelly Roll pen -  white, clear star
Lisa Horton Crafts - Mermaid Tails - Waterfall
 

Promarkers Used:

Skin:    almond, blush, oatmeal, soft peach, dusky rose

Hair:    gold, sunflower, buttercup

Tail:     verdigris, pebble blue, pastel blue
            lime zest, lime green, pear green

Shell:    mandarin, buttercup


Thanks for stopping by and reading my blog I would love if you could leave me a comment. 

Wendy x

Wednesday, 14 February 2024

New Release - Pancakes & Waffles - Pancake Time! with Polkadoodles

Hello and happy Valentine's Day everyone.  Wishing you all a lovely day today.  

It was Pancake Tuesday in the UK yesterday or Shrove Tuesday and to celebrate everything pancake, Nikky from Polkadoodles decided it was time to give a couple of the digital stamps a refresh.

Today I'm sharing Pancake Time! - Ooh I love making scotch pancakes with Maple syrup on the side - yummy and this sweetheart was hard at work in her kitchen whipping up a batch of yummy blueberry pancakes yesterday....Maybe an idea for this Saturday's breakfast as a treat ...hmm


For my 5" x 7" card I decided that I wanted to create a little kitchen scene, so I drew this up in my graphics software on the computer, using one of the sweet papers from the Coffee, Tea & Cake collection for the wallpaper in the background.


I created a simple kitchen, adding a few pre-coloured embellishments from the Waffles & Pancakes collection, before mounting this onto my 5 x 7 Kraft card blank, matting it with black card, to create a nice border.

The kitchen units, cooker and window scene were hand coloured with my Promarkers.


Next I resized the little girl and printed her out, colouring in with promarkers before fussy cutting her out and mounting into my scene with foam tape for extra dimension

Just a few highlights with my white gel pen and I added clear sparkle to add a touch of magic

I hope that you like my card today and you'll enjoy the next cards I share from Polkadoodles


Hasta luego ๐Ÿ‘‹ 


Enjoy the rest of your day !


Card recipe:
Polkadoodles digital stamp - Waffles & PancakesPancake Time
Polkadoodles digital paper - Coffee, Tea & Cake Collection - Paper Bundle
Polkadoodles digital ephemera - Waffles & Pancakes - word art, mixer, scales, blackboard, frying pan, mug
Sakura Gelly Roll pen - white
Crafters Companion Sparkle pen - clear


Promarkers used :

Skin:                  almond, blush, oatmeal, soft peach, dusky rose

Blush:                 pale pink

Hair:                   vanilla, sandstone, caramel, umber

Flowers:              hot pink, carmine, cerise
                          sunflower, buttercup

Dress:                 hot pink, carmine, cerise

Shoes:                 Egyptian blue, violet, lilac
Blueberries

Maple syrup:        sandstone, pastel beige

Jug:                    cool aqua

Orange:                bright orange, honeycomb

Pancakes:            sandstone, caramel, violet

Cream:                pale cream, bisque

Kitchen units:       caramel, sandstone, pastel beige    

Cooker:                blue black, cool grey 7,5,3
                           cool grey 1, 3

Window:               sandstone, pastel beige    
                            cool aqua, sky blue
                            forest green, bright green, leaf green
                            caramel


Thanks for stopping by and reading my blog I would love if you could leave me a comment. 

Wendy x

Wednesday, 13 December 2023

I love Promarkers #549 For the Men Sponsored by Dr Digi's House of Stamps

Hello everyone wishing you a wonderful Wednesday! I hope that you are having a lovely week, not long now until Christmas 

I'm on my blog today for the new bi-weekly I Love Promarkers blog challenge , it would be wonderful if you joined us over there if you love to colour with alcohol markers and don't forget there are prizes up for grabs.  


You can find all of the rules and details for the challenge over on the blog. 


This challenge is being sponsored by Dr. Digi's House of Stamps


Here is my inspiration card for the current blog challenge with the theme - For the Men, using the super cute Patient Pets digital stamp.  I cant decide if they want to go out and play in the snow or stay all warm and cozy inside - I  know what our kitties would choose!


It's a larger 5 " x 7"  scene card created using papers from my stash for the wallpaper and the flooring of the room.

The image was coloured using Promarkers and then fussy cut out.  To create my window I've used a small piece of white card, blending distress inks to create a snowy sky and snow hills and then I've freehand drawn in some fir trees onto the hills.  To create the snow I've splattered the panel with white ink.

For the window I cut a small piece of acetate, adding snow with a posca pen and then assembled this onto the card.

The sentiment has been cut out and adhered to the top of the card to look like a piece of hanging wall art, with brass drops for the fittings.

I blended a little brown distress ink over the background for extra detail and added some copper sequins to tie the design together.

I really hope that you like my card today and will drop by again to see my next project and don't forget to join in with the challenge over on the I Love Markers blog


Hasta luego ๐Ÿ‘‹ 


Enjoy the rest of your day !

Card recipe:
Dr.Digi's House of stamps - Patient Pets
Polkadoodles  Designer Papers - Peeling Paint
Craft Sensations Paper Pad - Grunge
Winsor & Newton Calligraphy ink - white
Spectrum noir Colorista pens - forest green, umber
Distress Ink - tumbled glass, uncharted mariner, tea dye
Sakura Gelly Roll Pen - white, black
Lisa Horton Crafts - Washi tape sentiment
Nuvo Crystal Drops - copper penny
Posca pen - white
Sugar and Spice sequins - Alloy


Promarkers used :

Curtains:        royal blue, china blue, cobalt blue

Kitty:             ginger, apricot, saffron

Bulldog:         warm grey 4, 3, 2, 1
                     burgundy, poppy, lipstick red

Labrador:        caramel, buttercup, primrose
                      forest green, bright green, leaf green


Thanks for stopping by and reading my blog I would love if you could leave me a comment. 


 Wendy x
Tuesday, 17 October 2023

Digi Choosday - Hocus Pocus Witches Halloween with Polkadoodles

Hello everyone and happy Tuesday.  Wishing you all a lovely day today and that you enjoy the week ahead.


It's that time of the week when we launch a brand new 'Anything Goes' challenge over on the Polkadoodles Digi Choosday Blog so I hope you are going to join in and don't forget the amazing discount off all crafty printable downloads until midnight today!


The theme set for the DT this week is Halloween.  Well it had to be really with only a couple of weeks to go to the spooky celebration.

For todays card I decided to use one of the fabulous witches from the newly released Hocus Pocus Witches collection

I chose to create a very simple spooky scene for my little witch - they don't always have to be complicated - just a simple stone wall and a dirt floor - it is a cave after all.

I started by resizing the little witch with the eyeballs in a flask to suit an A6 card panel and added cobwebs and potion flasks from the Autumn Fall Halloween set of ephemera.

I printed and fussy cut out the Hocus Pocus sentiment from the Halloween Trick or Treat set of sentiments

Once my background was coloured in with my promarkers, I have added some distress ink around the outside edge to make it a little more spooky, before adhering to my card blank, with a mat layer of black card.

To finish off the card I added just a touch of glossy accents to the star on the witches hat and I used a metallic pen to add little sparkly details to the cobwebs, potion flasks, sentiment and witches dress.

I have a very special DT discount code that you can use for all your shopping on the Polkadoodles online shop at checkout use WENDYJ-10 and you will get 10% of your entire purchase (not in conjunction with other discount codes!)


I hope that you like my card today and you'll enjoy the next cards I share from Polkadoodles.


Hasta luego ๐Ÿ‘‹ 


Enjoy the rest of your day !


Card recipe:
Polkadoodles Digital Stamps - Hocus Pocus - Autumn Fall Halloween Treats
Polkadoodles Digital Sentiment - Hocus Pocus - Ghastly Ghosts
Polkadoodles Digital Sentiment - Gnome Trick or Treat Halloween - greetings set 
Distress Oxide Ink - hickory smoke
Glossy accents
Sakura Gelly Roll pens - black, white, metallic grey


Promarkers Used:

Skin:                almond, blush, oatmeal, soft peach, dusky rose

Blush:              dusky rose            

Hair:                pastel beige, sandstone, caramel, saffron

Hat:                 prussian, violet, bluebell
                       burnt orange, orange, pumpkin

Robe:               lush green, emerald, mint green

Star:                gold, sunflower, buttercup

Leaves:             lush green, emerald, mint green

Berries:             prussian, violet, bluebell

Potion Flasks:    ginger, mint green, pastel blue, pumpkin

Cork
Labels:              sandstone, caramel, pastel beige

Eyeballs:           vanilla, antique pink

Wall:                 cool grey, 00, 1, 3, 4

Floor:                pastel beige, sandstone, cool grey 3, 1
                        mint green, bluebell, pumpkin  


Thanks for stopping by and reading my blog I would love if you could leave me a comment. 

Wendy x